Multi-room audio over Wi-Fi with PulseAudio and Raspberry Pi(s)

NOTE/UPDATE: After an update this kind of stopped working and I struggled with it a lot. Now I actually recommend using snapcast instead of this solution. It works better!

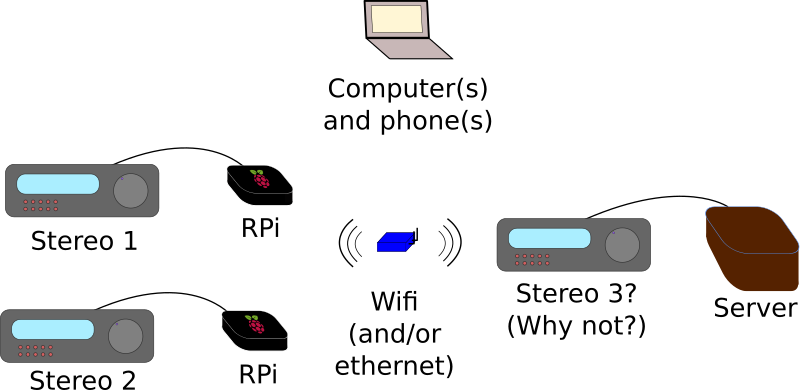
I moved to a new place and it has more than one room. Naturally, I hooked up the stereo in the living room and tested it like my dad taught me: by playing “Money For Nothing” really loudly. It worked. But wait a minute, there’s an upstairs now… how will I get it playing up there? I could always use the wifi network and raspberry pis to beam audio around. Yeah, let’s do that!

Continue reading Multi-room audio over Wi-Fi with PulseAudio and Raspberry Pi(s)

The Hero Jr. personal robot from HeathKit: a 1984 product way ahead of its time

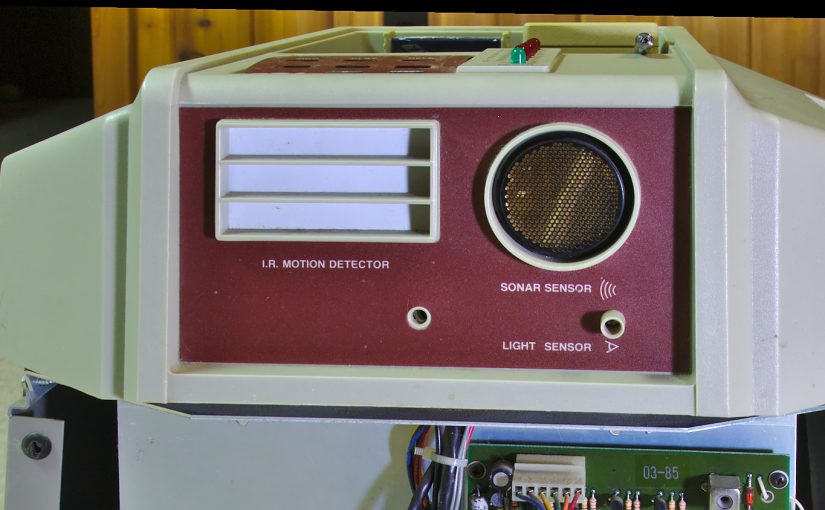
One of my first memories is a vision of lying near my dad in the basement in the mid-1980s while he endlessly soldered away at some big project. Later, I spent a lot of my childhood messing around with the product he was assembling: a Hero Jr. robot. This was a educational personal robot, intended to be your “friend, companion, and security guard.” Here he is:

Hero Jr. from 3 sides
My family’s Hero Jr.

Hero Jr. has a sonar, infrared motion sensor, light sensor, sound sensor, radio-frequency remote, drive motor, obstruction sensor, and a RS-232 serial port. His out-of-the-box features included a security guard mode, alarm clock, poetry, singing, and (my favorite) the ability to explore around the house, often while singing America, Daisy Bell, or Little Miss Muffet.

Continue reading The Hero Jr. personal robot from HeathKit: a 1984 product way ahead of its time

Secure remote access to a camera DVR with VPN and VLANs on an OpenWRT router

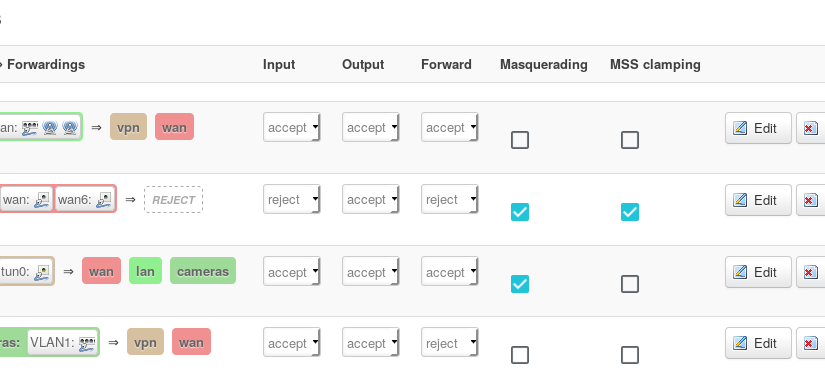
If you have a digital video recorder (DVR) hooked up to some cameras and you want to access it remotely when something happens, you can set up remote access to review things from wherever. Here’s how to do it.

Continue reading Secure remote access to a camera DVR with VPN and VLANs on an OpenWRT router

Helping an artist with a Morse code protest chant installation in Denmark

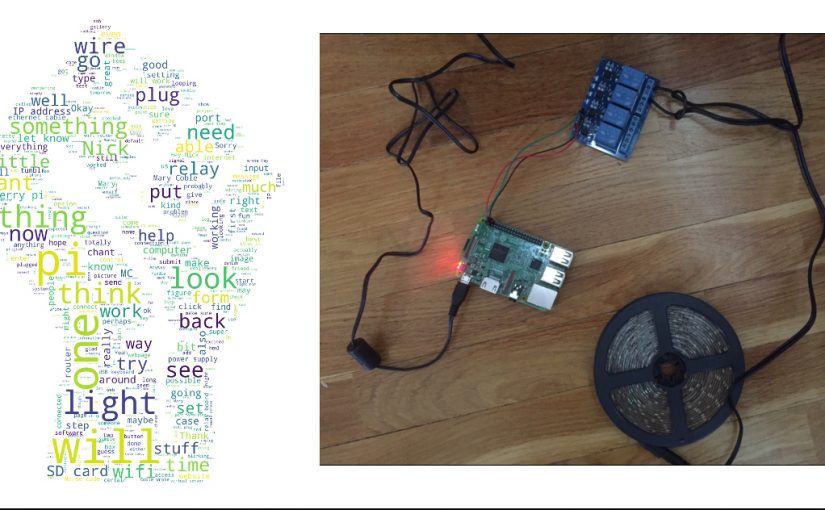
A few months ago, I got an email from a Sweden-based artist and teacher named MC Coble asking if my Morse code laser post could be helpful for an art installation they were working on. MC used Morse code in previous installations like one in Toronto where they sent coded light from a giant dome to people below who then relayed signals with flashlights. As a part of a new project, MC wanted people to be able to enter protest chants into a website and then have a system convert the message to code and flash a light in a gallery window. Did I want to help? You bet I did!

I got super excited about the prospect of helping with this and knew that with a combination of things I’ve used before it would be really doable. The plan was to have a webserver accept messages from a form and transmit them to a Raspberry Pi (cheap mini-computer), which would then flip pins on a relay to blink the light, like this:

A diagram showing the flow from user input through a webserver through MQTT to a raspberry pi and into a relay connected to a light.
The parts of the planned system working together

After many emails and some ups and downs, everything worked! This really feels like how the internet is supposed to work.

Continue reading Helping an artist with a Morse code protest chant installation in Denmark

A fancy Home Assistant automation that checks the weather and figures out when to turn on your heater

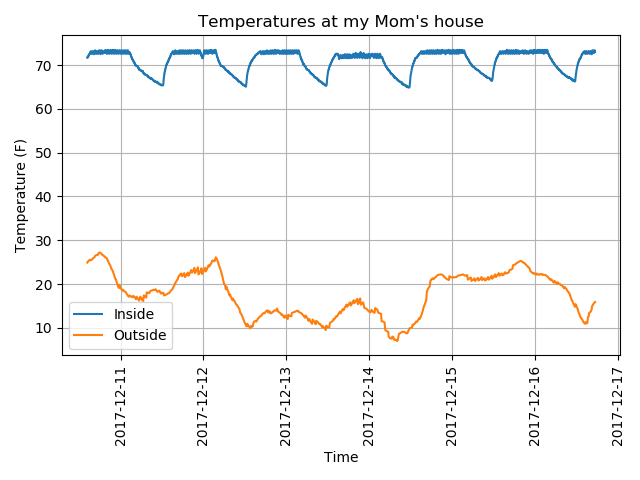
So in the continuing saga with my mom’s home-automated furnace, it got extra cold recently and I noticed it wasn’t getting up to temperature in time for her to wake up. I figured I could come up with a formula to compute the time needed to come to temperature and turn on the furnace at a dynamic time in the morning so it’d be just right.

Graph of temperatures inside and outside
Temperatures at my mom’s house over a few days

Continue reading A fancy Home Assistant automation that checks the weather and figures out when to turn on your heater

Downloading files from an Amcrest security camera with Python

UPDATE 2021: This was fun but nowadays I have to direct people to a more complete python solution here.

I got a few Amcrest Wifi security cameras for my mom’s house at her request. They’re pretty nice overall (My only complaint is that the web-interface doesn’t fully support Linux). I set one up to save a jpg snapshot to memory every minute and then flew across the country. When I wanted to access them, I couldn’t just put the SD-card in a computer or anything, and clicking all 14,000 of them seemed like a pain, so I decided to figure out how to get them with a Python script.

Continue reading Downloading files from an Amcrest security camera with Python

Reading data from a DXL360 digital level onto your computer

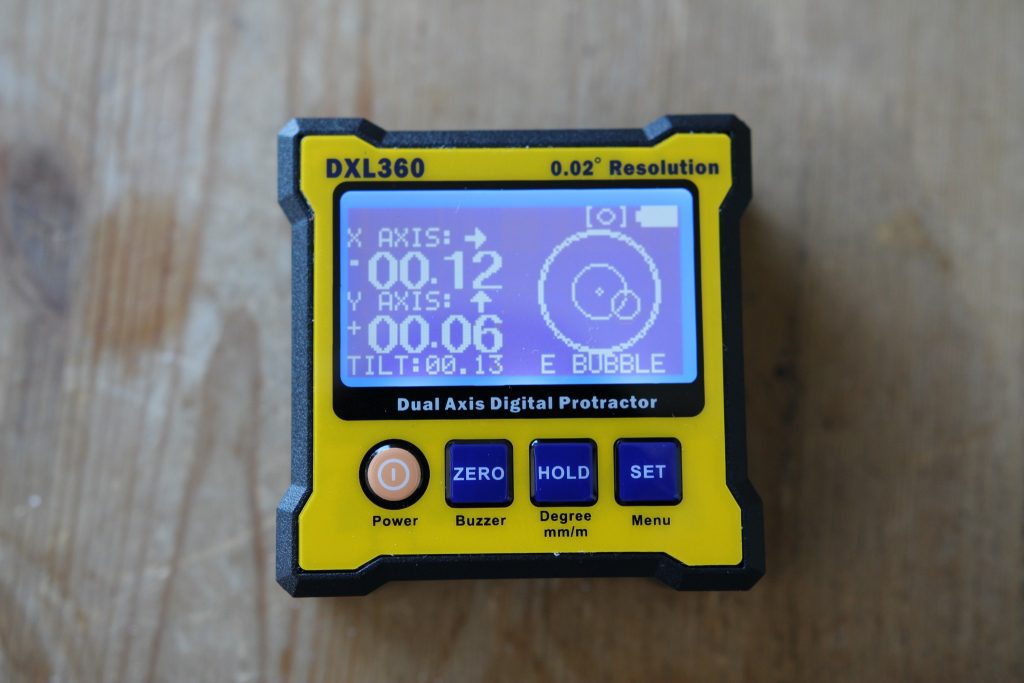
There are some digital levels on the market that are really nice tools to have for a variety of purposes. I grabbed a DXL360 and am really happy with it so far. When I wanted to do an angle vs. time calibration measurement of my Barn Door Startracker over 10s of minutes, I really wanted to get the data from the level into a computer so I could plot and process it a bit.

The level has a USB port but the manual suggests that an optional attachment is required to get it into a computer, at least for this model. However, the manual also states that data comes out of it in RS232 format. I bet I could read that data with some more generic equipment that I have sitting around. And it turned out to be easy. This post shows how I did it.

Continue reading Reading data from a DXL360 digital level onto your computer

Making a cheap and simple barn-door star tracker with software tangent correction for astrophotography

I like to mix hobbies, so naturally I’ve been eying astrophotography for a while. I’ve taken a time-lapse here and a moon picture there but, inspired by the folks over at /r/astrophotography,  I wanted to take it to the next level. Since the Earth is spinning, any long exposure of the night sky has star trails, so you have to make your camera counter-spin if you want clear shots. In this post, you can read about how I made a simple barn door sky tracker to do this.

Barn door sky trackers have been made at home by lots of people for a long time. There are a variety of designs with different levels of complexity and precision required. I thought I’d make the simplest-to-construct one, a Haig mount. To correct he tangent error, I decided to use a cheap microcontroller (MCU) and have it speed up appropriately via software. Fun!

With/without tracker

The Math

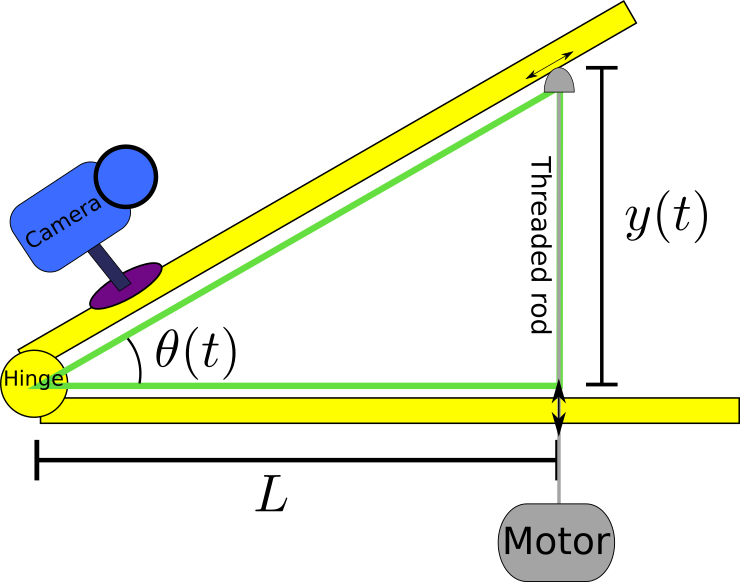
The math behind this is fun mostly because it’s straight out of high school and you finally at long last get to use it. Here’s the basic design:

Cartoon of barn door tracker

Continue reading Making a cheap and simple barn-door star tracker with software tangent correction for astrophotography

The Infopanel: a simple MQTT-connected display system for weather, traffic, pictures, animations…anything!

I got one of those RGB LED matrix things for my birthday and wasn’t sure what to do with it. Then I found this awesome library which has Python bindings and can control it nicely even from a Raspberry Pi. Conveniently I had a spare Raspberry Pi 1 B+  sitting around so I hooked it up. After playing around for a while, I got the demos working.

UPDATE: Full documentation of infopanel is now available.

But I needed to connect it to home-assistant to really make it valuable to myself. So I wrote a little program called Infopanel (available for free on github) that lets you do some things:

  • Get data directly from a MQTT broker for getting live data (e.g. travel times in traffic, weather conditions) and for command and control. This allows me to connect the screen to my home-assistant home automation system.
  • Assemble various built-in elements like giraffes, animated text, rainbow text, pictures, animated gifs into various scenes that rotate through on the screen to display the information in various fun and/or useful ways.
  • There are Temperature and Duration sprites that you can define high and low values of so they’re red when they’re bad and green when they’re good, and anywhere in between.

You can set the scenes to be just random or you can control them through MQTT.

It’s intended to be very configurable but since it’s brand new some extra development is needed to make everything perfect. Send in your ideas and requests and code changes!

A relatively complete example configuration file is in the repo. That demonstrates using MQTT, connecting MQTT topics to various sprites, building your own frames of animation by hand, and adding in gifs and images from file paths. Note that you have to set an environmental variable or two to get the fonts right and whatnot.

Getting live alerts when your website is visited with Apache, MQTT, and home-assistant

I have a website or two and sometime wish I could get notifications whenever someone visited them, just for fun. Well I did it, and now I can get beeps in my home whenever anyone visits. It’s kind of cool to hear it go off, though normally it will be annoying, so we need a switch for it.

Continue reading Getting live alerts when your website is visited with Apache, MQTT, and home-assistant

Enlighten your old furnace with a Raspberry Pi, Home Assistant, an ESP8266, and some relays.

My mom has one of those on/off furnaces (EDIT: actually it’s a boiler) that heats up water and circulates it through pipes around the house that have little radiator fins. She wants it to turn on before she wakes up so it’s not so cold in the morning. In this post, I explain how to turn a normal furnace into a smart furnace controlled by Home Assistant for only a few bucks.

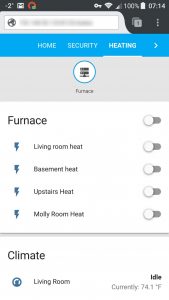
Furnace controls in Home Assistant

Continue reading Enlighten your old furnace with a Raspberry Pi, Home Assistant, an ESP8266, and some relays.

ESP8266 Furnace Code

Here’s the code for the smart furnace project. This is provided “as is”. Use at your own risk; I take no responsibility if this code damages or destroys your equipment or home or injures or kills anyone. Controlling household/industrial equipment is a non-trivial task.

Getting IP camera motion events into Home Assistant to trigger things

Oh this is exciting! I’ve been trying to figure out how to get motion events from my IP camera into my home-assistant instance running on my Raspberry Pi, and I just did a successful test! It works! Hooray. Briefly, I set up an email server on the Pi, have the camera email the Pi, have the email server trigger a script which parses the email for key words and sends MQTT signals as appropriate, at which point the home-assistant MQTT client sees them and triggers automations (like blinking a light to scare people off). Here’s how I did it.

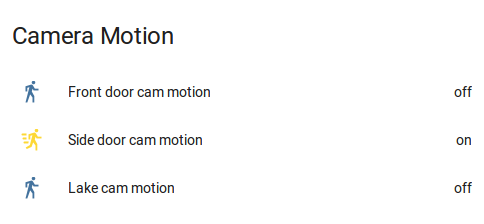
Camera-based motion sensors in home-assistant

Continue reading Getting IP camera motion events into Home Assistant to trigger things

Cheap vacuum pump for home physics experiments

As documented earlier, I made one of those CRT-in-a-winebottle things. I used a cheap 2-stage mechanical vacuum pump for it. Well, it was so good that my boss wanted to use it as a science demo at some dinners he gives, so it’s been permanently transferred to work. So I need a new pump, and a new chamber!

Continue reading Cheap vacuum pump for home physics experiments

Raspberry Pi + Home Assistant DIY Burglar Alarm

I just configured a pretty slick burglar alarm with the open-source Home-Assistant platform running on my Raspberry Pi. It can be armed to trigger when a door is opened and/or when a motion sensor goes off.

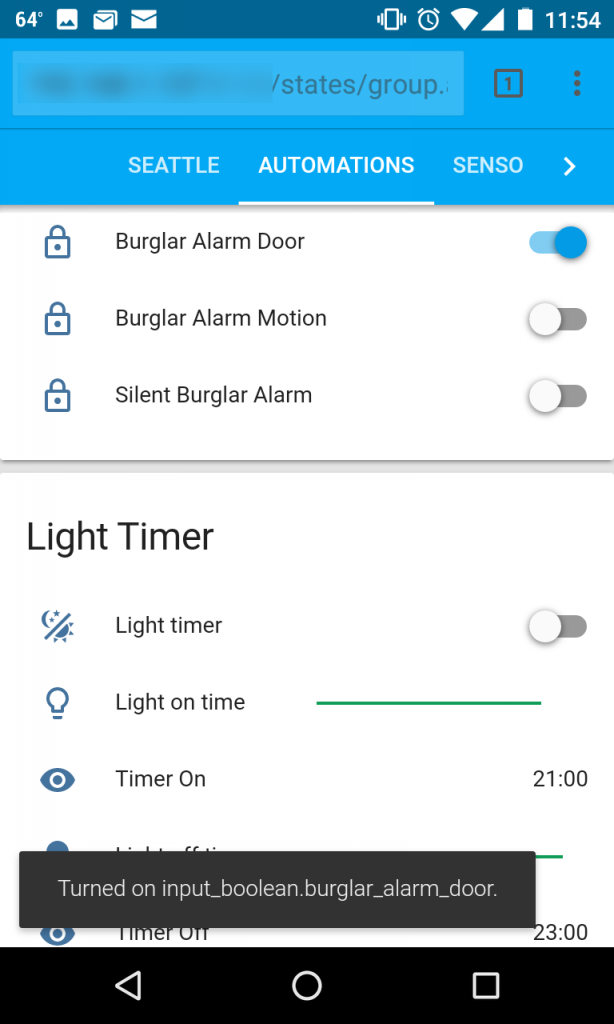
Arm the burglar alarm

Then, a sequence of events happens:

  • An IR LED turns on my stereo
  • A sound file I cobbled together starts playing. It starts with a computerized voice saying that your entry been detected and recorded, then it beeps for a while (giving you time to disarm), and then it goes into a blaring siren noise. Quite the escalation!
  • A light blinks on and off a few times
  • A camera takes a series of snapshots of the area
  • An email is sent to my phone with the snapshots, showing me what’s going on

Continue reading Raspberry Pi + Home Assistant DIY Burglar Alarm

Adding IR send and receive capabilities to my home-assistant based smart home

Or, how to control your A/C from your phone

You may have seen my earlier post about my new home automation setup. Well I just upgraded it! I just finished testing out a new infrared remote control send and receive capability and it is pure awesome. Here’s what I can do now from within home-assistant:

  • Turn on and off my new DeLonghi portable air conditioner from Costco, and set the temperature to whatever
  • Turn on and off the TV and press any buttons from its remote control
  • Turn on and off the stereo and virtually press any buttons from its remote control (which I never even had!)
  • Use an old random blueray remote control to set scenes, turn lights on and off, etc. (basically do anything under home-assistant’s control)

This post is about how I did it on my Raspberry Pi.

Update: A video!

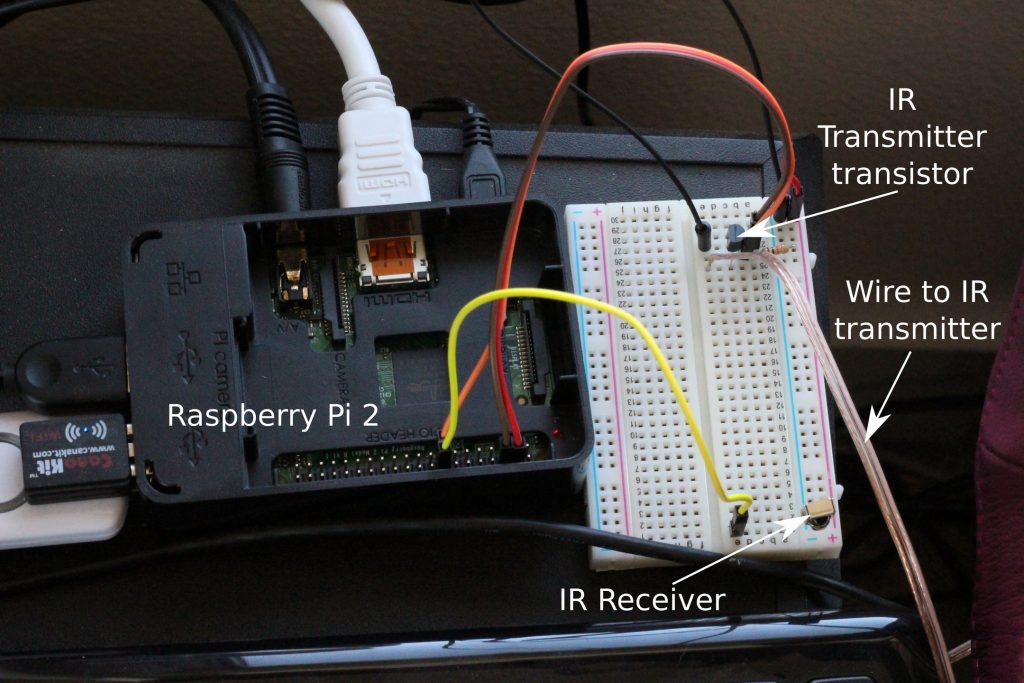
Annotated setup with IR sensors

Continue reading Adding IR send and receive capabilities to my home-assistant based smart home

Using an Aeotech recessed door sensor in home-assistant

I went over to my friend’s house last night to help get home-assistant on a Raspberry Pi working for his z-wave door sensors and siren. The Ecotech sensor showed up fine but the Aeotech recessed one (Recessed Door Sensor Gen5 , ZW089-A) did not show up by default. After poking around in the logs for a while, we realized that it was sending BASIC_SET command classes instead of BinarySensor commands. Apparently (I thought I had fixed this already), home-assistant doesn’t recognize the BASIC_SET commands just yet. But looking at the config file for this device, we discovered that config item 121 changes which kind of report this sensor sends:
Continue reading Using an Aeotech recessed door sensor in home-assistant

Determine your location from relative FM radio signal strengths

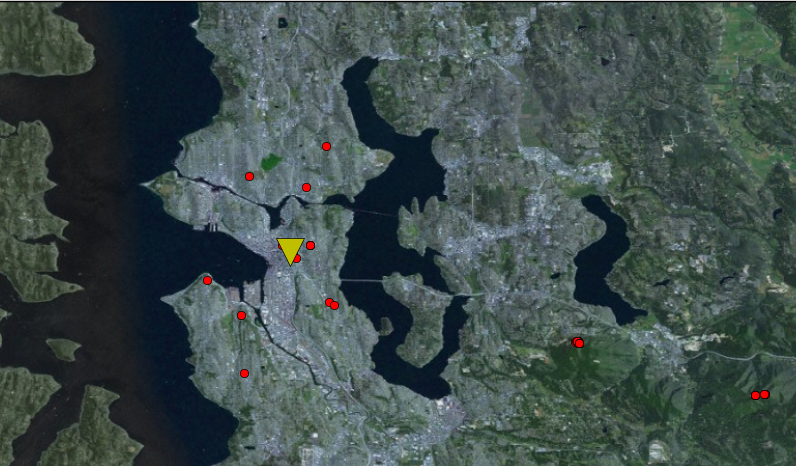
In this post, we’ll take a brief measurement of regular old FM radio stations and try to determine where we are. It’s like a GPS but with local FM transmitters instead of satellites. I did this just for fun. I wonder if it could be used for indoor location and stuff? It is nowhere near as accurate as GPS. But whatever.

calibrated_result1Reading FM radio signal power

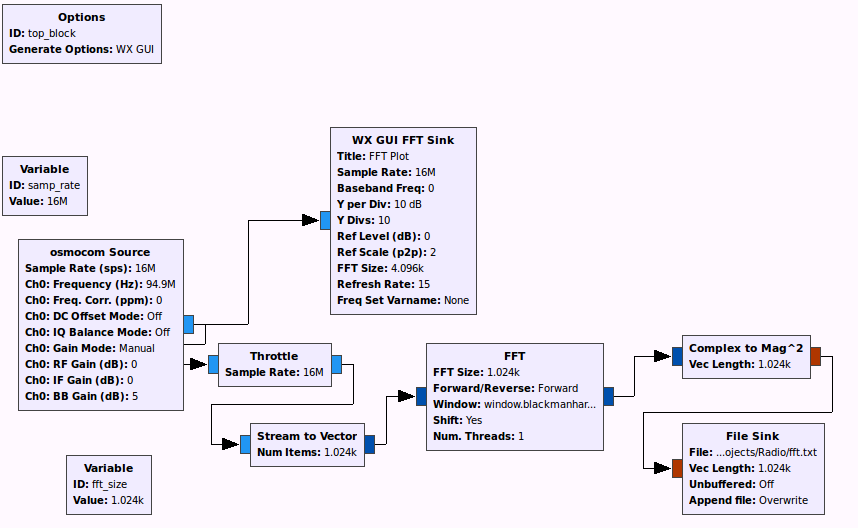
The first step is to get a reading of all the nearby radio stations. I used gnuradio and a HackRF One software defined radio. A simple flow-chart that takes the FFT and dumps it to a file is all I needed. I had to throttle the I/O or else my computer would freeze. I used 16M sample rate to have as wide a bandwidth as possible.

The gnuradio flow-chart used to gather data

The file sink saves the FFT results in 4-byte integers and just has one 1024-length vector after the other. In a few seconds, I had a 50 MB of data. I did all the post-processing in an external Python script.

Continue reading Determine your location from relative FM radio signal strengths

Home automation with Z-Wave, Home-Assistant, Aeon Multisensor, HUE lights, and a Raspberry Pi 2

I’ve always dreamed of having a “smart-home.” There’s just something cool about being able to flip switches and read sensors and have a program turn a light on when you open the door, but only if it’s dark. This post is about home automation.

UPDATE: I made a video demoing everything:

Continue reading Home automation with Z-Wave, Home-Assistant, Aeon Multisensor, HUE lights, and a Raspberry Pi 2

My new color-changing LED lights

UPDATE 2023: After a decade of fun with HUE, I’m phasing them out now because they switched their policy to require connecting to their cloud rather than allowing local-only control. Screw those guys and get something else.

My wife got me an early birthday present: Philips HUE Color-Changing LED lights! They’re incredible. Look:

Right now I’m controlling them with my tablet, which is fine for changing colors and setting light alarms. I can even control them from afar thanks to my VPN. I will soon hook them up to my nascent Raspberry Pi powered home automation system (using the open-source Home Assistant program) that will allow me to trigger them based on various events like motion, doors opening, weather changing, or whatever. The future is here!

Each bulb uses 9 Watts but makes the same amount of light as a 60W conventional bulb, so they’re very eco-friendly. Furthermore, since they’re LEDs, they should last for 15 years of normal use! They communicate with a little hub that uses the ZigBee protocol (like Bluetooth but lower power and lower speed, good for home automation stuff).

Downside: They’re pretty pricey. I expect their coolness to drive demand enough to bring supply up. Expect these bulbs for $10 in the next few years.