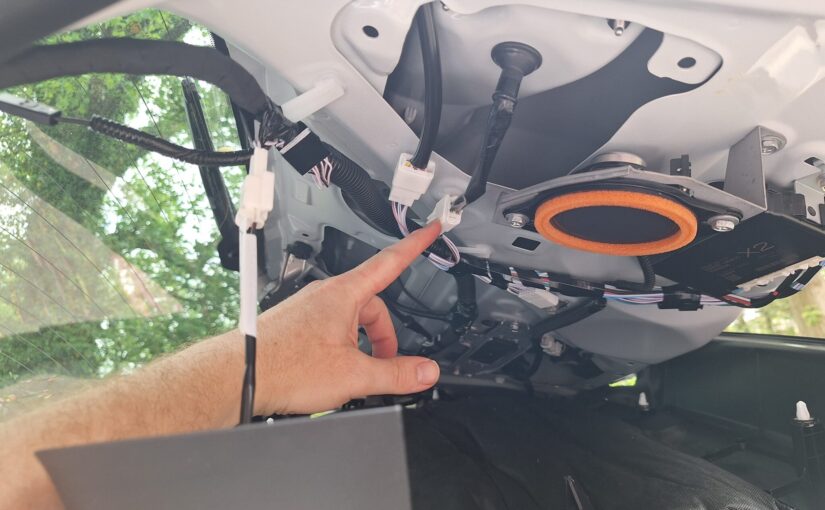
The built-in backup camera in a Grand Highlander shows the ground pretty well but doesn’t show things up higher. This can be a problem backing up e.g. in a short parking garage with lots of ventilation hanging down. Also, front/rear dashcams are a necessity in the modern world, and for some reason, some new cars don’t seem to come with recording capabilities. So I needed to install a clip-over rearview mirror cam.
I got the hard-wire kit and plugged ACC into the P/OUTLET NO.1 15A fuse and plugged BAT into the DOME fuse (both located side by side in the fuse box just above the brake pedal).
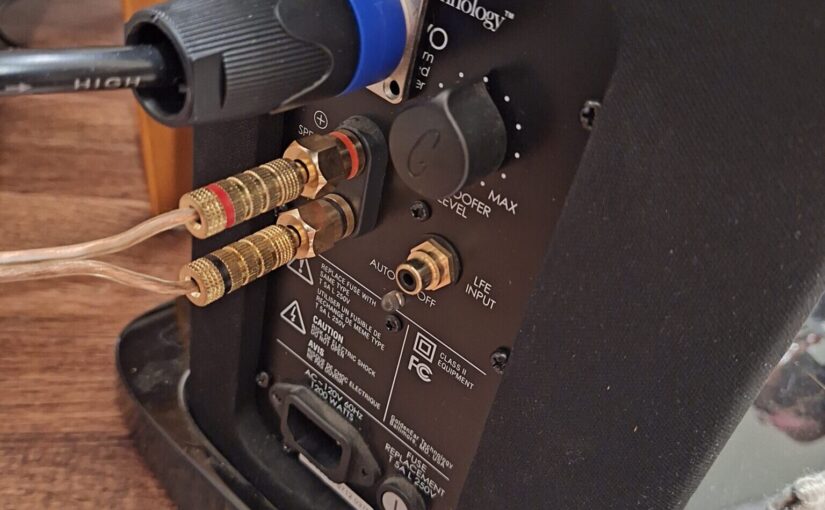
I have a pair of GoldenEar Triton 2 tower speakers that are truly awesome. For years, they have played well and received excellent support when needed from the company. However, recently the company ownership changed and the service situation has shifted. The speakers have integrated powered subwoofer amplifiers in them which seem to go out somewhat regularly. A few years ago, one of mine started making an awful high-pitch tone and died. I emailed support and they walked me through getting and installing a replacement. It worked fine for a while, but soon it died too. I ran with just one woofer for a while but then it started getting crackly when powered. I emailed support again and they said that they have run out of spare units and they also no longer perform repairs due to lack of parts. They suggested I take them to a local electronics shop for repairs.
I considered getting a separate powered subwoofer but really liked the look of the Tritons, and it’d be a shame to not use their woofers. I decided to try to just bypass the broken amplifiers, turning the speakers into completely passive speakers, and then getting an external amplifier to power both. I just finished the job and am happy to report that I have excellent booming bass and can fully enjoy my Tritons yet again.
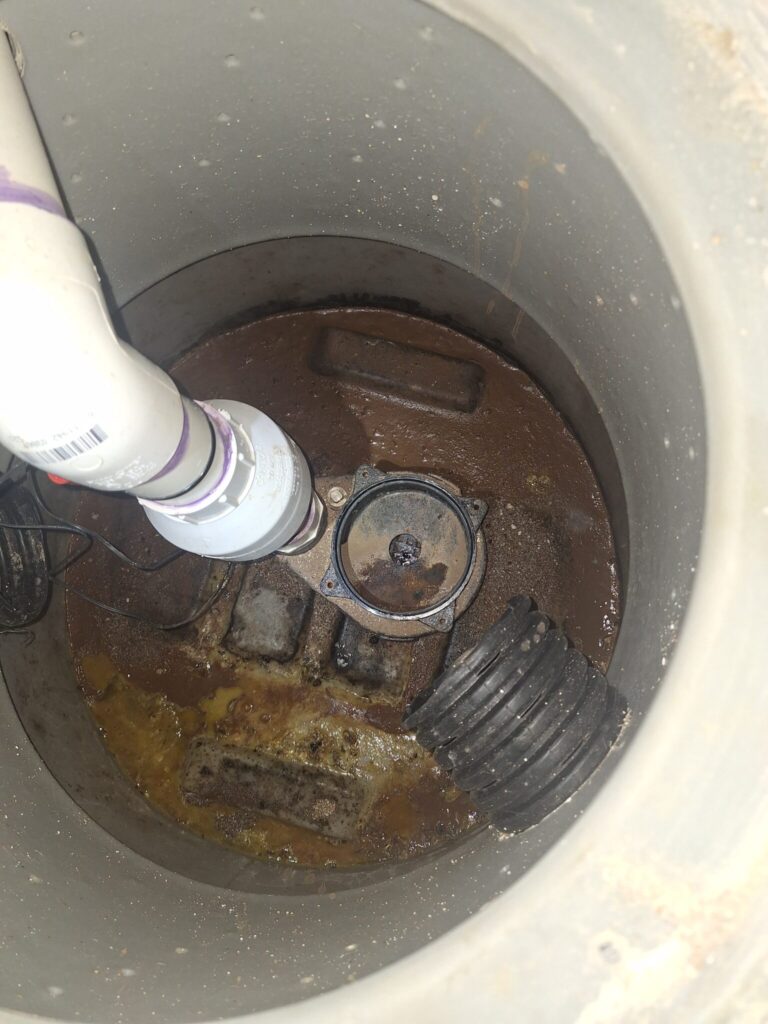
I moved into a house that has two sump pumps dating back to about 2017 from Mid-Atlantic Waterproofing, a company that is no longer operating. During some plumbing, I became aware of the fact that at least one of them doesn’t work at all. I guess this is partially a good thing: I haven’t actually needed sump pumping for the past ~2 years. This post talks about what I learned and how I fixed the pump.
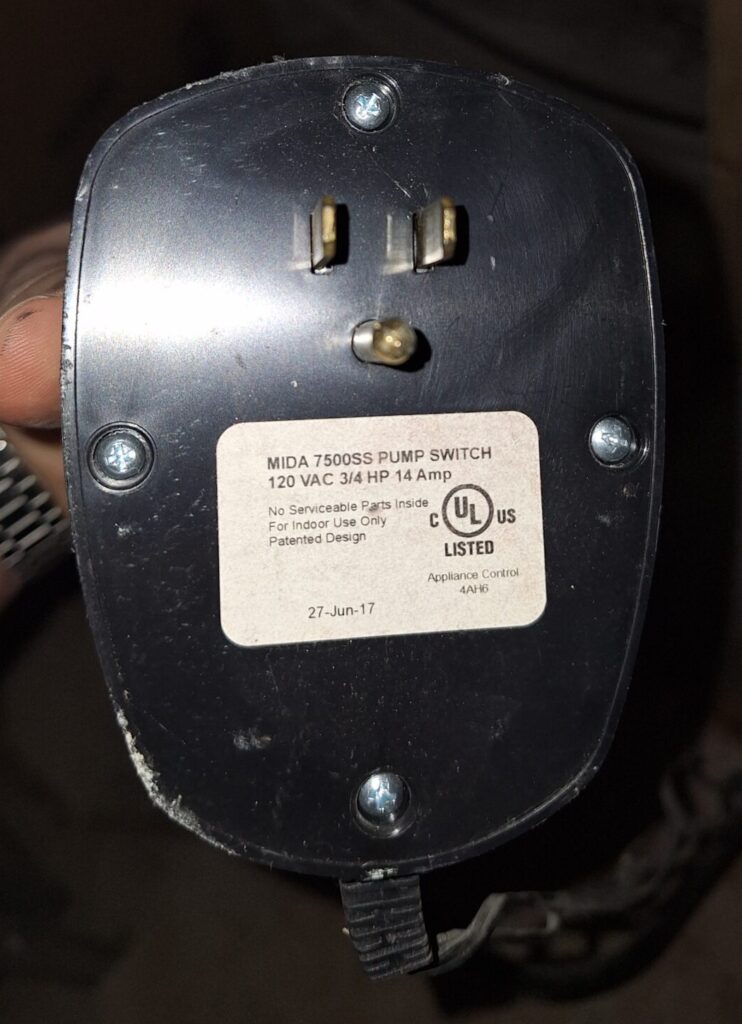
MIDA 7500SS Sump Pump Switch 120 VAC 3/4 HP 14 Amp from Mid-Atlantic Waterproofing
Problem 1: The pump was seized up
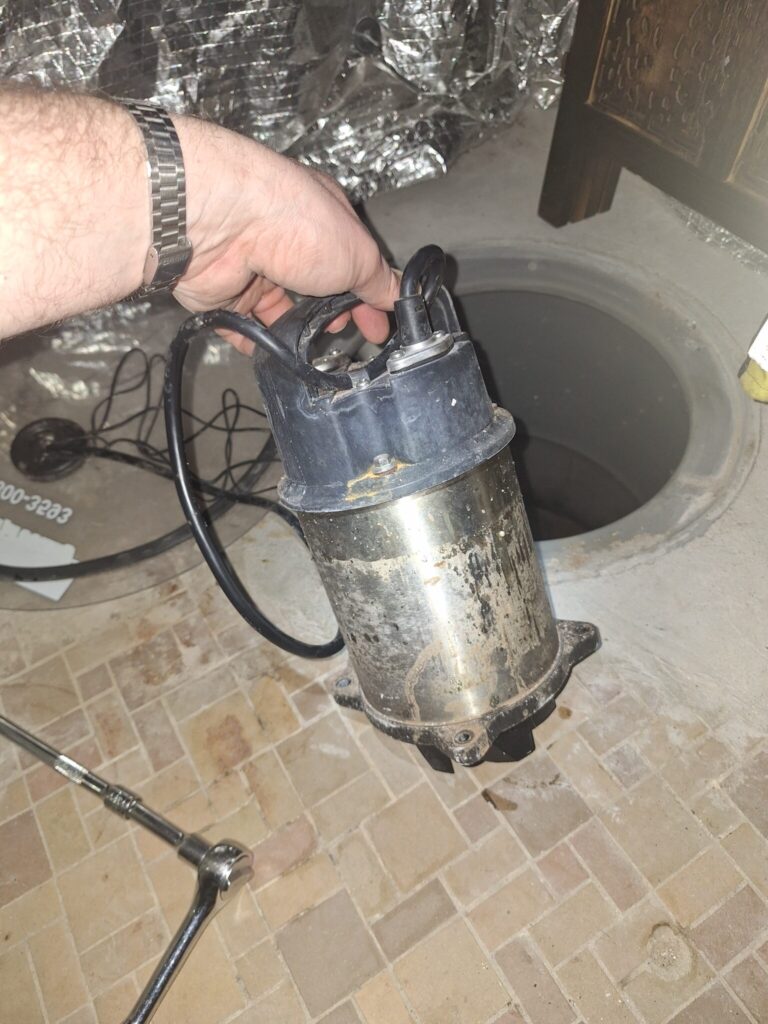
When I unplugged and re-plugged the switch, it beeped, turned the relay on for 3 seconds, and then turned it off and went solid red. When the relay was on, the pump was buzzing but not turning. I unbolted 4 bolts from the pump with a really long socket extension on an electric drill and pulled it out. I could barely turn the impeller by hand. I put on thick gardening gloves and really went to town on it. It broke free and soon I could spin it freely. I plugged it directly into the wall and it spun like crazy. It was probably seized up due to Iron Ochre, see Problem 2
Sump pump removed
Problem 2: Iron Ochre
There was a layer of super gross, super sticky yellowish ooze in the sump. It was shockingly sticky and difficult to wash off hands so I had to be careful with it. Eventually I decided it was iron ochre. I guess this got into the pump shaft and seized it up. I bolted the pump back in, bought some Basement Wash-Dog tablets, dropped 3 in, poured in 15 gallons of warm water, and let it sit overnight. In the morning I plugged the pump in directly and it pumped most of it out. The iron ochre was indeed much diminished! Guess I’ll do this every now and then if water builds back in.
Sump with lots of Iron Ochre in it
Problem 3: Understanding the Pump controller switch
I thought (perhaps mistakenly?) that the pump switch wasn’t working because it always turned off 3 seconds after plugging it in. I cut out the high and low water sensors to experiment with it and see what the problem was. For one thing, one of the sensor lead wires had exposed copper, so I cut that section out and soldered it back together. After that I experimented with a bucket of water to see what it would do. It did turn on if both water sensors were underwater, but it turned off 3 seconds after the red high-water sensor was removed from the bucket, regardless of what the black low-water sensor was doing. This confused me. Eventually I read somewhere that you may need a ground line dipping into the water for these sensors to work right. Sure enough, with a ground wire in (sourced from the mounting screw in the nearby outlet, the switch stayed on until the black sensor was uncovered. The colors observed were:
Color
Meaning
Solid Red and silent
Pump not operating, no water detected
Blinking red and silent
Pump not operating, low water detected
Solid green and beeping
Pump operating, high water detected
Blinking green and beeping
Pump operating, high water no longer detected, low water still detected
Here’s a little video of the switch in a bucket:
So I fished a ground wire towards the bottom of my sump. I imagine ground could be provided by the pump casing itself under normal circumstances, so I’m not 100% sure it was necessary to do this in the sump, but it was definitely needed for my bucket experiments.
Now I’m confident the sump pump will work if it is ever actually needed.
I just upgraded a machine to Ubuntu 25.10 and started seeing the following error messages from sudo (which is now infamously using sudo-rs implemented in rust)
These come from an older version of jellyfin, which installed that file. Current jellyfin does not install that at all (it was removed in 2023). When I went to remove the offending lines in the file with visudo I was slightly worried due to the warning that I’d remove my ability to sudo visudo anything:
$ sudo visudo /etc/sudoers.d/jellyfin-sudoers

[...removes lines with requiretty on them and save...]

It looks like you have removed your ability to run 'sudo visudo' again.

What now? e(x)it without saving / (e)dit again / lock me out and (S)ave: S
I ended up hitting save, confident that it was just sudo-rs being overzealous with its warnings. Sure enough, everything worked fine. Good luck!
I bought a 2021 EGO electric lawnmower on Craigslist 7 months ago. It’s been mowing my 1/3-acre yard just fine since the spring. But yesterday when I started it up, the light blinked green once and then blinked yellow or orange a bunch of times and made just a little click and failed to start. The motor spins like 1/16th of a turn but then stops. It’s like it’s trying to ‘kick over’ but just can’t make it. The self-propulsion still works fine, as do the LED lights, so I know it has power.
What’s happened to it since it worked last? Well, it’s been really hot and humid here in the DC area, and I’ve been storing it somewhat improperly outside in a tarp (I haven’t gotten around to getting a shed yet after moving). So presumably something temperature or humidity sensitive happened.
I tried a few simple things, none of which worked:
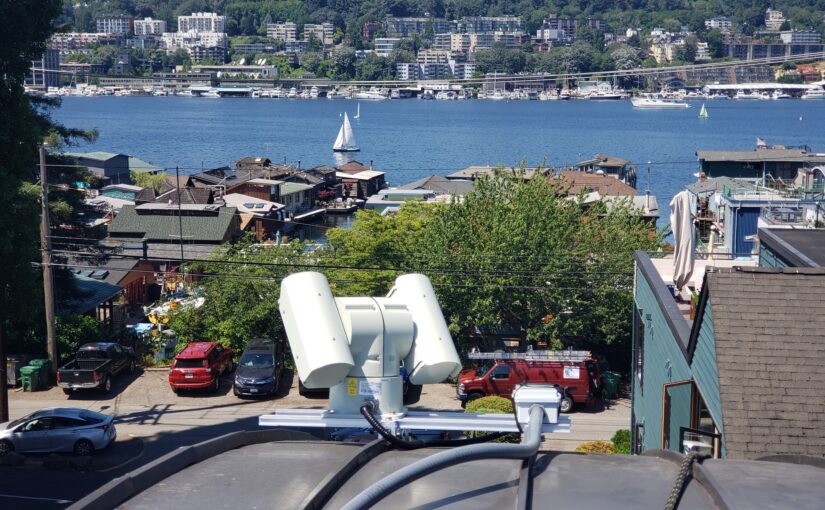
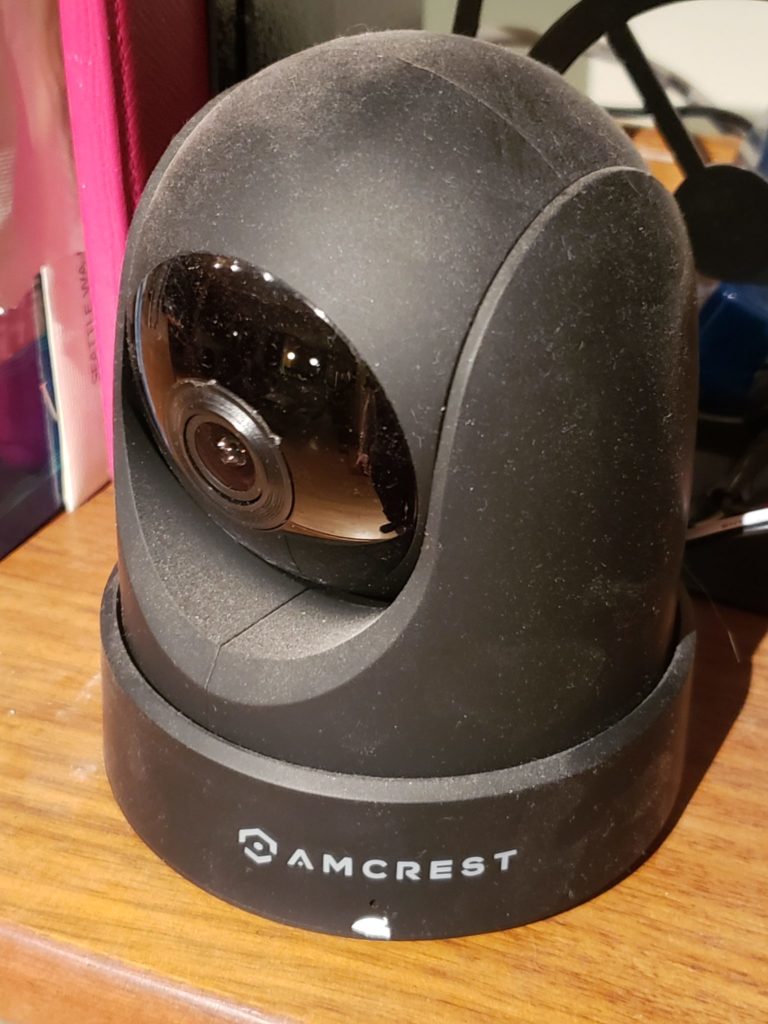
I had a lot of fun installing an industrial outdoor pan-tilt-zoom (PTZ) camera on my roof in Seattle. Whereas most townhouses built today have rooftop decks, my townhouse has a curved metal roof. Being near Lake Union, it has a phenomenal view from the top of the roof, showing the city, the lake, and even Gasworks park. Since it’s pretty difficult and unsafe to get up on that roof, I did the next best thing, which was to install a camera. This was inspired by this skybot cam post.
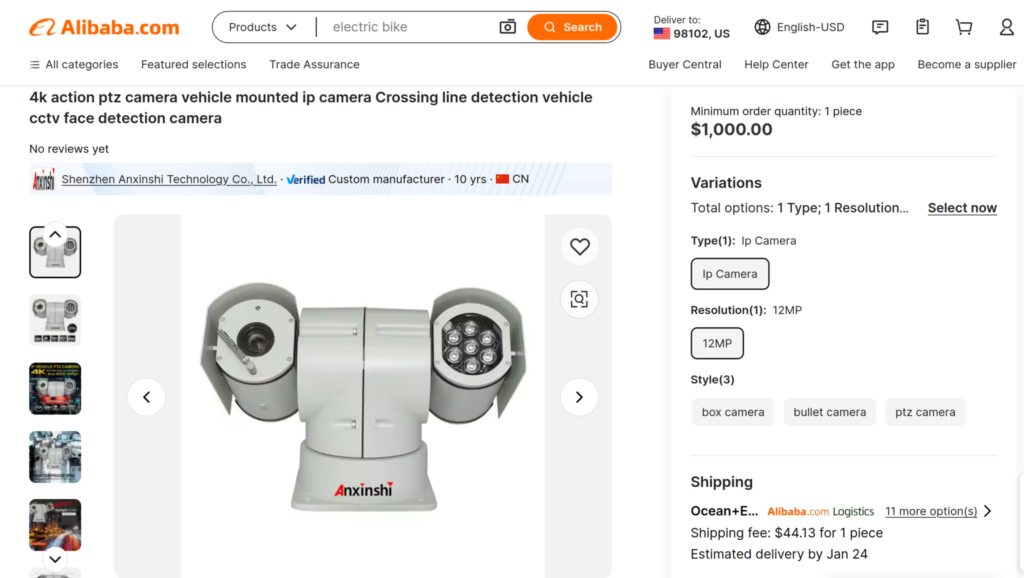
I spent a lot of time looking at camera options. New cameras from US vendors seem to be roughly $30k, which was way out of range. So I checked alibaba. Sure enough, there was a pretty awesome looking one with 4K resolution.
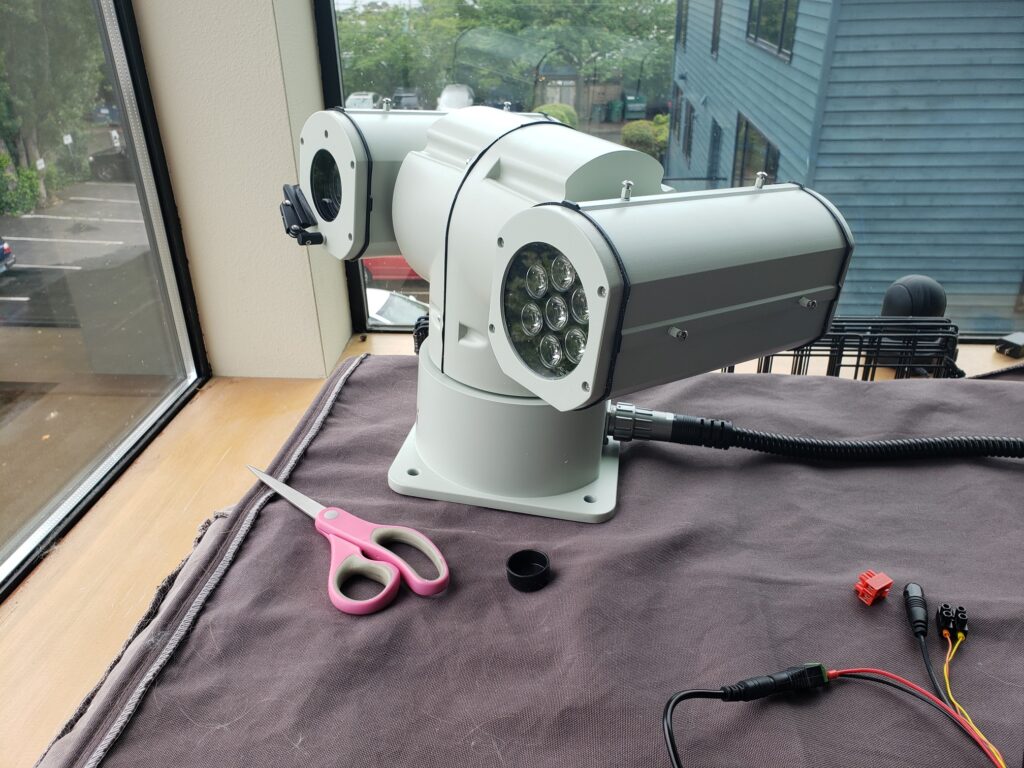
I was a little skeptical of how it would turn out, but was pleasantly surprised with the build quality and reliability. It showed up pretty quickly and I tested it out.
Getting into the firmware took a second because the password on the sticker was misspelled. I was able to figure it out and get in. The firmware was pretty solid with lots of cool features, and the camera supports basic ONVIF stuff so I can control it with standardized software, e.g. in Home Assistant via Frigate.
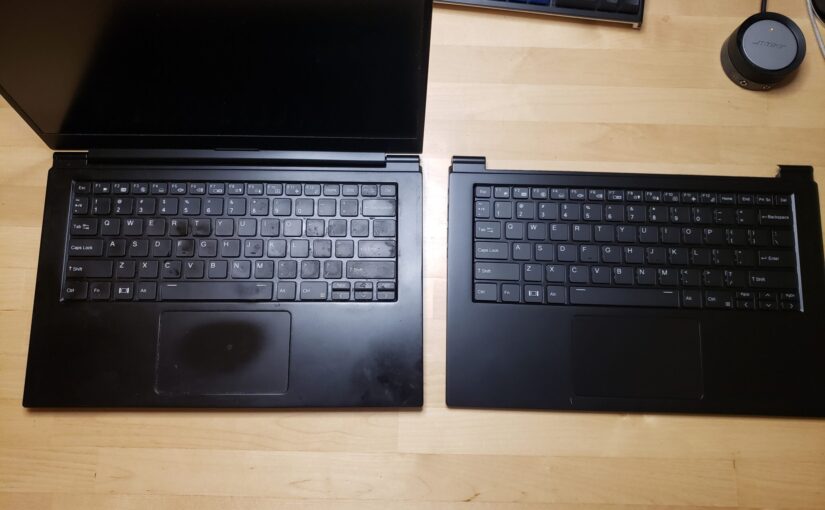
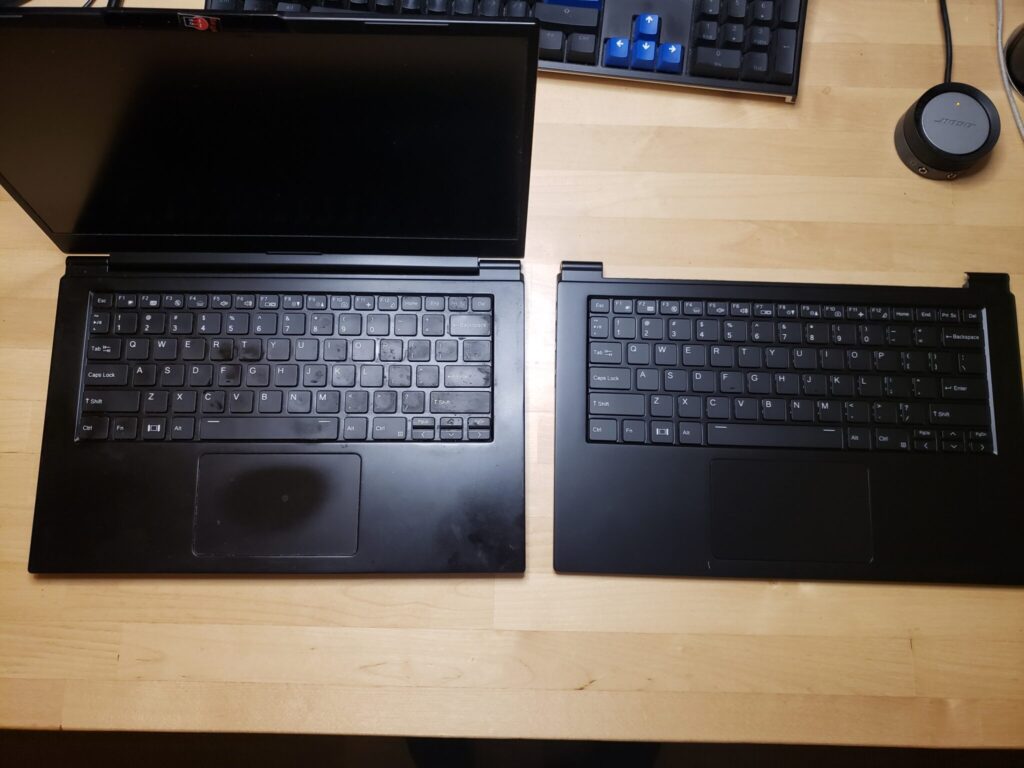
I love my System76 Lemur Pro laptop and use it a lot. But the keyboard started dying recently. The F and R keys got really finicky, basically not registering most of the time. If I mashed them really hard sometimes they’d repeat like 15 times. It was not good. I started using an external keyboard just to get by.
I blew the keyboard out with air a few times and I thought it helped at first but the problem came right back.
From what I read online, the keyboard is not readily replaced. It’s integrated into the top case and requires the battery, speakers, and motherboard to all be swapped, with all connections/wires unhooked and then re-hooked. Well I’ve done stuff like that before so I figured I could do it. Better than getting a whole new laptop!
So I put in a ticket to see if they’d help me find the right top case.
My f and r keys are slowly failing on my keyboard. The keys themselves are fine, but pressing them doesn’t work for some periods of time. If I press them like 50 times, sometimes they’ll work. Then, seconds later, they wok o a little while but then they stop woking again (see they ae not woking ight now as I type this). I undestand it’s had to eplace the keyboad on a lemu but I am willing to ty. I have swapped out majo pats o laptops in the past and would eally like this compute to keep woking. Can you help me ind a eplacement keyboad unit o the lemu po 9 that I can install mysel? Thank you.
— Me to System76 support
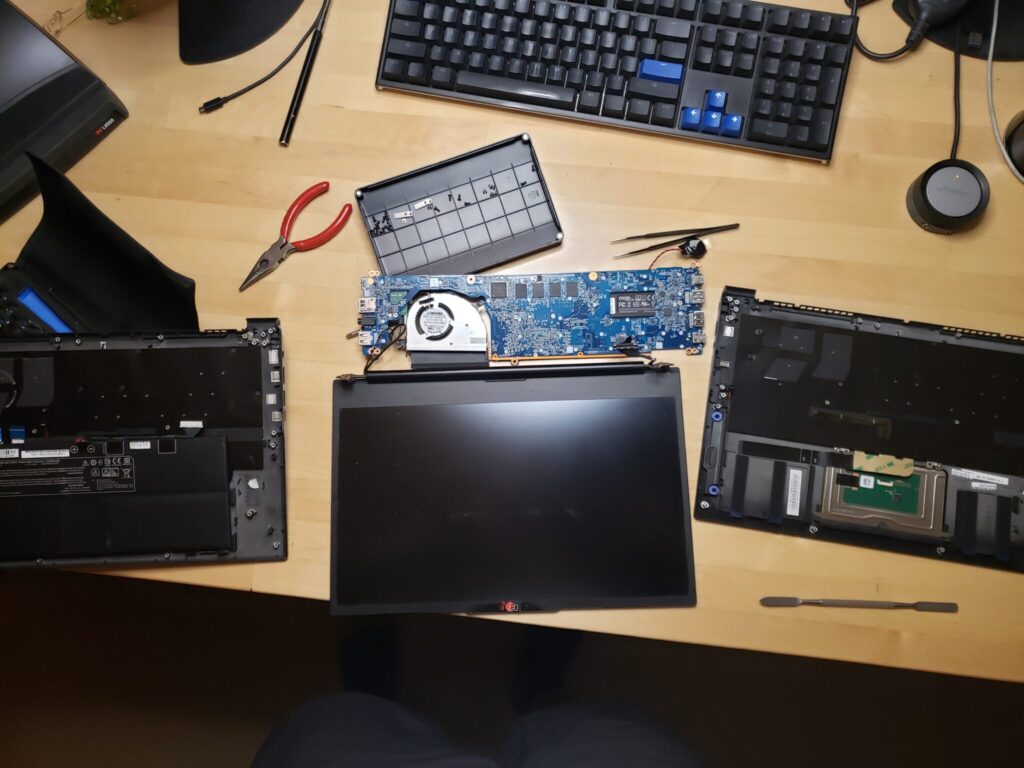
They explained that they did not recommend I do the repair myself due to the complexity but I insisted. They got the part and shipped it to me for just under $200 shipped (again, better than a whole new laptop). It arrived two days later, which is today!
BeforeDuringAfter
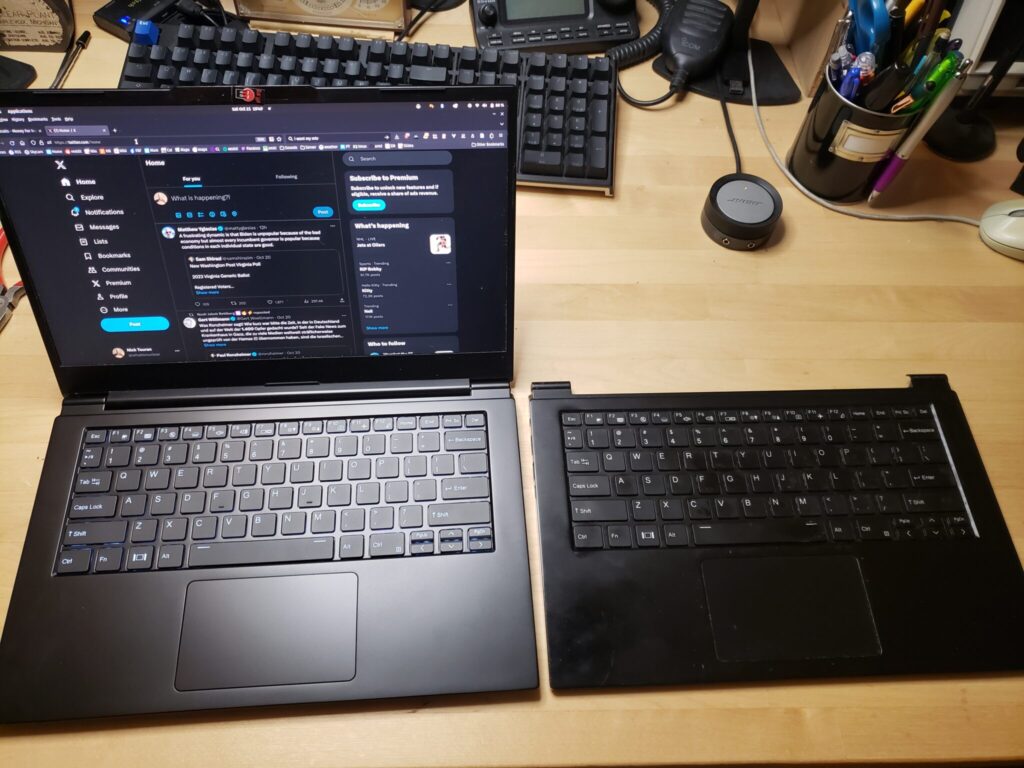
I struggled with some of the connectors and ended up leaving the fan connections just on and taking the fan and main board off together. I also left the CMOS battery connected. I popped it all back together and…. it worked! Now it’s a beautiful new top case, feels brand new. I’m very happy with this, and it wasn’t even that bad to swap out. According to the photo timestamps, it took me from 7:09pm to 7:46pm, so 35 minutes.
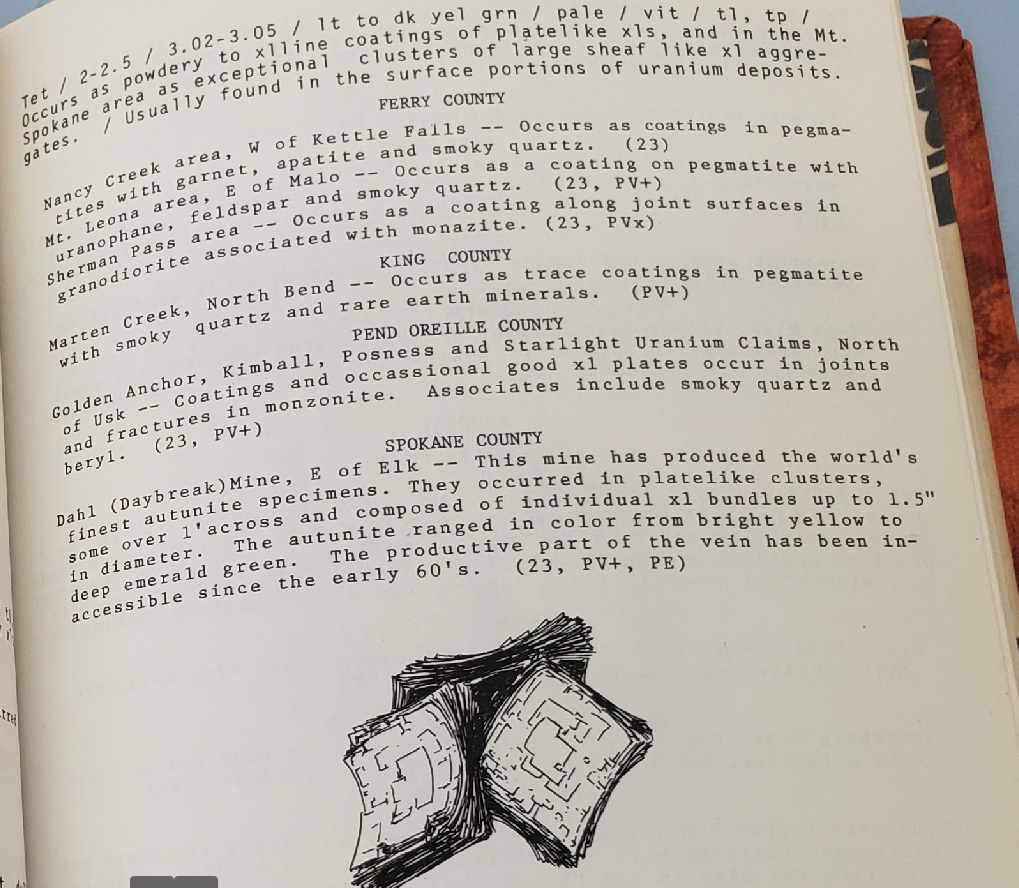
Autunite is a beautiful and rare uranium mineral that’s common in Spokane, WA. That’s a four-hour drive from my home in Seattle. However, in the 1975 out-of-print book “Minerals of Washington” by Bart Cannon, there is brief and ambiguous mention of some closer to Seattle in King County!
Minerals of Washington, by Bart Cannon
Marten Creek, eh? This one sentence appears to be the sole reference for this mindat entry, which appears to just be a random dot along the creek.
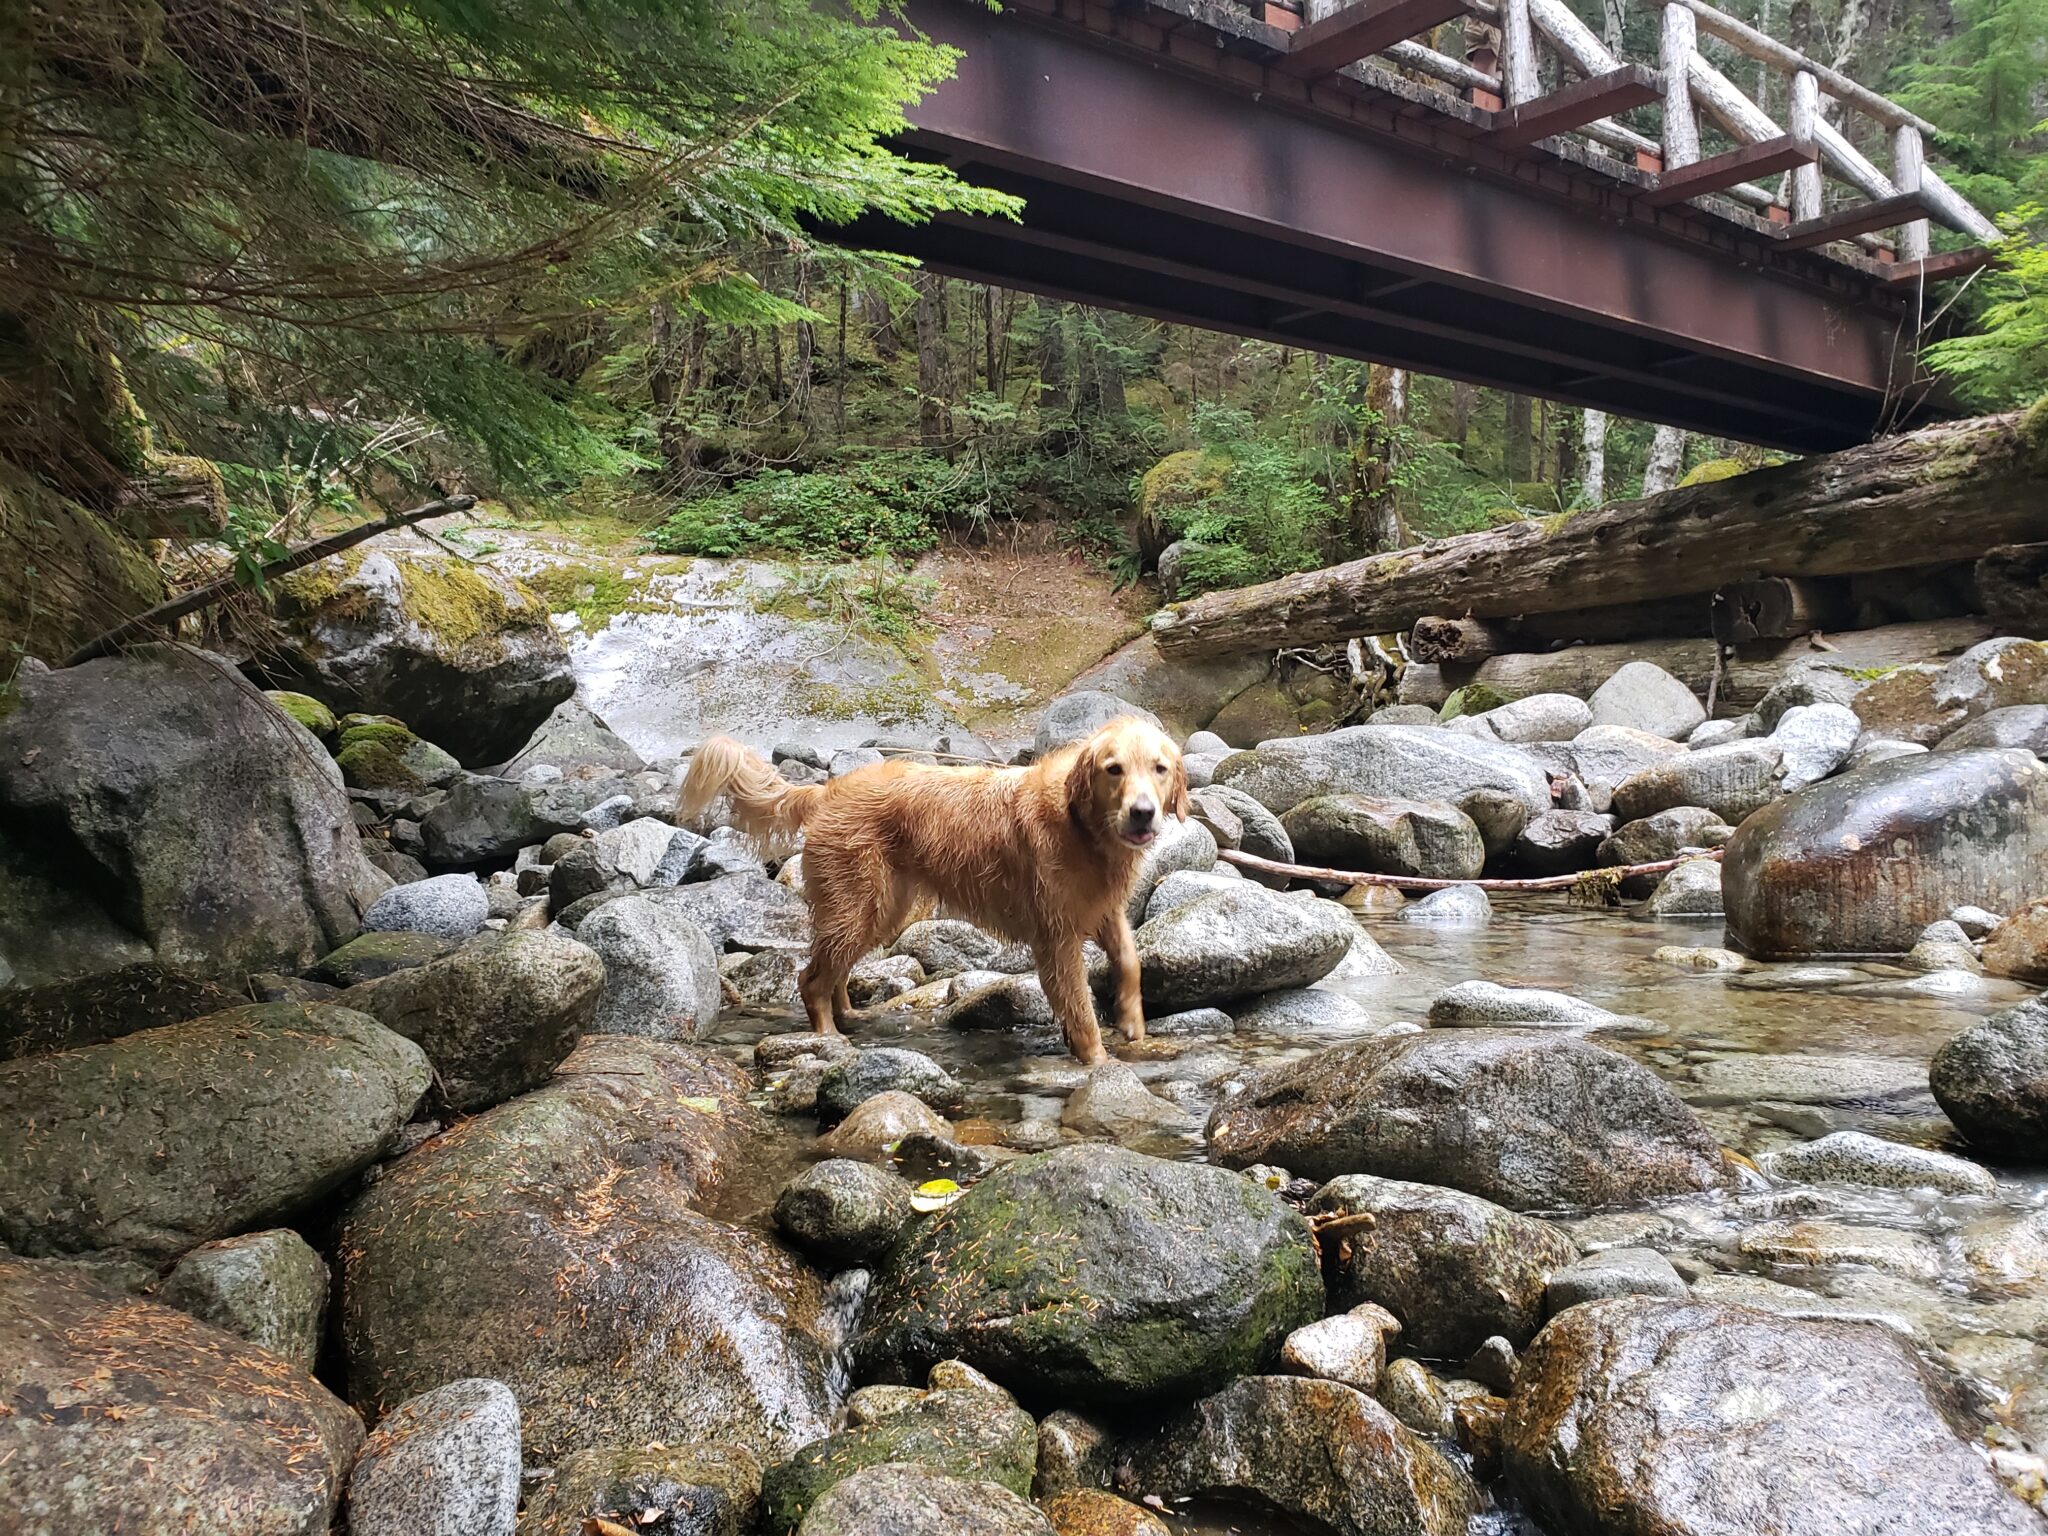
Middle Fork road is totally paved these days, so there’s just about 0.5 miles of gravel at the end. Very easy access. The hike starts out as a walk on the road, and then a nice, fairly flat trail for 2.7 miles. The turn-off on the left to Marten Lake is not labeled, but you know you went too far if you get to a beautiful bridge about 2.7 miles in.
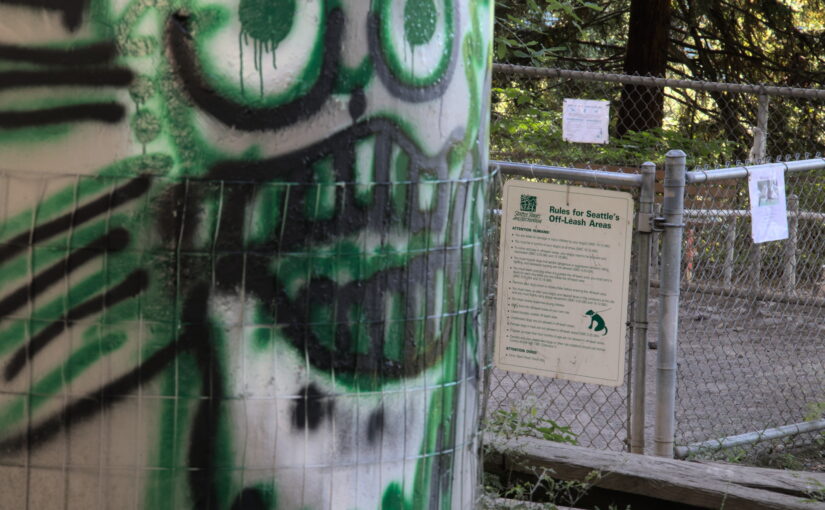
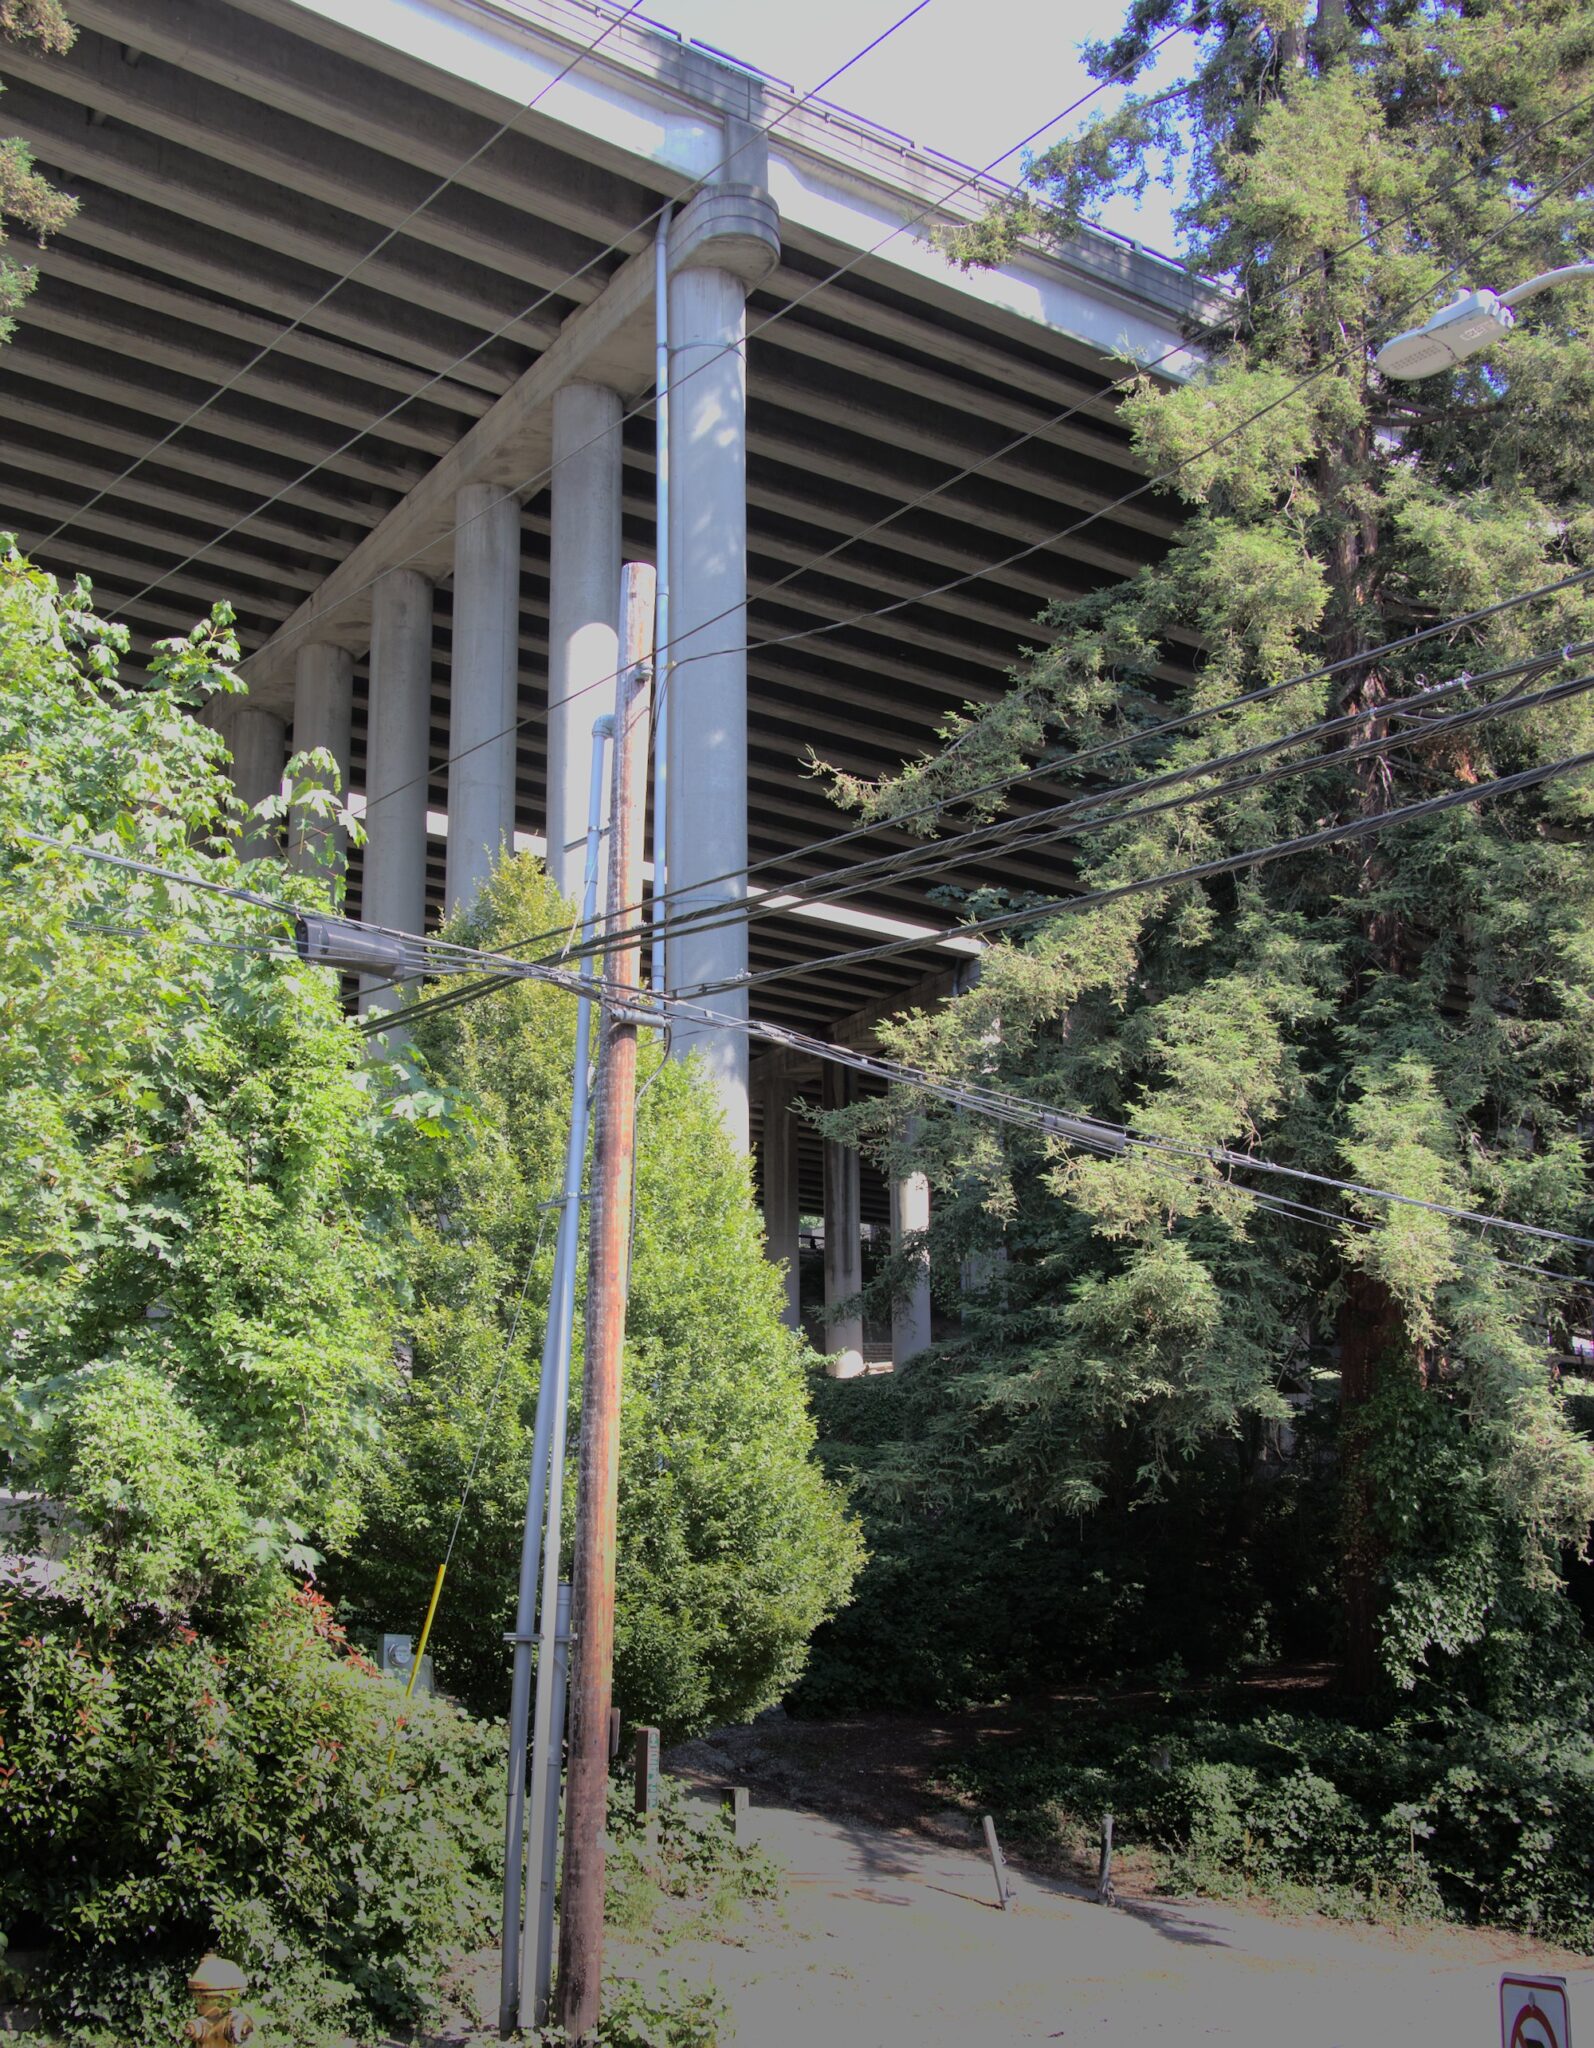
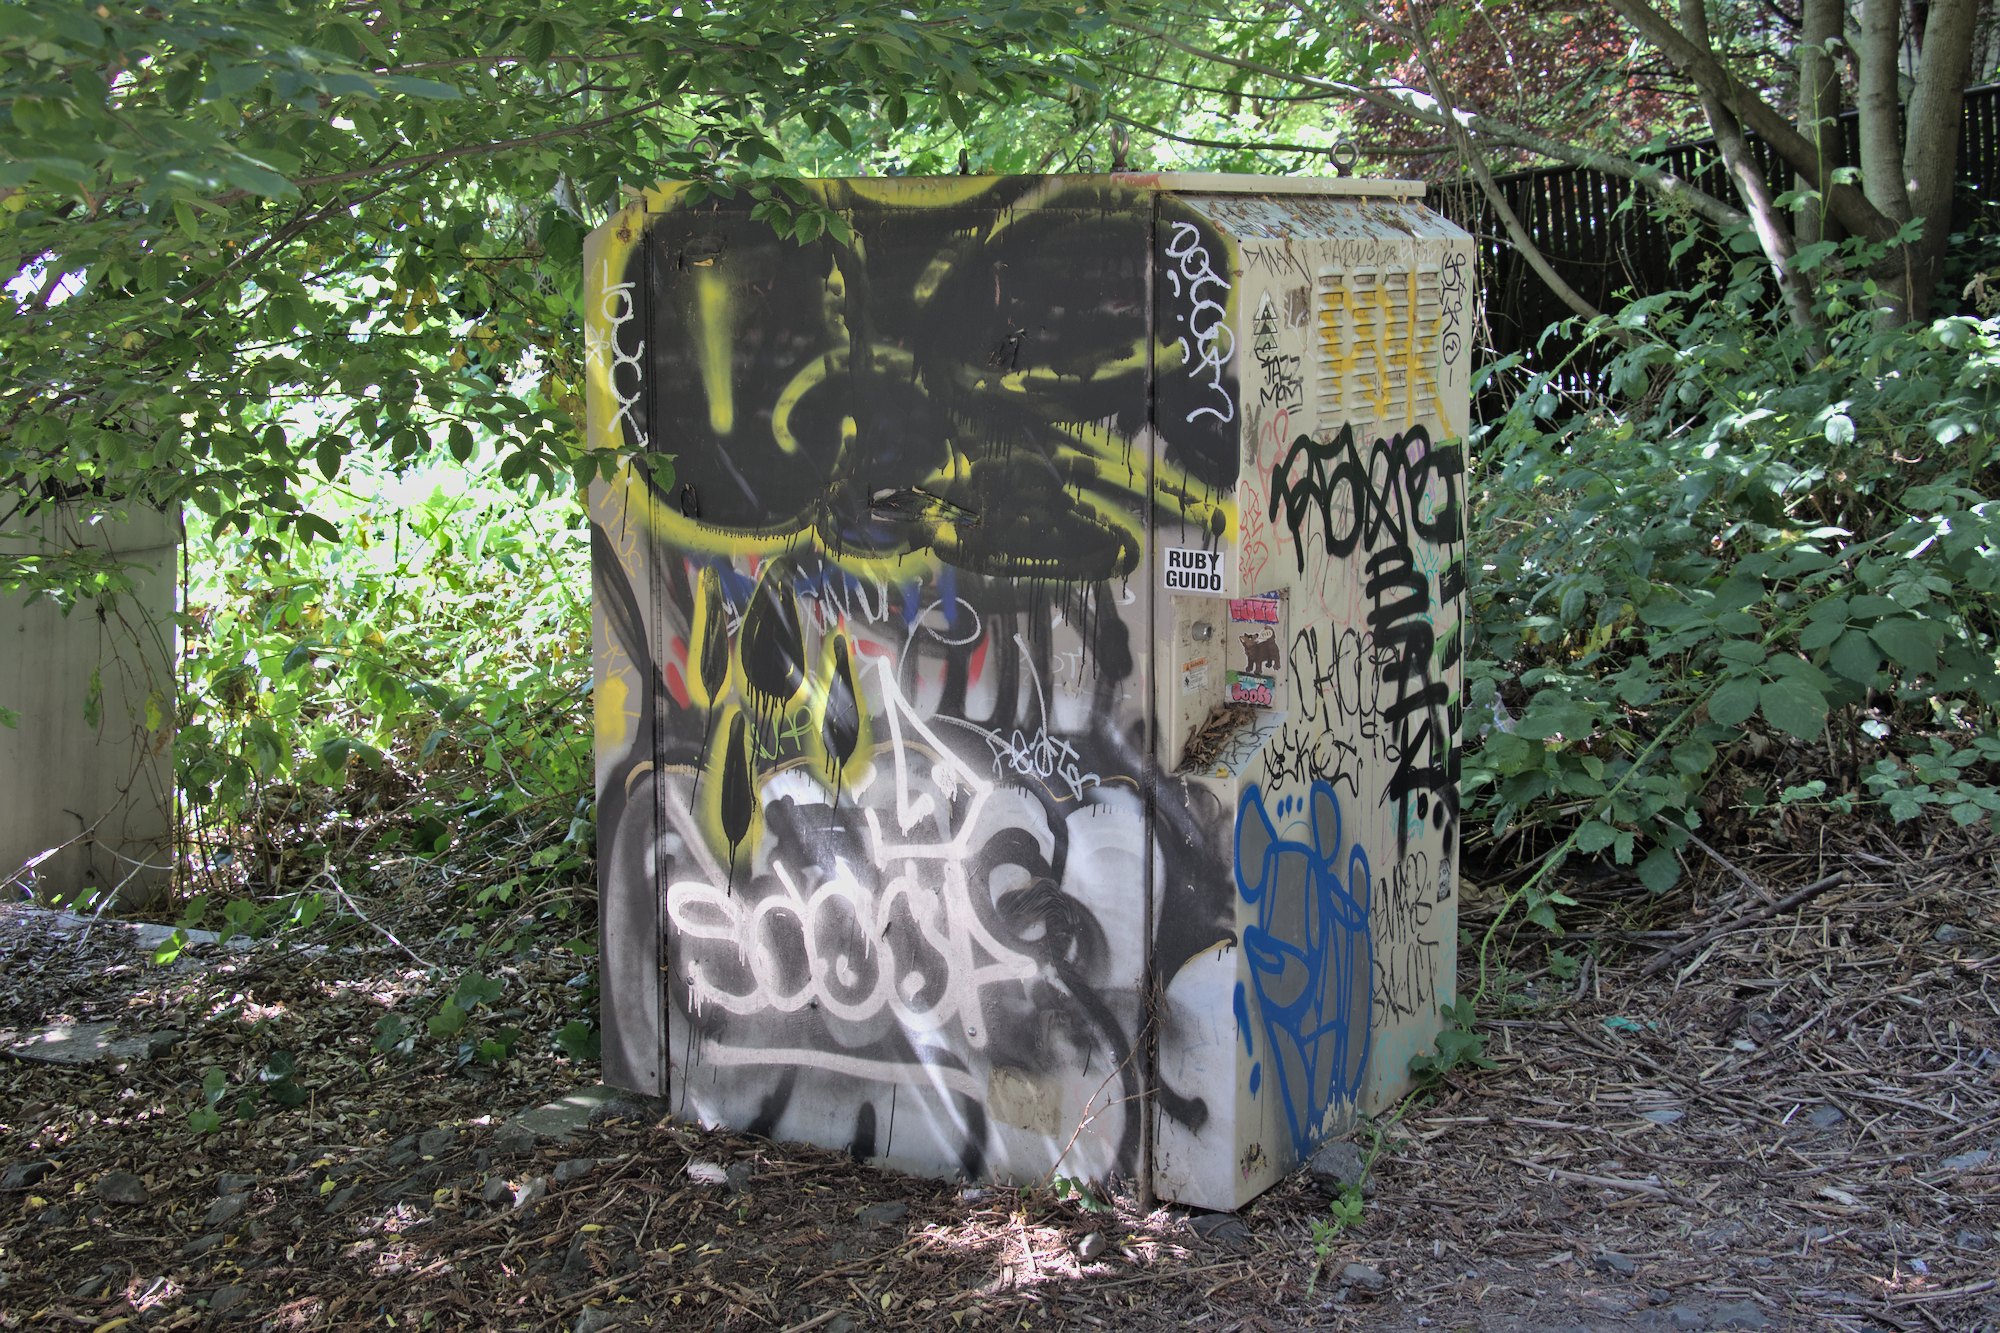
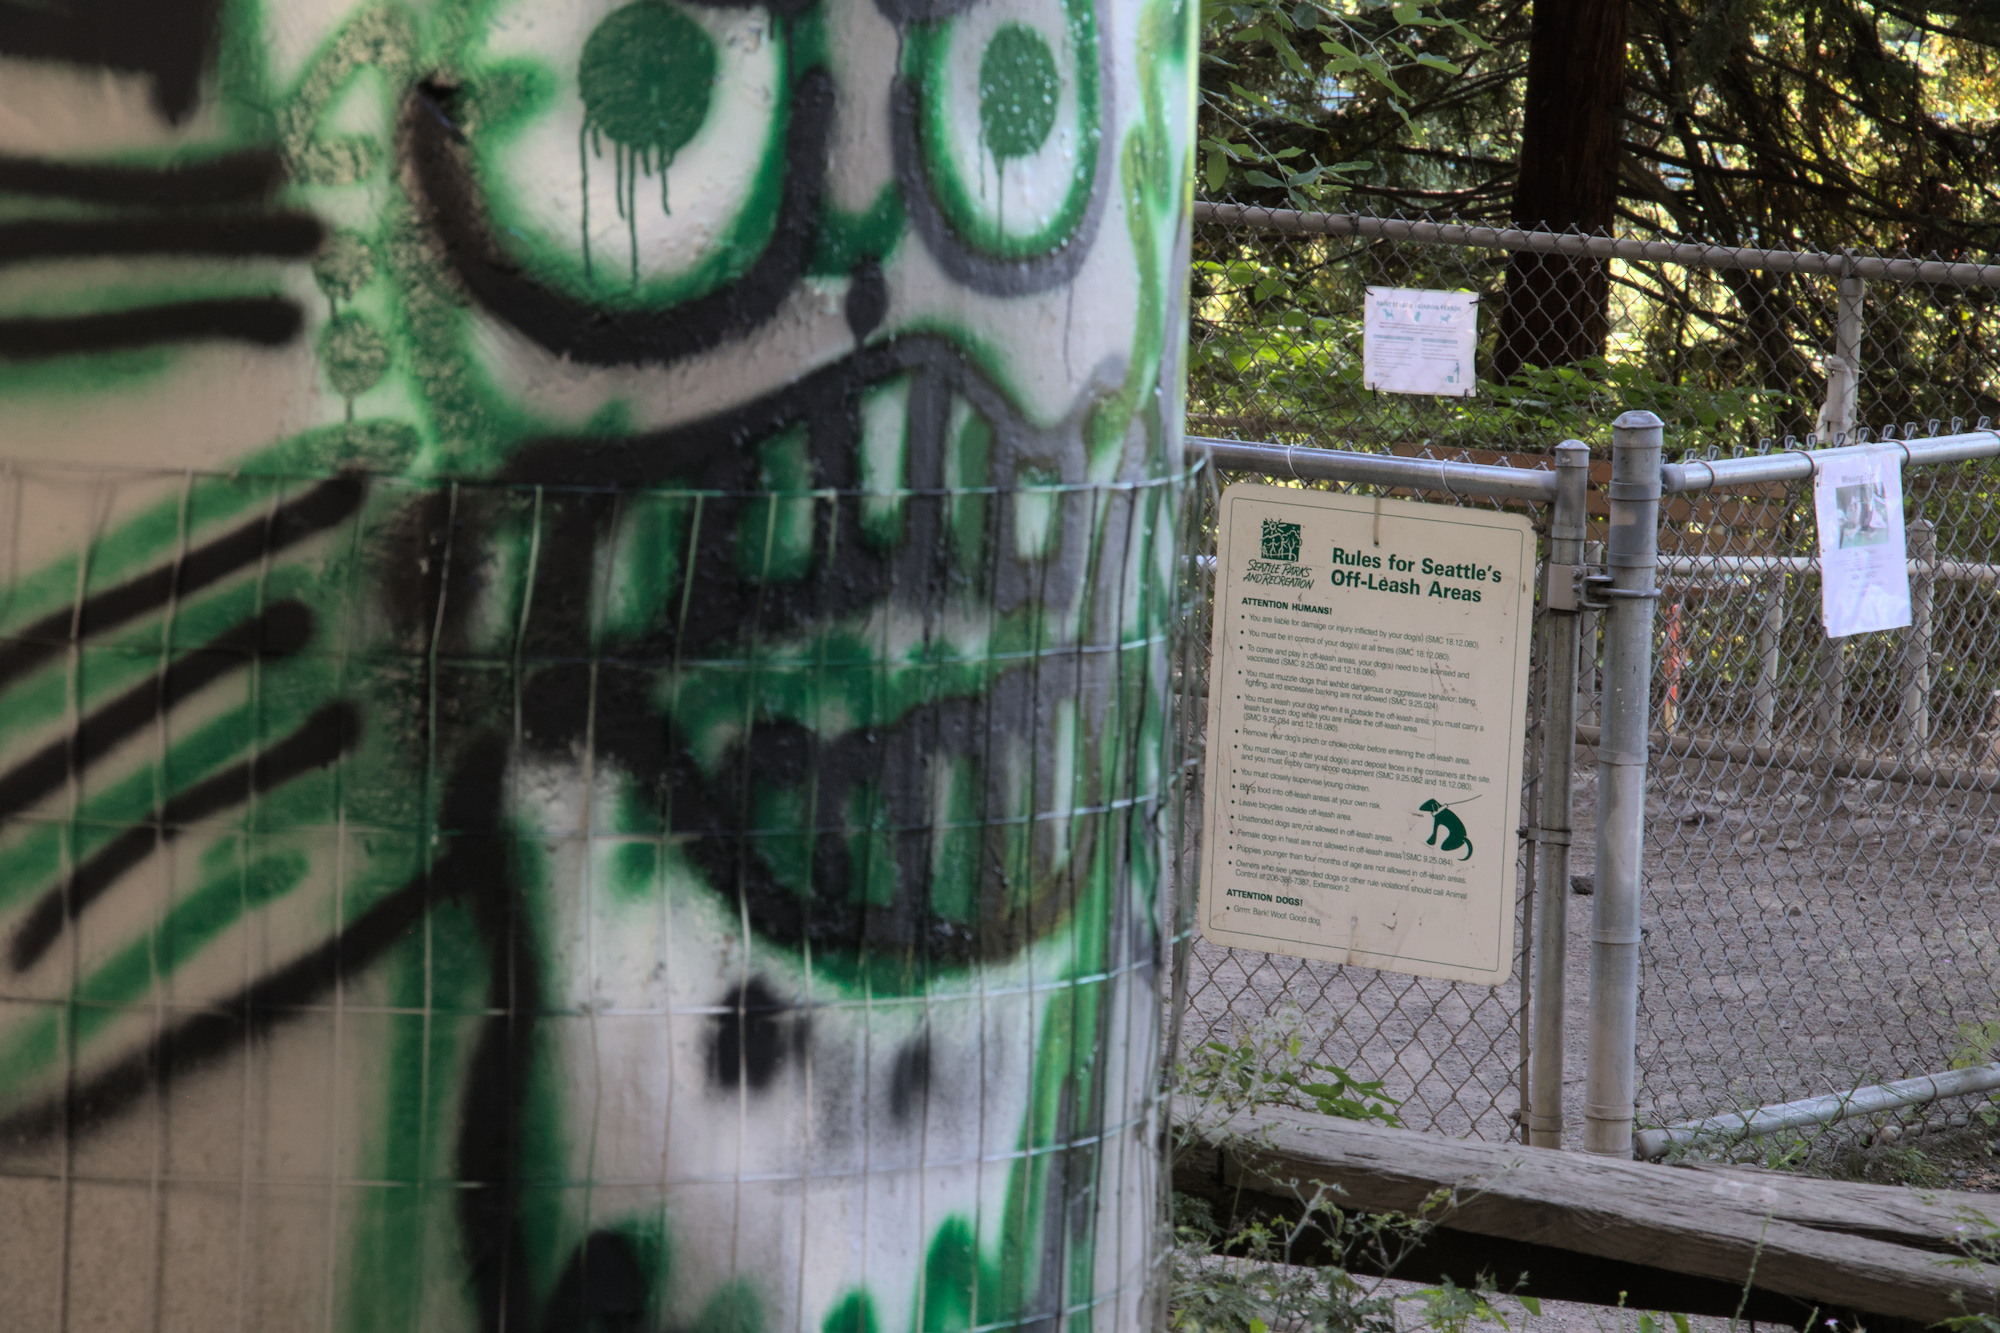
There’s a dog park under the I-5 interstate in Seattle’s Eastlake neighborhood. It’s here on a map. Many dog lovers hate it. It’s been called sketchy, dystopian, horrifying, and so on. But it’s not all bad. This post describes it a bit.
Entering from the Eastlake side, at Franklin and Blaine
As you’re entering you’ll see a bit of graffiti, ripped up Amazon boxes, and assorted garbage. This has come and gone over the last few years but is fairly common today.
Art
After a brief climb, you’ll find the entrance
The north entrance to the dog park
It has a gravel surface that gets a bit dusty, and it’s also fully covered by I-5. So it does stay dry in the rain!
I wanted to try out a camper van for a vacation to see what it was like to van life it. I found a pet-friendly local option in my area (Seattle) called Indie Campers that rented out vans. They were pretty pricey, but a lot cheaper than like, buying a van. So I went for it. I wish I had paid more attention to the negative reviews of Indie Campers before doing so. Here’s an explanation of our negative experience with Indie Campers.
Pickup location bait and switch: 2 hours away
At first, it said the pickup location is at the Seattle Tacoma airport. Great. There’s public transit to there, and it’s just 15 mins down the road. As the time for the vacation got closer, I got more concerned about details about where exactly at the airport to pick it up. I kept following their FAQ to get details and it said to go to the center of the passenger terminal. That’s suspicious. Then, a few hours before pickup (right when the cancellation deadline moves into “no money back no matter what” category) they reveal that ope the location is actually in Enumclaw, a full 1-hour drive beyond the airport, in good traffic. 2 hours in bad traffic. And that’s one way, so this adds between 2 and 4 hours to your pickup plans all of a sudden. Slap in the face.
When we got there, there were 5 other customers there, and they all thought the pickup location was at the airport. They flew in and had to spend an ungodly amount of money on an Uber to get there. Super deceitful. After this, we added the spot to the google maps for the next person. You’re welcome.
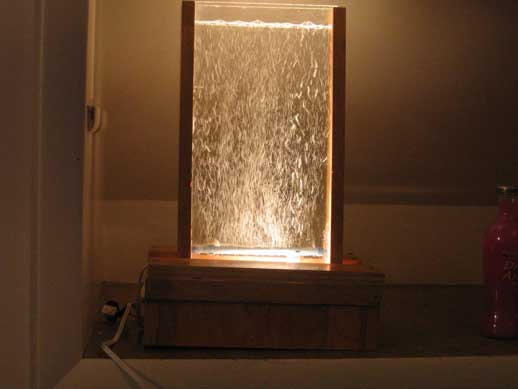
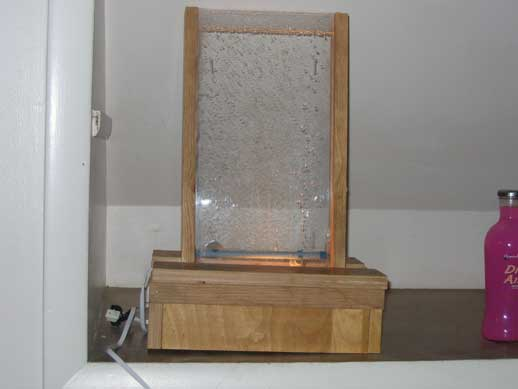
This is a legacy post, written originally in 2005.
I, Nick Touran, built a bubble wall. You can build one yourself if you want. You can follow my example.
The bubble wall with the light onThe bubble wall with flash
What is a bubble wall?
Basically, a bubble wall is a thin, clear wall of any size that is filled with water. Bubbles rise up throughout the entire wall and are lit up. It is basically an inch thick empty bubbling fish tank. I saw a 6-foot tall one in Las Vegas for $2,500 and decided I would just make my own. Mine will be a little smaller so that I can transport it.
There are some really nice art tiles at the Lynn Street Mini Park in Eastlake neighborhood of Seattle. They were made around 2002. I took some pictures of them. You can find them here:
Seeing radiation with your own eyes is incredible. It wows everyone who sees it, and is a perfect ‘hook’ to bring people over to your nuclear education table. “Hey, you guys want to see some radiation?”
I’ve used a normal dry ice cooled cloud chamber many times in science demos at corporate family nights, at demo tables at the Pacific Science Center, at schools, and so on for many years. You can still find dry ice at a number of grocery stores, but it seems to be getting more difficult. Plus, the dry ice runs out after a few hours, and you have to get more. I’ve heard of people using thermoelectric cooler (TEC) pads for this and thought I should try it out.
Being a nuclear engineer, I thought it’d be fun to find some Uranium in the wild just out there in the nature, sitting somewhat dormant since it was made by neutron star mergers and giant supernova billions of years ago. I just wanted like a tiny rock with some uranium ore in it.
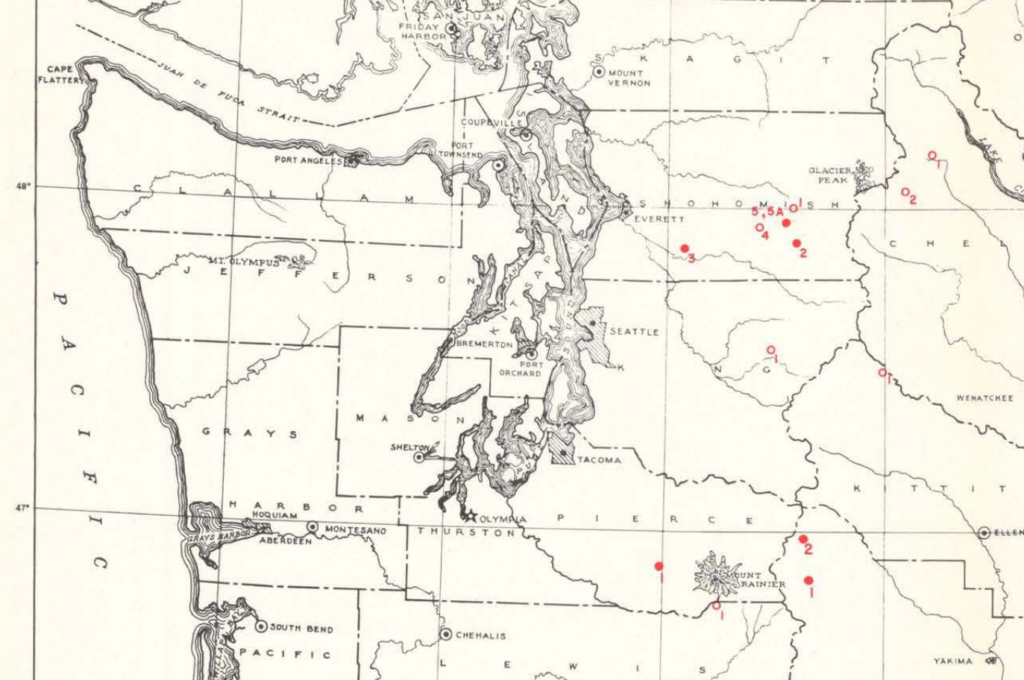
I found an old document from 1957 describing where Uranium had been found in Washington State. The vast majority of it is around Spokane in Eastern WA, but there are a few spots closer by worth maybe checking out.
Map showing uranium claims in Western Washington (1957)
The ones up in the central cascades all looked to be in the Galena area, which is difficult/impossible to get to at the moment due to the washout on the index/galena road.
I thought I’d go for the one East of Rainier, which is on National Forest land and talks about super high-grade ore, but all the reasonable approaches require either a 14-mile one-way hike or access to closed-off lumber roads. I spent a lot of time on satellite maps before I convinced myself that you could not get past Ohop on the logging road, thanks mostly to this post. (Along the way, I learned about the Electron Dam down there, which seems pretty cool, as well as Vancouver Notch).
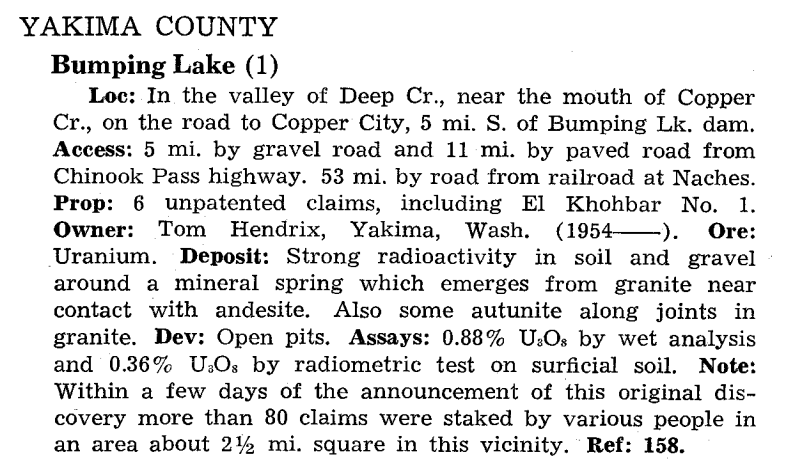
So anyway, this one by Bumping Lake West of Mt. Rainier looked much easier to access.
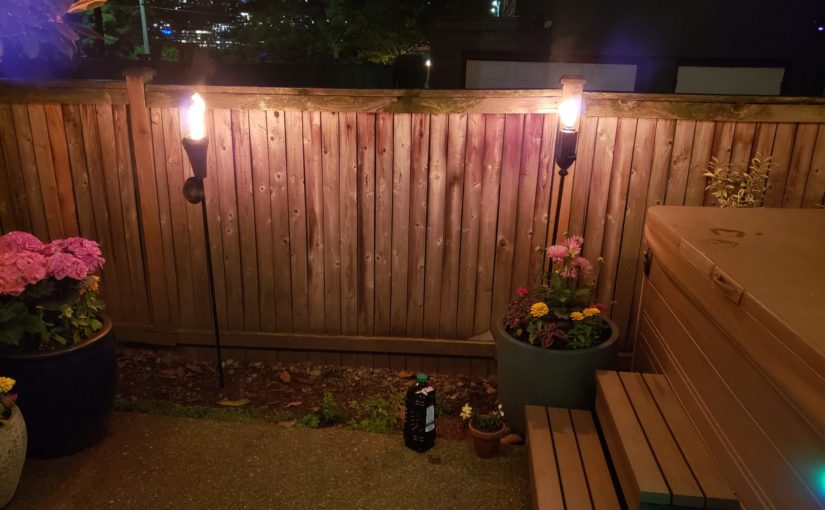
I don’t like the concept of decorative combustion that much, but I do have two tiki torches in my yard. I fired them up and checked my indoor vs. outdoor air quality sensors from my weather stations. Here are the results:
Reading the joystick in Python is super easy using pygame. I ran the demo code toward the bottom of the joystick page as my first step. It showed all axes and buttons working great out of the box with my controller.
Amcrest cameras support the ONVIF protocol. The python-onvif-zeep package supports sending ONVIF commands from modern Python (I used Python 3.10 for this project).
Specific example code demonstrating how to use the package from Python to send PTZ commands to the camera can be found e.g. here.
Given the ability to read the joystick and the ability to control the camera, we just need to glue it together! So I wrote a 250-line package called joy-ptz-cam that does just this.
The package is pretty limited at the moment but does handle PTZ controls. It pans and tilts with the left joystick and zooms when you pull the right trigger and zooms out when you pull the left trigger. (Note that for this particular camera, zoom is purely software, but on an actual zoom cam it would work the optical zoom).
And there you go I saved myself $500 vs. getting one of those fancy joystick camera controller things.
I have a fancier PTZ ONVIF-compliant camera on order which is the real reason I wanted to try this out on the smaller cam.
A family member upgraded his stereo and offered me his Peachtree Audio Decco as a hand-me-down. I couldn’t say no because my previous hand-me-down has recently become buzzy. But, in order for it to work with my home automation setup, I needed to be able to turn it on and off, switch inputs, and change volume from my Home Assistant home automation system via my Raspberry Pi. I useLIRC for this but there is no remote config for the Decco. So I used the remote and recorded the pulses.
Using irrecord didn’t go that well. The dots were coming in but very slowly. I’d have to sit there for 10 minutes pressing in order to get enough dots for it. So I used mode2 to record raw commands on my pi. Then I hand-edited it to have the right format for a conf file and then ran irrecord -a on it to convert it to actual codes.
Since the LIRC remote DB hasn’t been updated since 2018 and has a few open merge requests, I figured it’d be easier to just post the file here for the next person who needs it. It works great. Here you go.
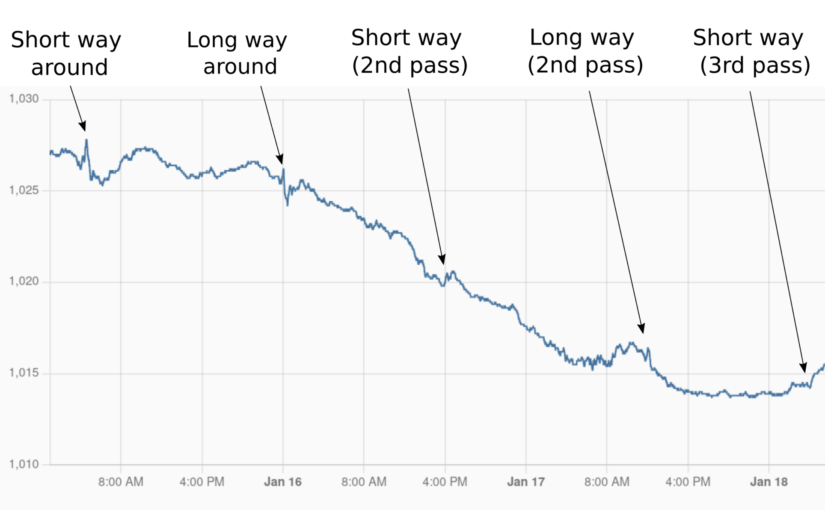
The Tonga eruption on January 14, 2022 sent a big shock wave out in all direction in the atmosphere. I had once read about how the Krakatoa eruption shock wave was measured 7 times going around the world, so I wondered if I could measure it with my weather station. Sure enough, I could!
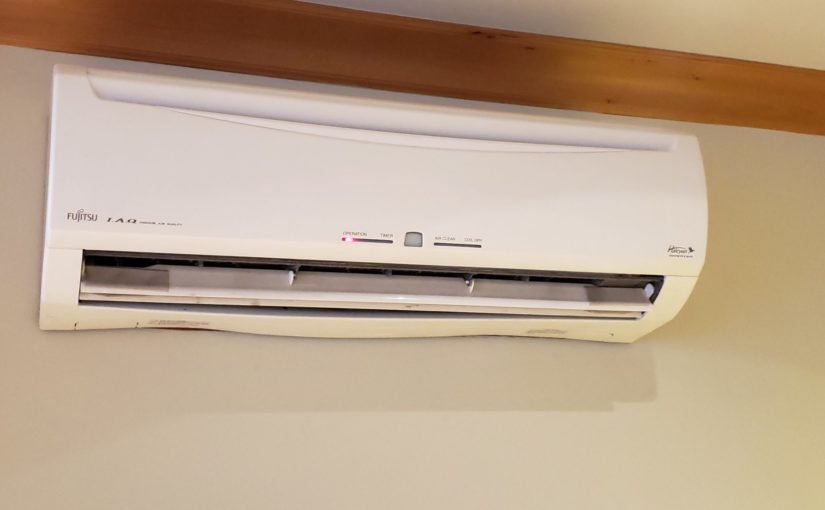
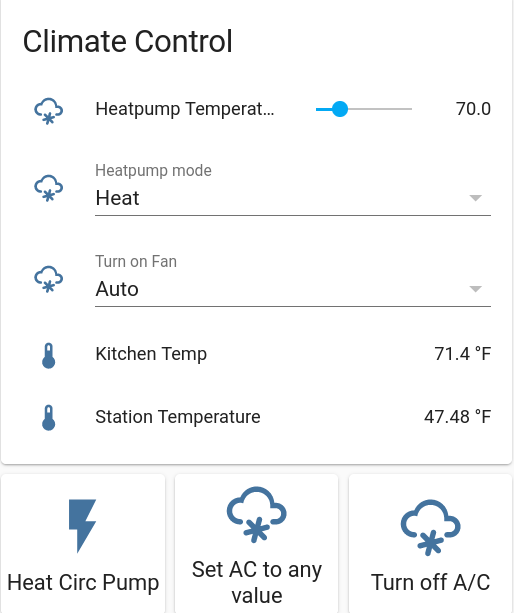
I have some of those mini-split Fujitsu heat pumps in my house that have infrared (IR) remote controls. This post explains how I set up my smart house to be able to automate the heat and air conditioning with a raspberry pi and Home Assistant.
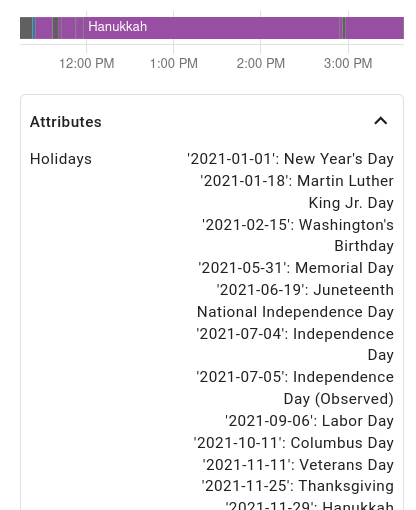
I rigged up some holiday lights that switch between a number of color palettes based on what holiday is coming up next. I used a $25 light strip, a $5 WiFi microcontroller (ESP8266), and Home Assistant to make it all happen.
Setting up the light strip
Using a “NeoPixel”-like addressable RGB light strip is pretty well-covered online these days. I got this waterproof one. I plugged in one of my ESP8266’s and loaded it up with some demo code from the FastLED library. I bought an outdoor waterproof enclosure for the 5V power supply and ran outdoor wires in a small trench over to my fence, where I then used one of these outdoor wire coupler things to both protect the connection and store the ESP8266 itself.