I’ve always wanted a weather/air quality station. So I built one. Here it is.

I’ll basically detect whatever I can get. Here’s the parts list so far (expected to expand):
- PIR Motion sensor because maybe I want to know when people walk by the sensor box
- Si1145 Sunlight sensor for Infrared, Visible, and Ultraviolet light. Conveniently using this Grove library to interface.
- LIS3DHTR 3-axis accelerometer. I read that this one might have the noise and sensitivity characteristics needed to try to measure some seismic activity (I live in Seattle, after all)! Notably I did not research this very seriously so we will see. Note: this chip has three analog-to-digital inputs but they are not available in the Grove package that I got. Prefer Adafruit)!
- BME680 gas sensor for Temperature, Humidity, Air Pressure and Volatile Organic Compounds (a rough measure of air quality)
- HM3301 Laser PM 2.5 Air quality sensor for measuring particulates in the air at sizes PM1, PM2.5, and PM10. This will be really useful to have one outside and one inside during fire season so I can see how dangerous the air is outside and how well my air filters are doing inside.
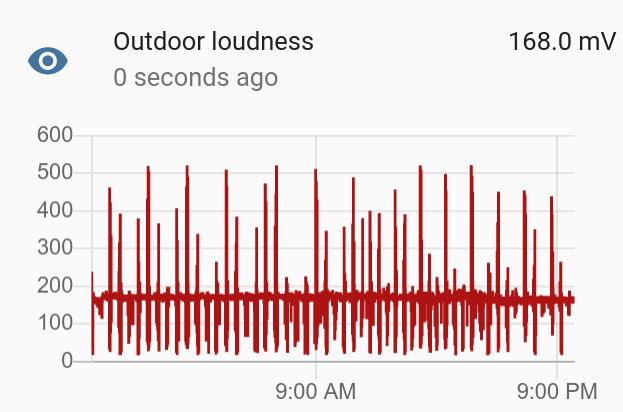
- Grove Loudness Sensor for keeping up with traffic noise, fireworks, landscaping, air traffic, etc.
- The ESP8266 Microcontroller. I absolutely love the ESP8266 for being the brains of things like this. I had used one for my doorbell sensor, my mom’s boiler controller, and various other things. Programming this to read all these sensors is a major part of this project.
- MH-Z14A NDIR carbon dioxide sensor (up to 5000 ppm). This is more interesting on the indoor unit than the outdoor unit, but fun nonetheless
- Geiger Counter with USB interface. I had to reverse engineer the protocol coming out of this USB port and was able to do it using pyusb but that’s another post in itself. Unfortunately, I don’t think I can actually read this USB port too easily on the ESP8266 so I might have to slap a Raspberry Pi in here, or some other USB interface. This is a big TBD.
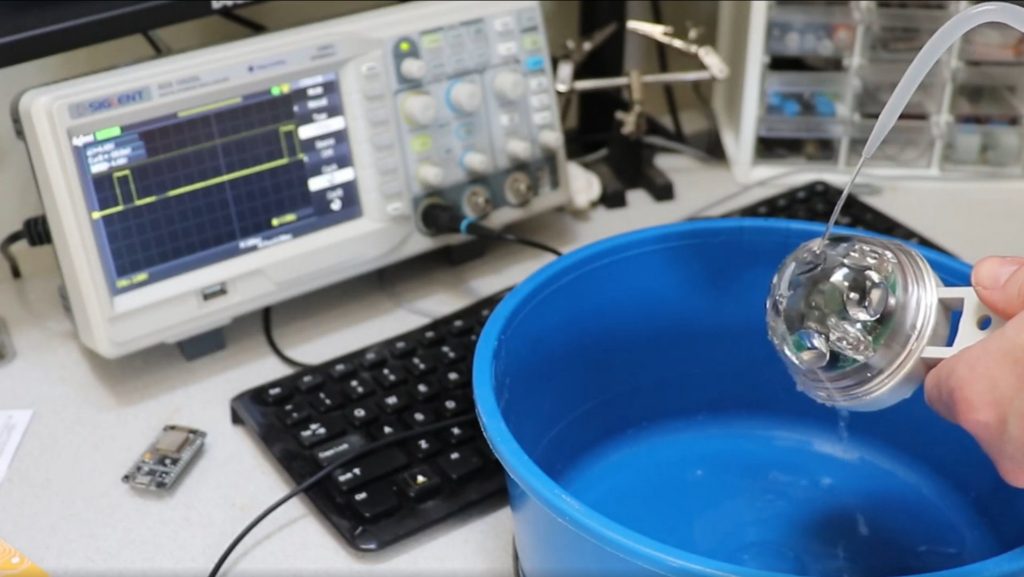
- (Not pictured, see below or rain sensor post): Infrared rain sensor from Hydreon in MN. This is actually a sweet sensor. It shoots IR light around the dome and when water hits it, refraction of IR changes and the response at the receiver can pick up even a single raindrop. Garsh-darned epic!
As you can maybe see, I got most of these sensors with I2C interfaces from Grove, which has a really nice ecosystem with easily-interconnectable sensors. This is my first experience with the Grove ecosystem, and I love it. Very clean. Note, however, that I2C is not good for off-board sensors (so maybe not a great choice for the sunlight sensor which should be placed higher up).
Assembling
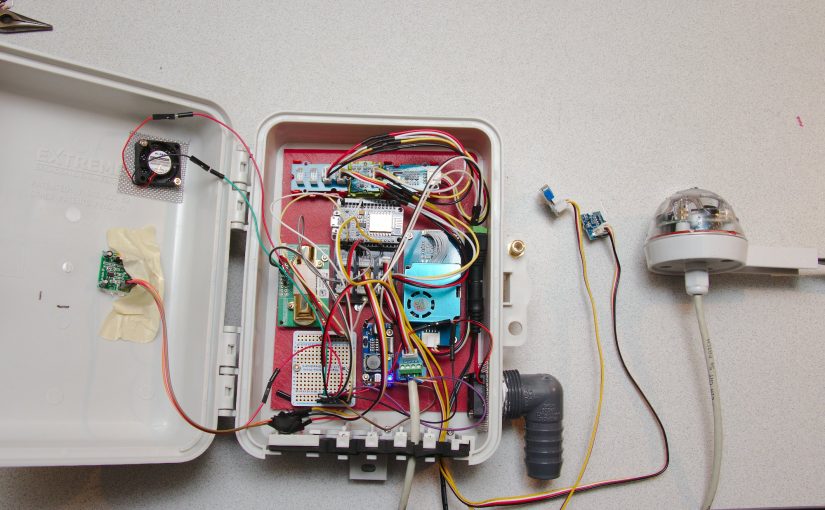
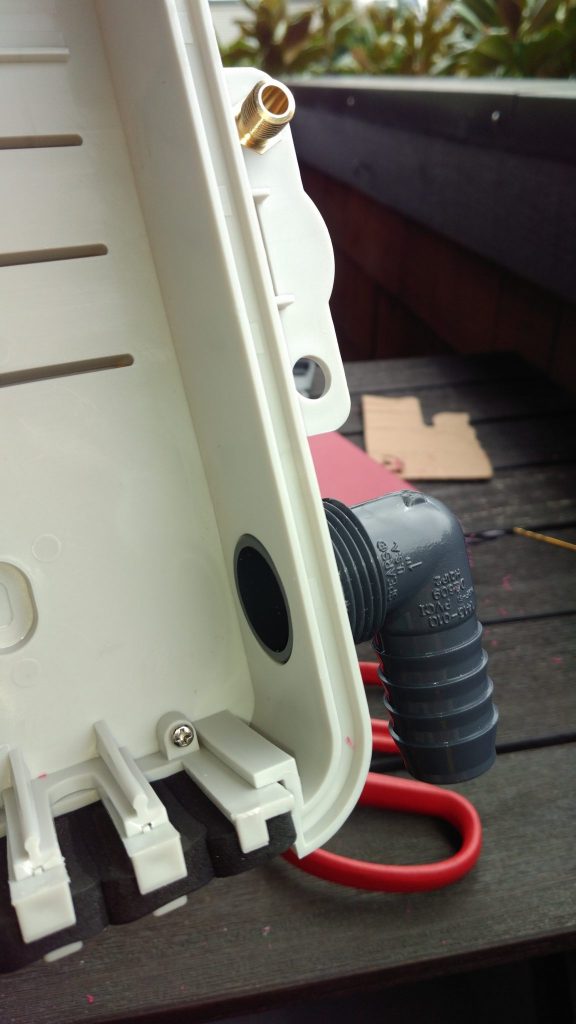
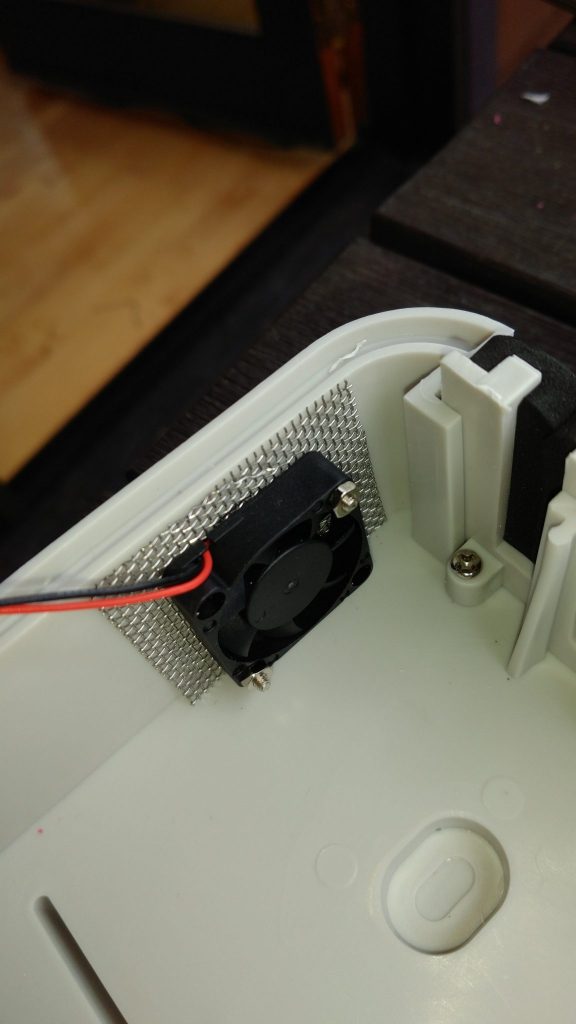
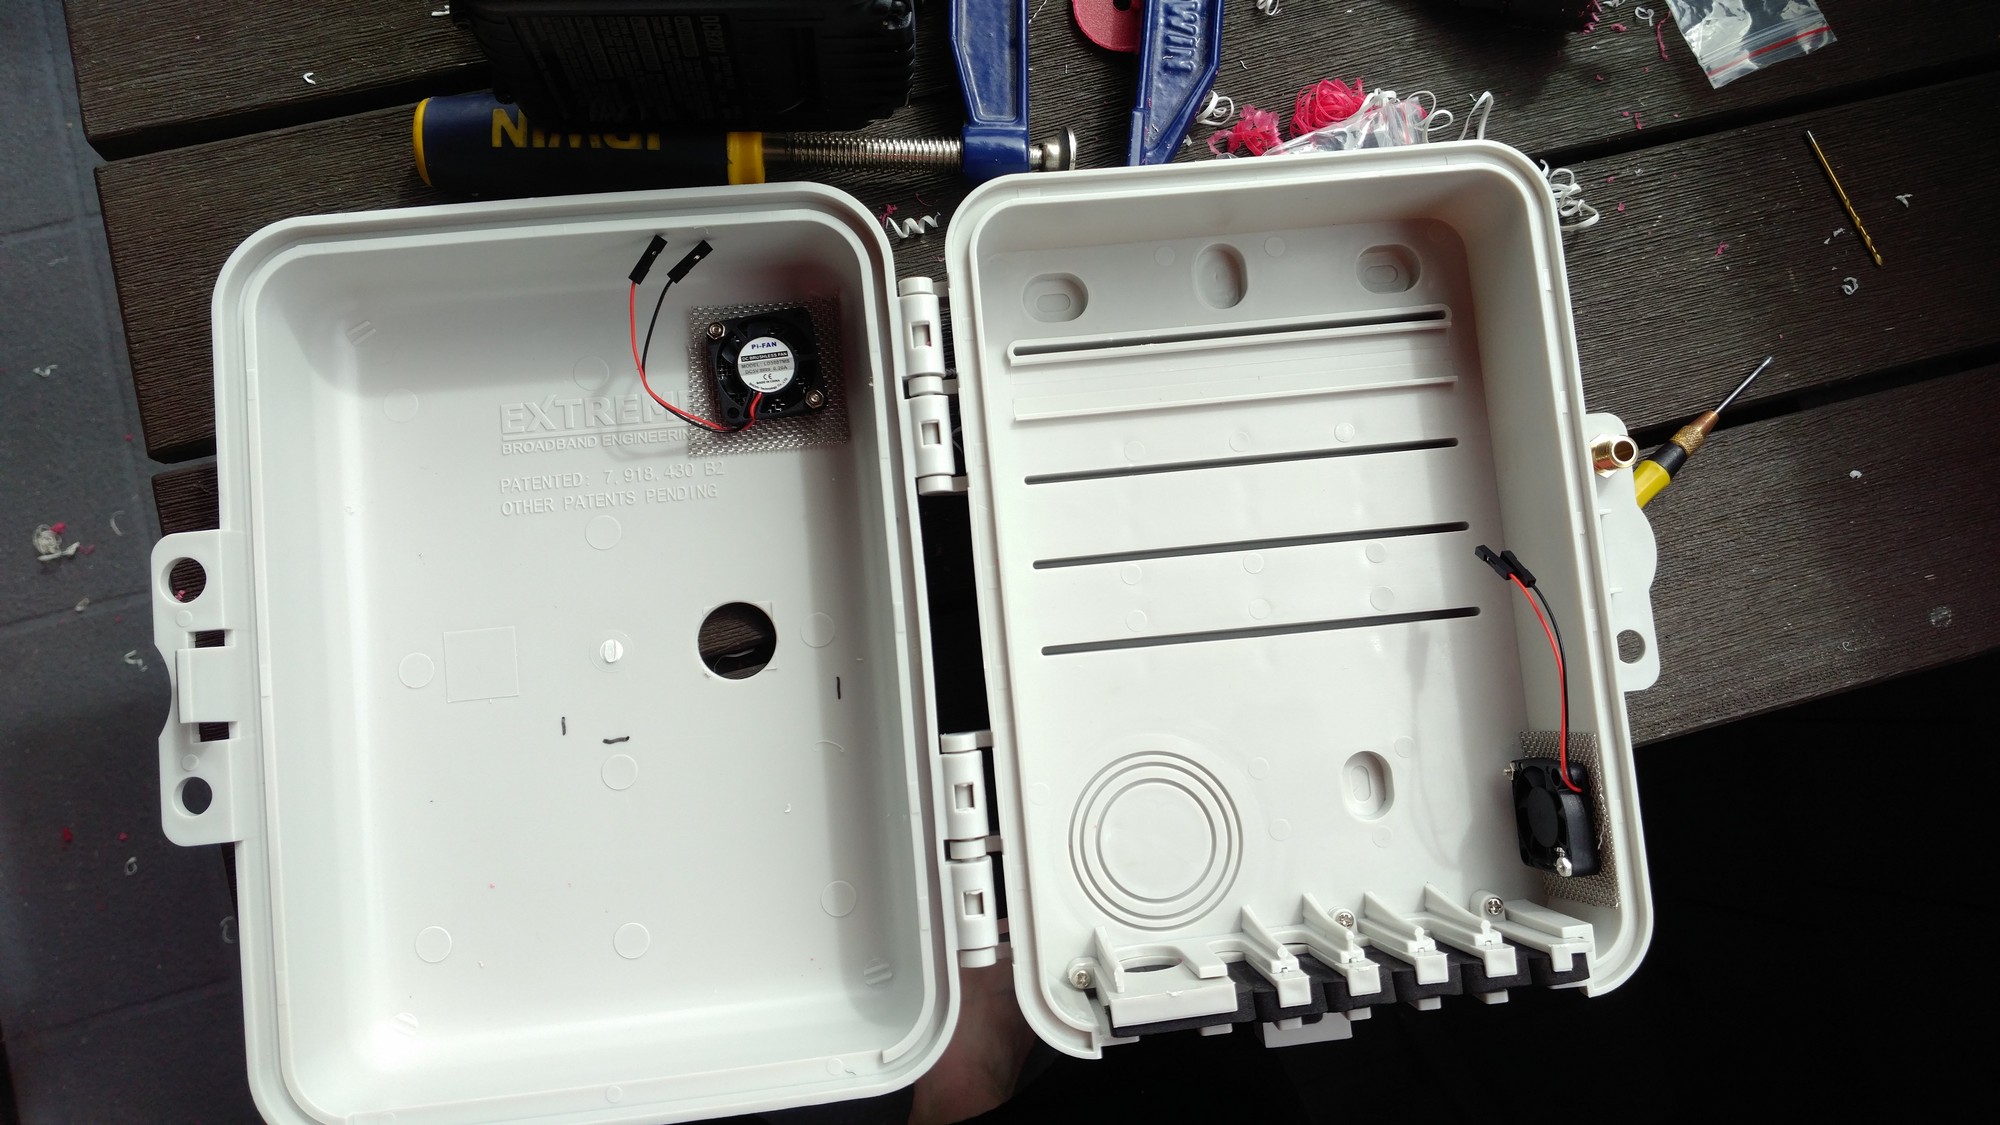
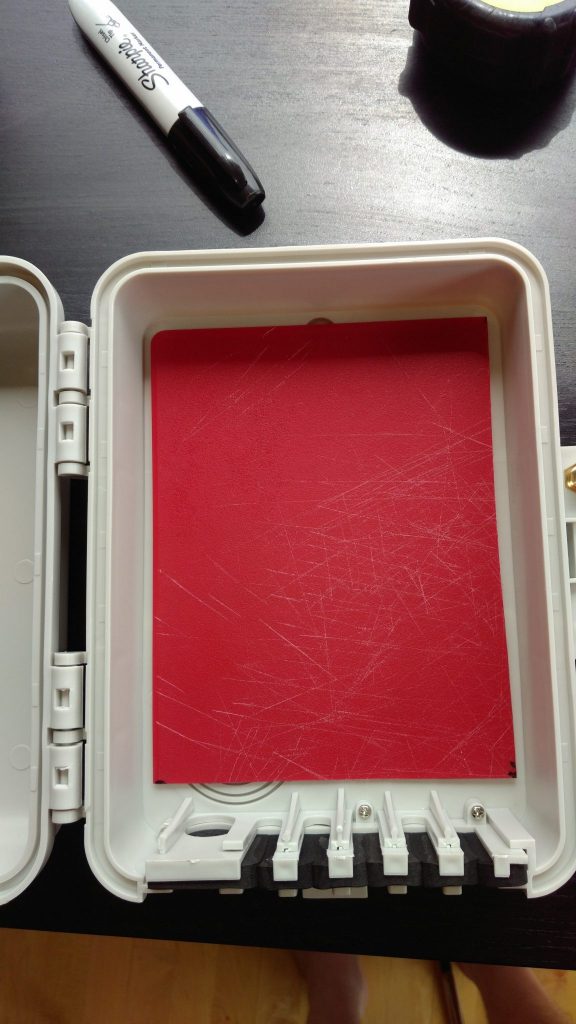
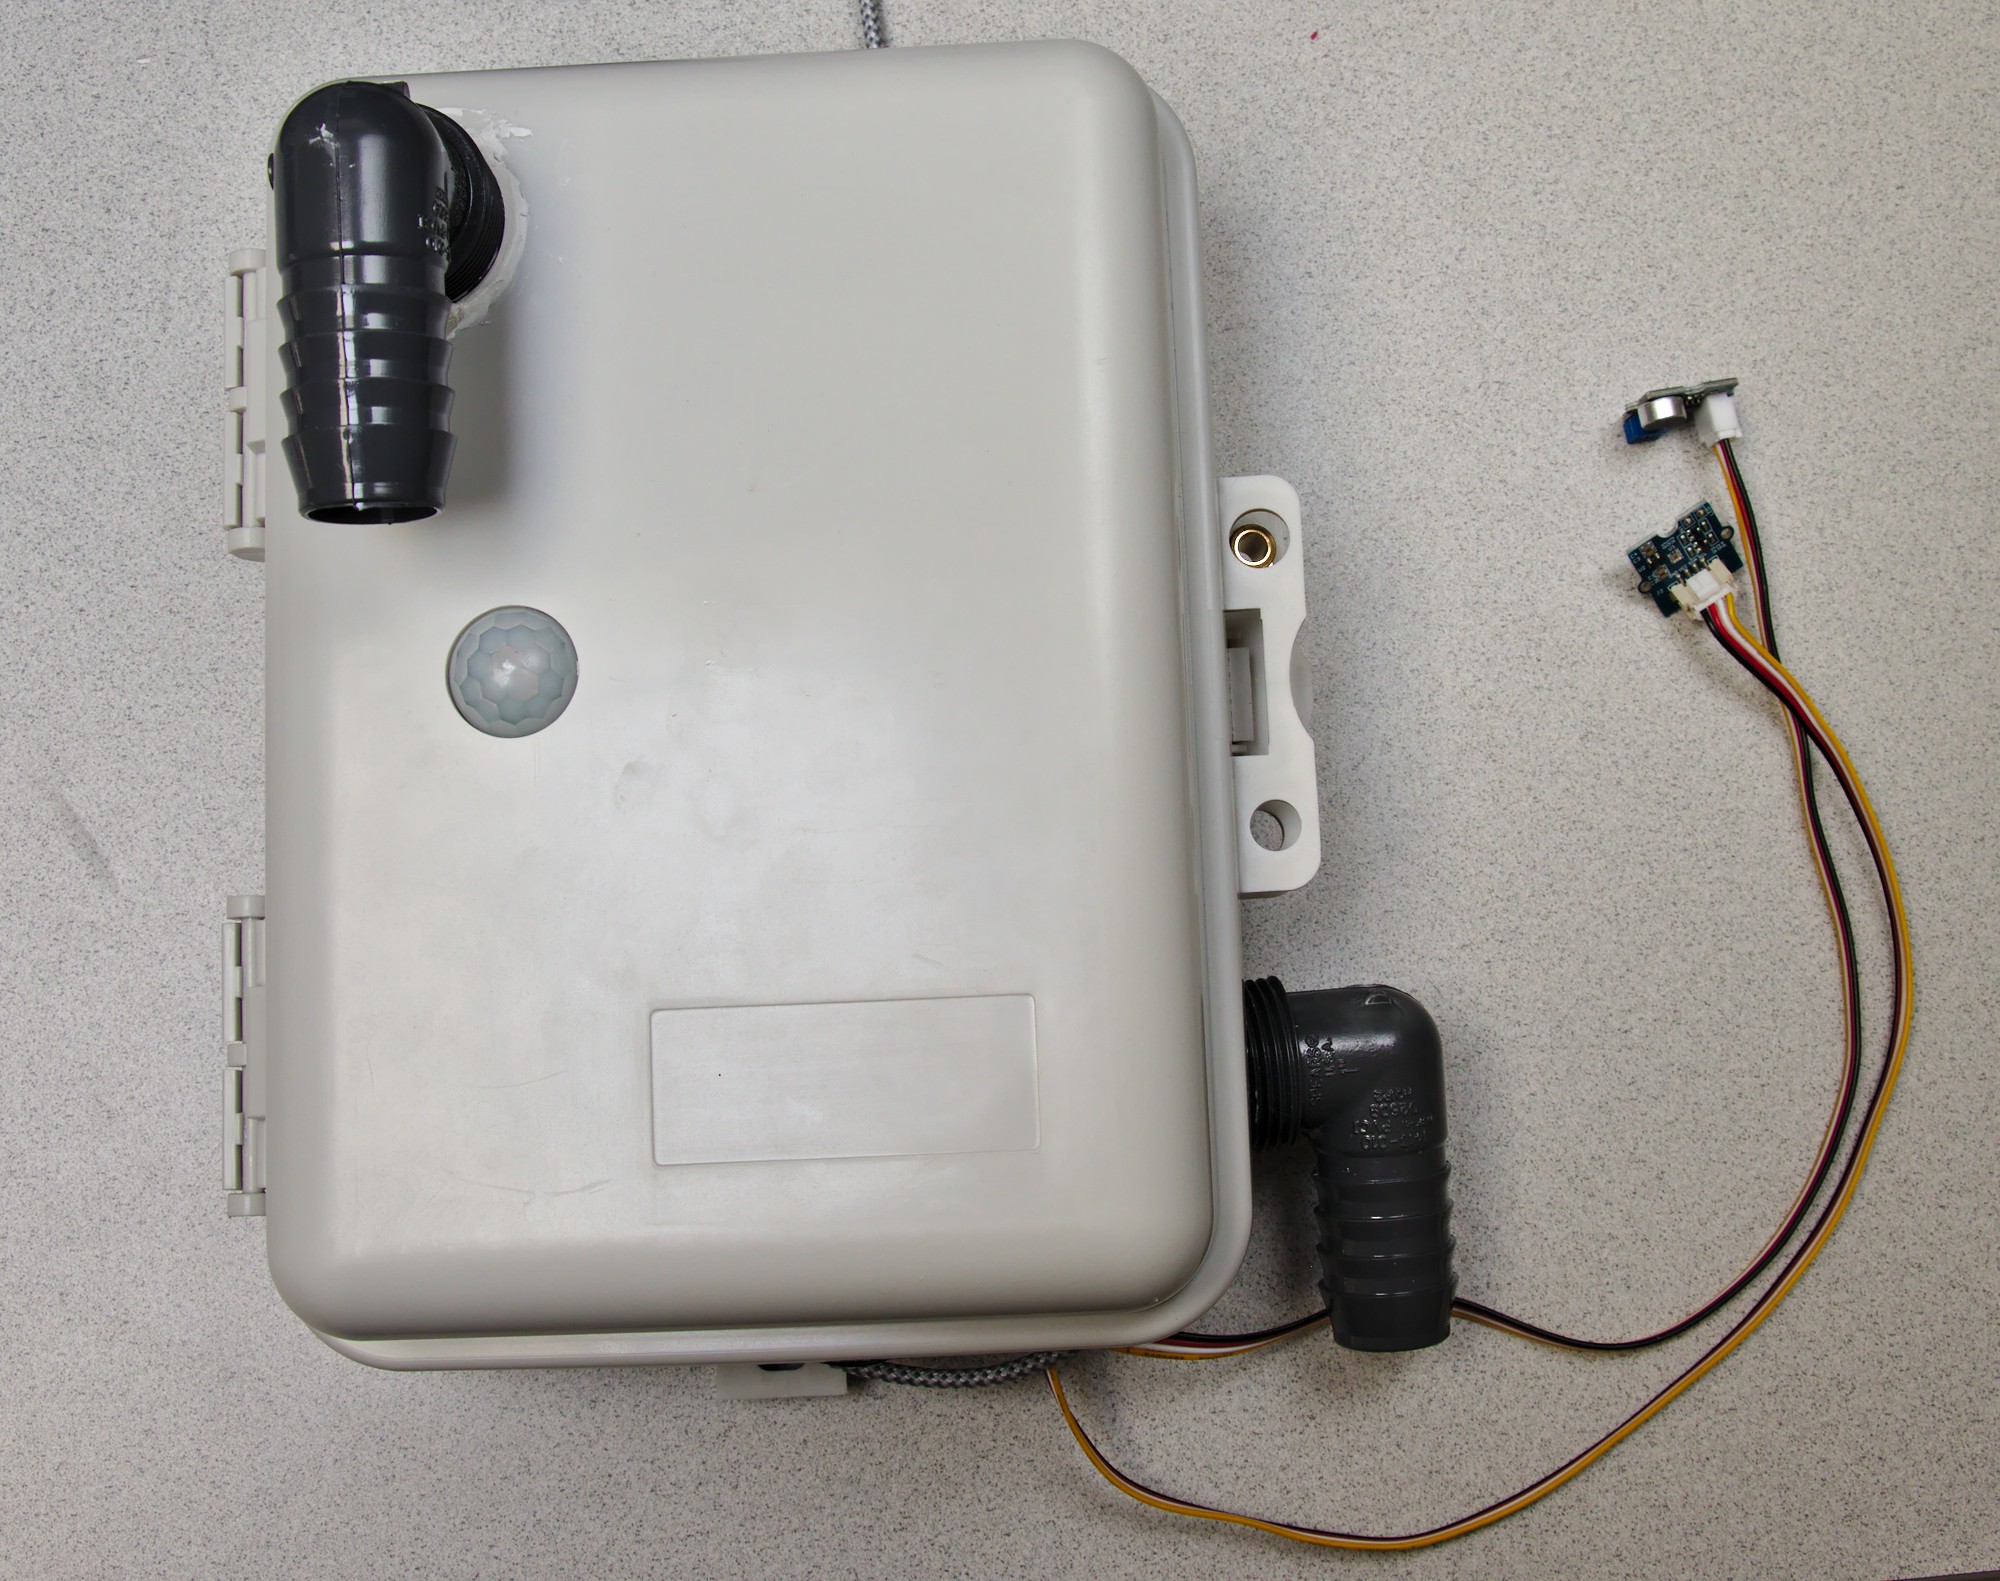
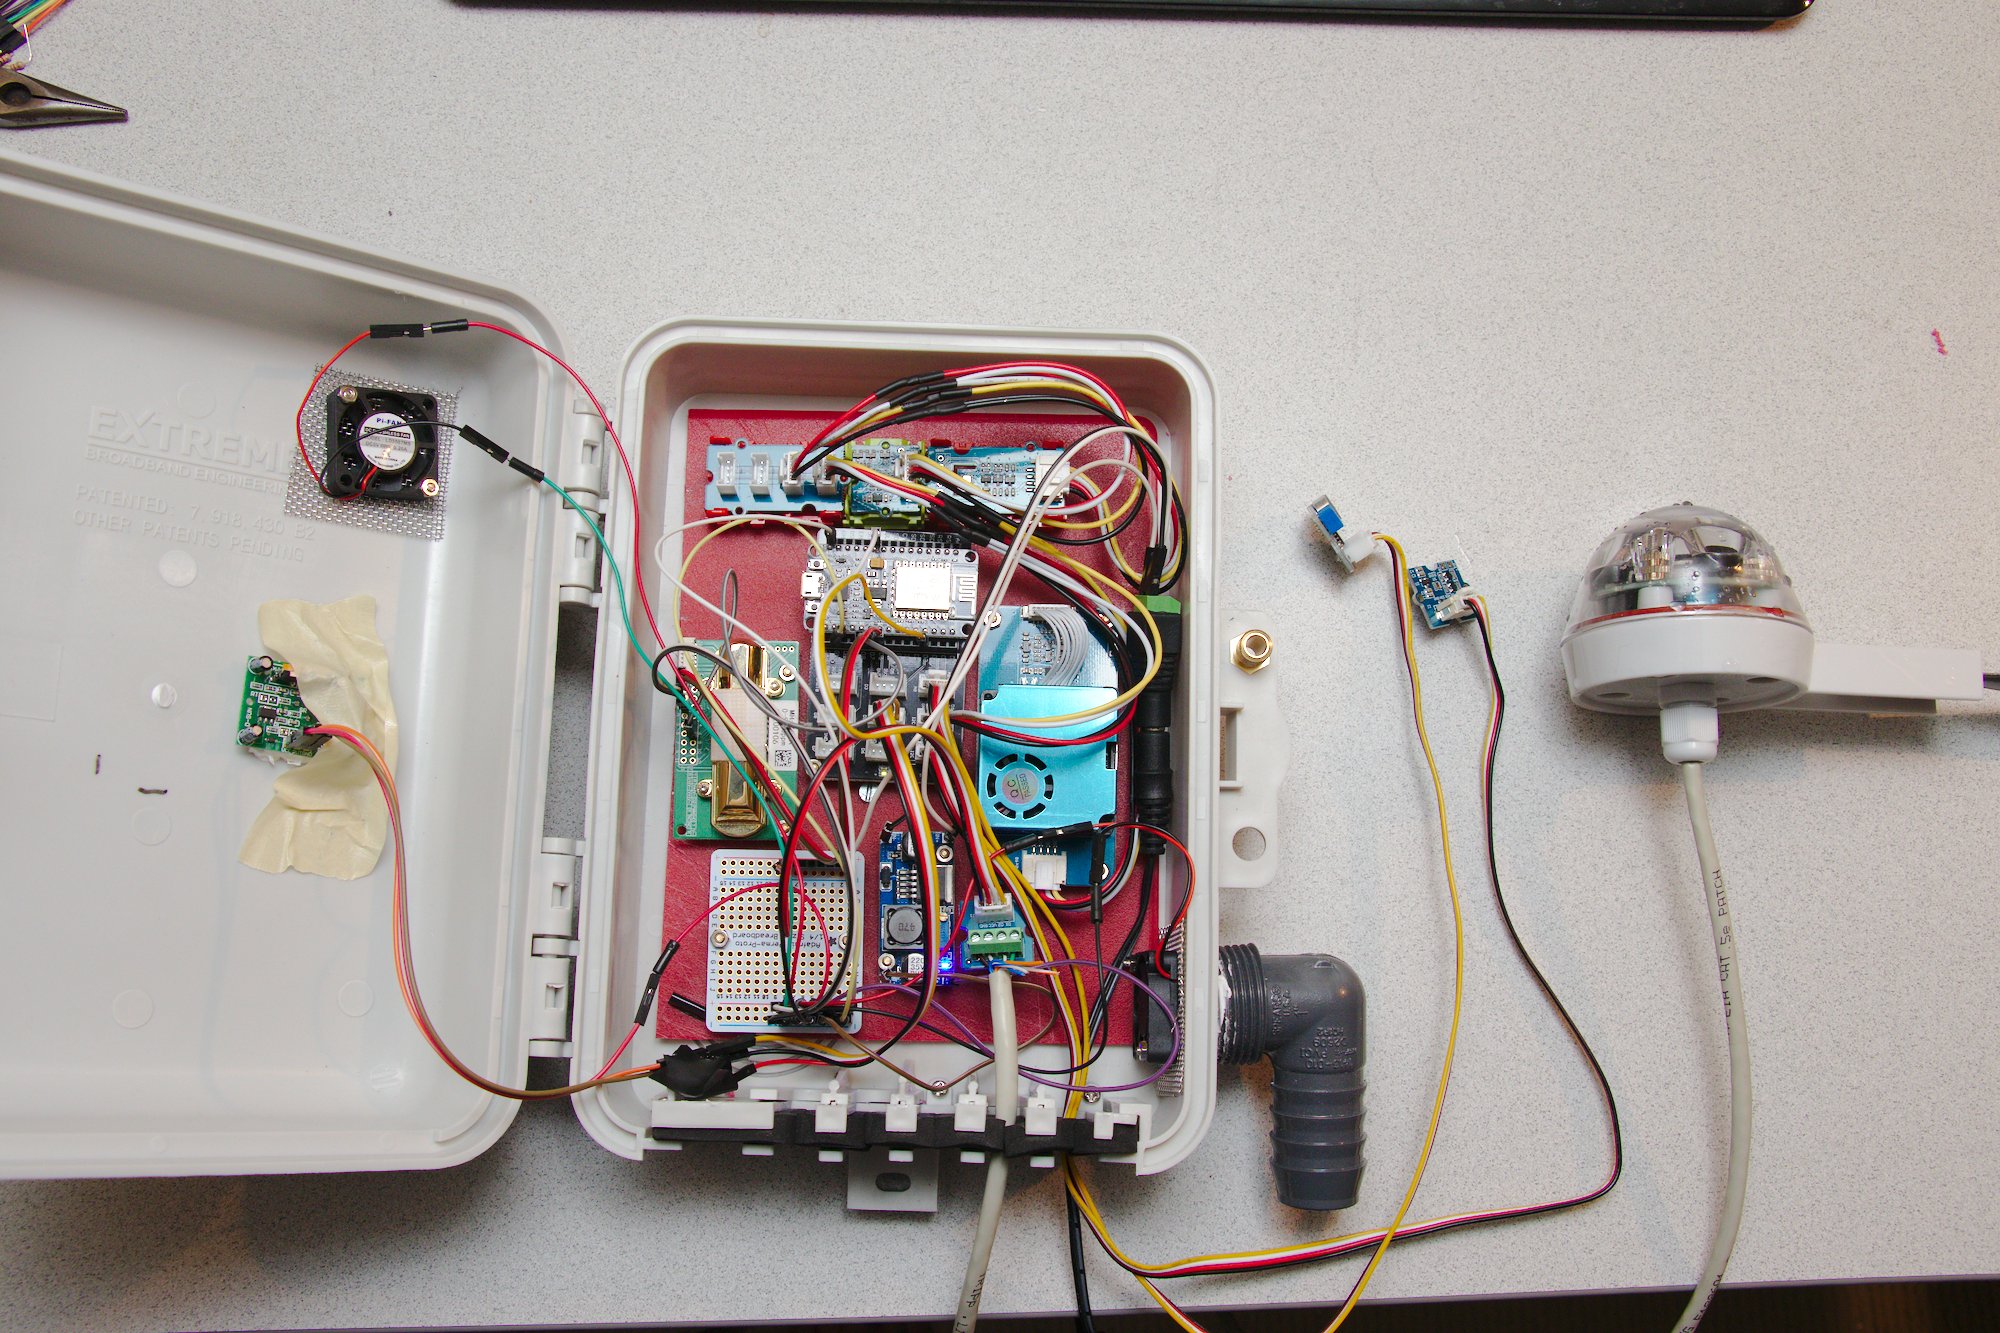
I got a cable box case for this that looked reasonable. I also decided to try out active air flow so I could keep this stuff fairly out of the weather but still getting good ambient air. It took me a while to discover that the traditional passive system for weathers sensors is called a Stevenson Screen. But whatever, I’m going to try it with fans. So I cut holes in the enclosure and put some elbows in it and caulked them. I used one of those sweet hole-cutting step bits to cut the holes.
I decided that cannibalizing an old cutting board was the best choice for mounting all the electronics and sensors.

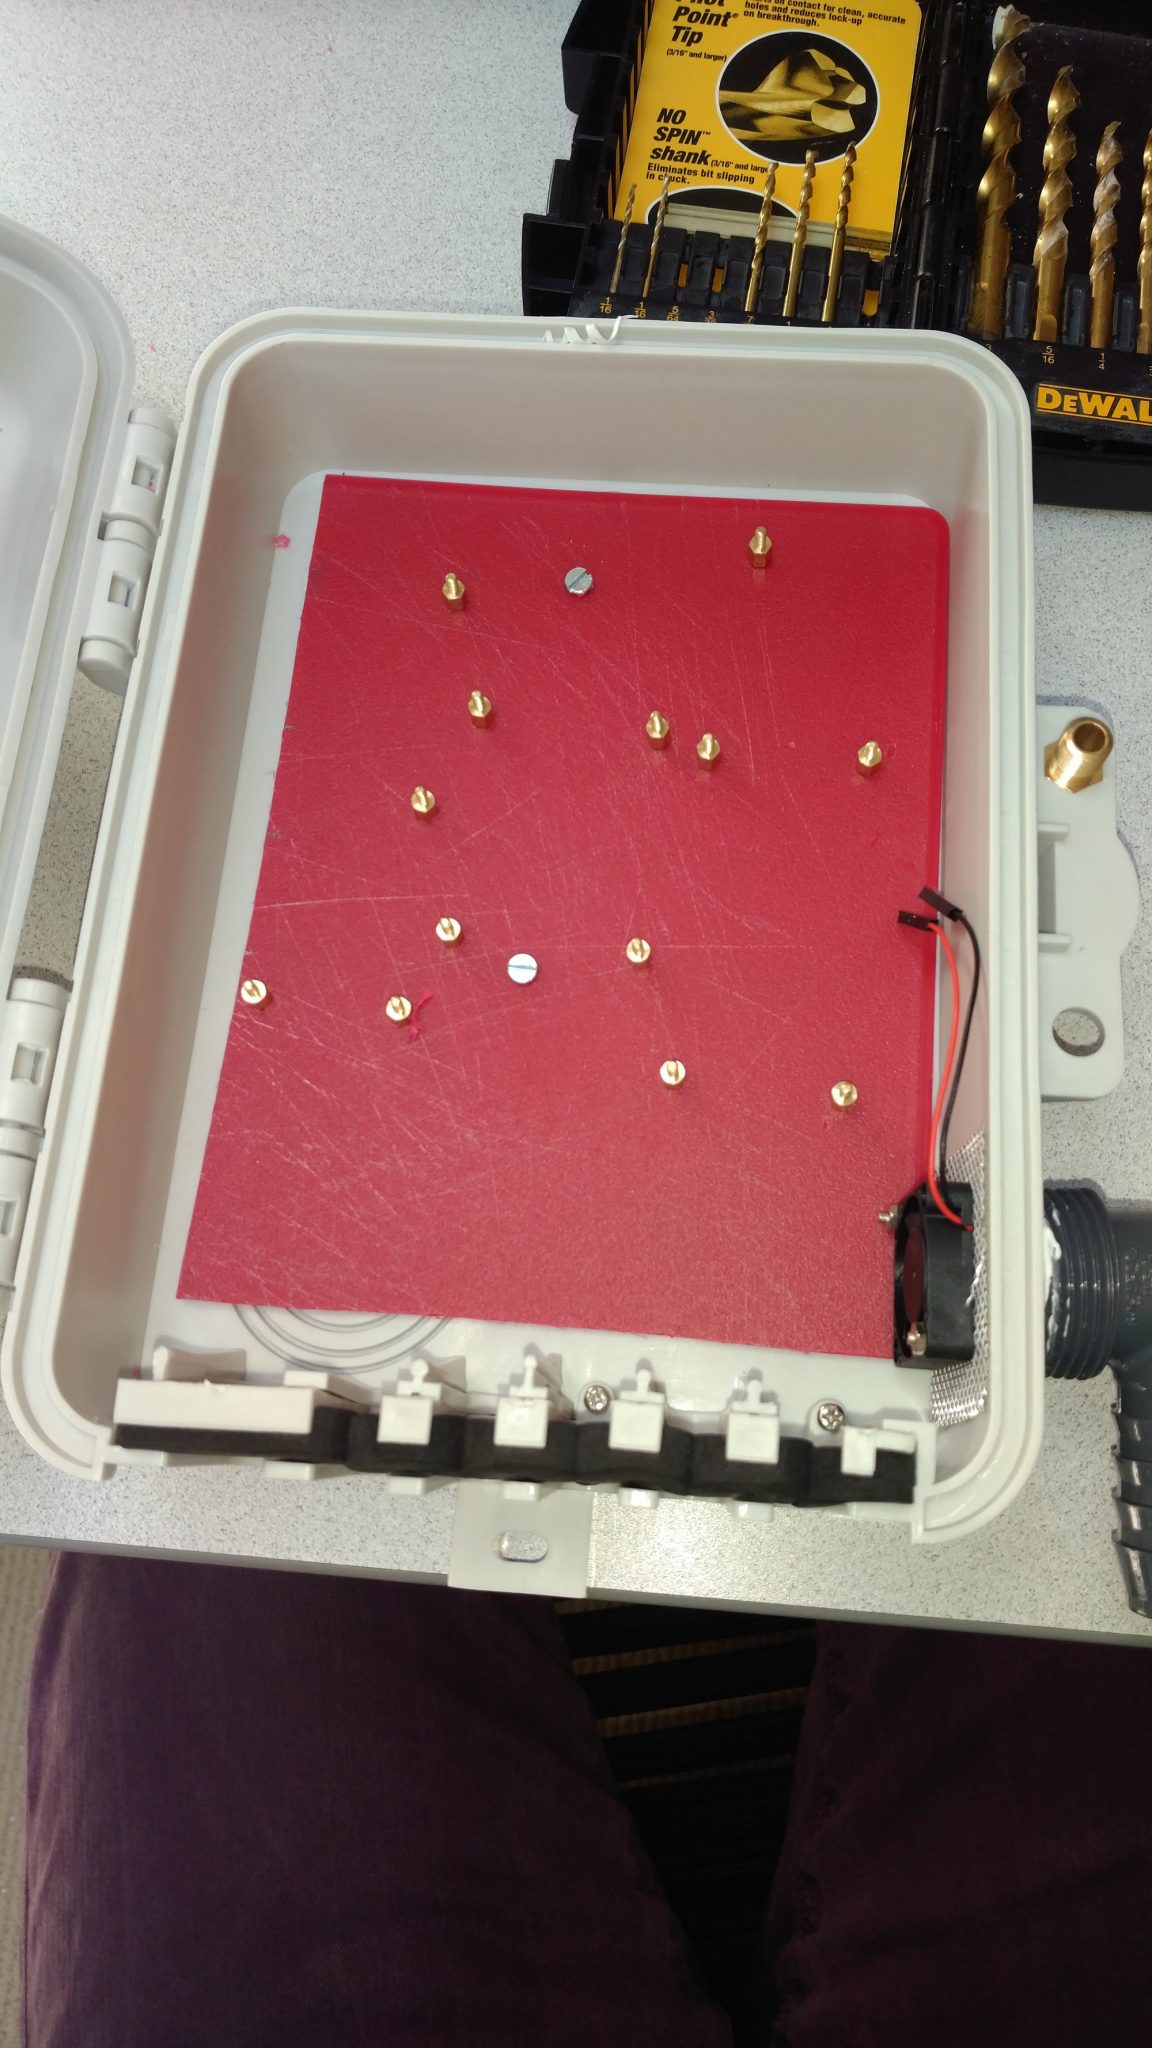
Soon I had most things in and wired up.
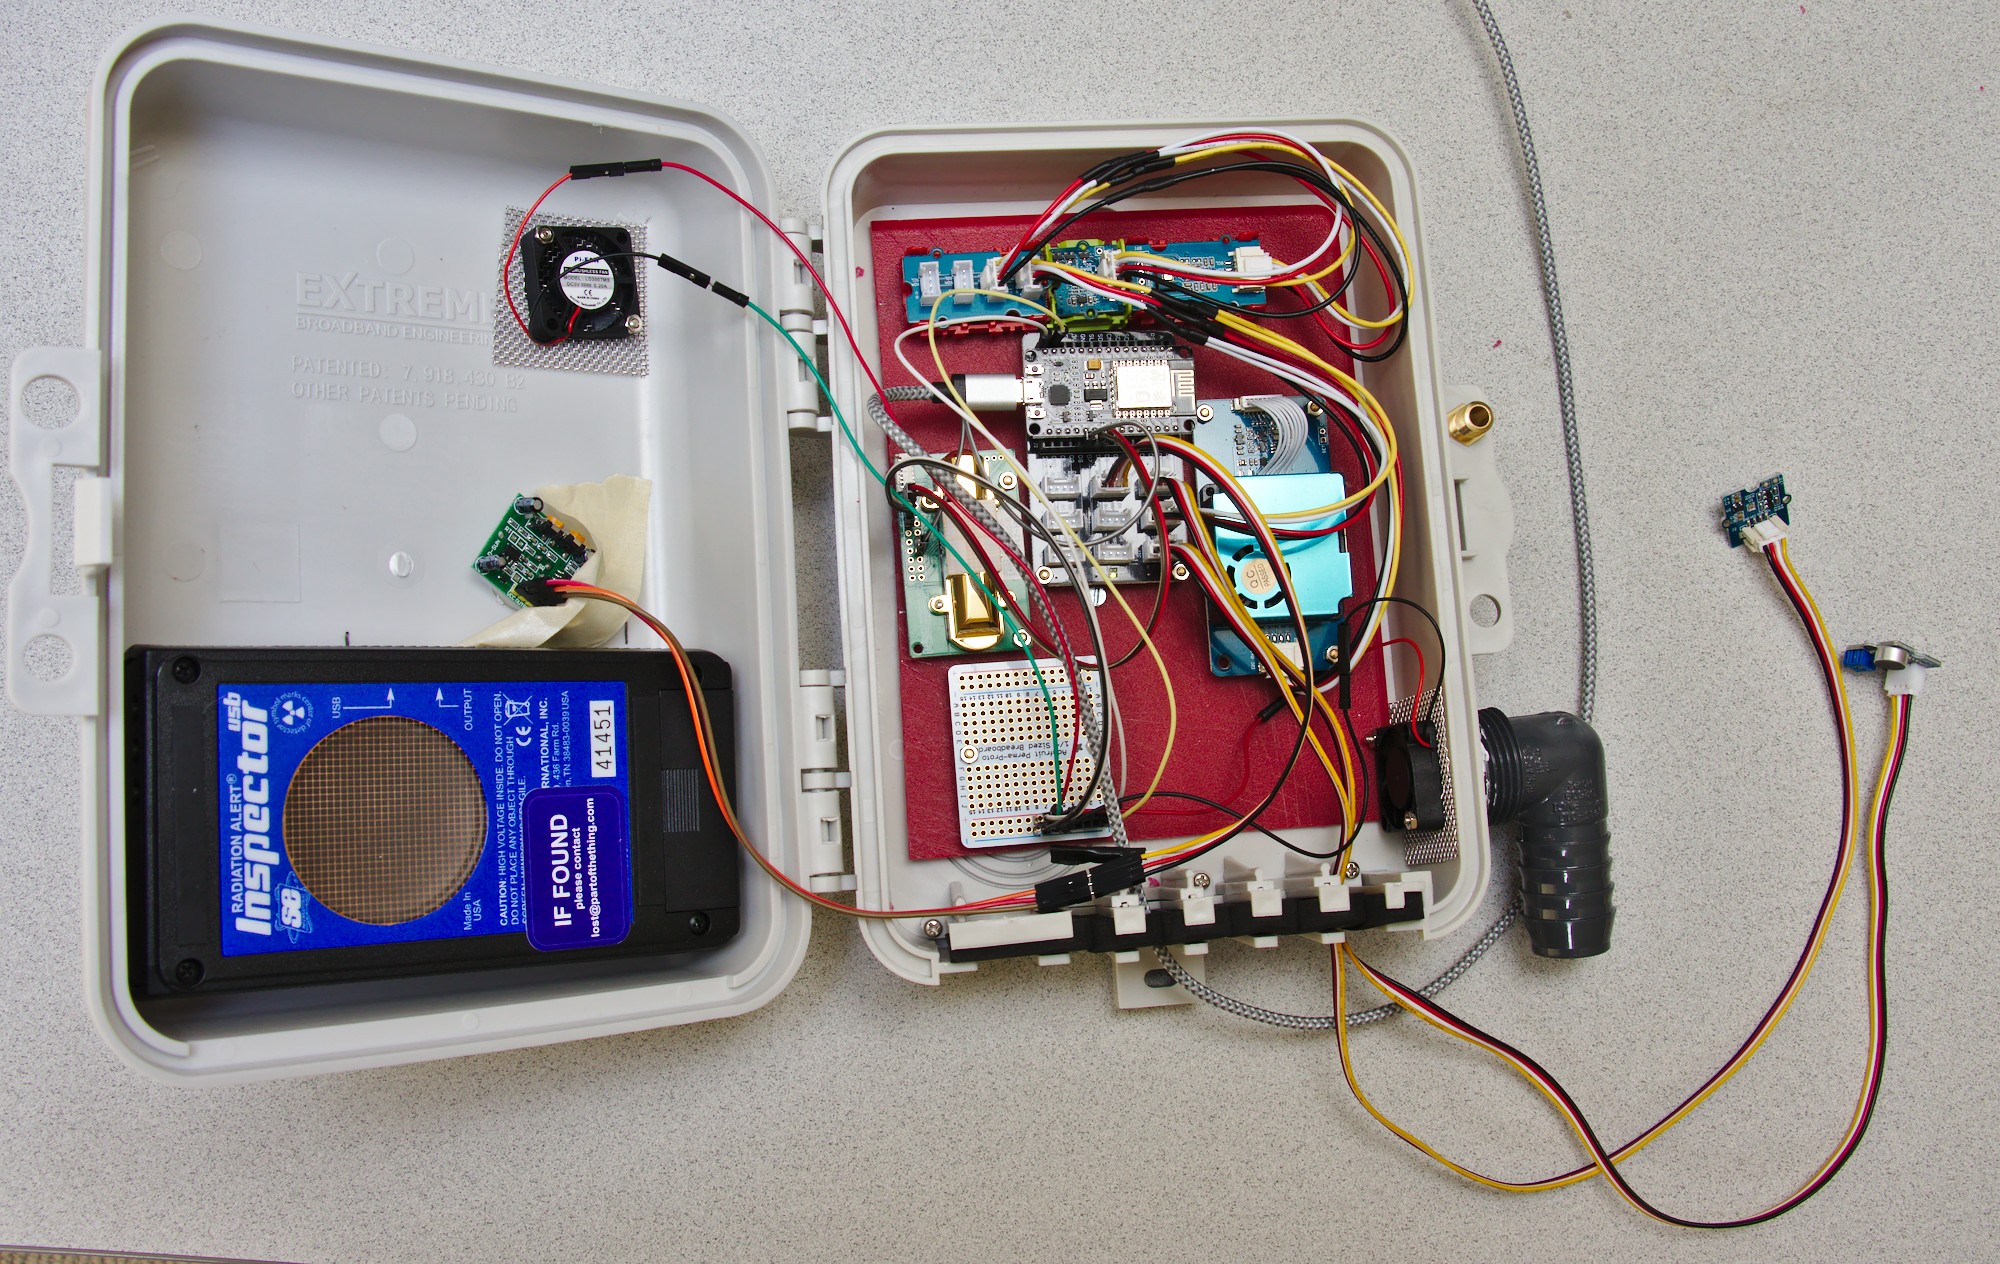
The infrared rain sensor
I got an IR rain sensor from Hydreon, which I hooked up through a voltage divider to one of the GPIO input pins in tipping-bucket mode. See post demonstrating that here. I added the voltage divider to the little breakout board pictured above for convenience. The rain sensor required 12V so I also had to switch the overall power supply of the system to 12V, which I stepped back down to 5V for the rest of the equipment using a LM2596 step-down regulator that I had around.
The board with the extra power conversion looks extra ugly:
Programming
This project requires programming of the microcontroller to collect sensor data and transmit it to the server. At a high level, I wrote code that collects data from the sensors, does a little bit of data processing, and then sends the information to my Home Assistant instance over local WiFi using the light-weight MQTT protocol.
Polling the sensors
The simple sensors are fine to just poll on some kind of interval (like every 30 seconds) and transmit the results through MQTT. On the ESP8266, a good way to do this is to use the ESP’s software timers (see §3.1 in the Espressif API documentation PDF). Four of my sensor packages use I2C, which is nearly trivial to poll from the ESP. The analog noise sensor is also trivial.
The CO2 sensor is a bit more complex. It has UART serial output which can be read using a SoftwareSerial port on the ESP. I had some stability issues with this so went with using the PWM output for a while, and that worked fine using the ESP PWM reading stuff. Even though the sensor requires 5V input, it’s interface level is 3.3V so it’s safe with the ESP’s 3.3V logic.
The rain sensor also has serial output but they say it’s experimental. The “tipping bucket” signal was easy to read on a digital input pin. It just pulses for a few ms whenever a configurable amount of rain has fallen. I set my bucket size pretty small because I love resolution. Again, see rain sensor details here.
Estimating Earthquake Magnitude from the accelerometer
This is a huge topic that’s covered by dozens of research papers from big teams of people who are thinking of building simple, cheap, and widely distributed seismic sensor networks for earthquake warning systems. Serious stuff. My current work on this is quite literally nothing compared to that body of literature.
That said, I just used a little bit of info from Understanding the Fundamentals of Earthquake Signal Sensing Networks to do my simple processing. As it turns out, a common equation for the Modified Mercalli Intensity is just a simple expression related to the peak ground acceleration.
Now to really get PGA you have to be intimately coupled to the actual ground. I could bury a concrete block in my yard and fasten the accelerometer to it rigidly to get more accurate numbers. Maybe I’ll do this in a progressive improvement phase of this project…
Anyway, so I figured I’ll just read acceleration values into buffers at 200 Hz for 5 seconds. The memory on the ESP8266 isn’t huge, but it can handle this. Then I just find the peak magnitude in that sampling period. Then I keep track of the peak peak between reporting phases. If the peak in a sampling period is notably large, I send the update immediately.
The datasheet explains that this sensor actually has 32-level FIFO buffer built-in, so rather than sitting around waiting for the sampling, I can just let the sensor stream to that buffer and grab it all instantly. Awesome. Oh but I may need to fiddle with the libraries to get that. The SparkFun library has examples on how to use the FIFO so I switched to that library.
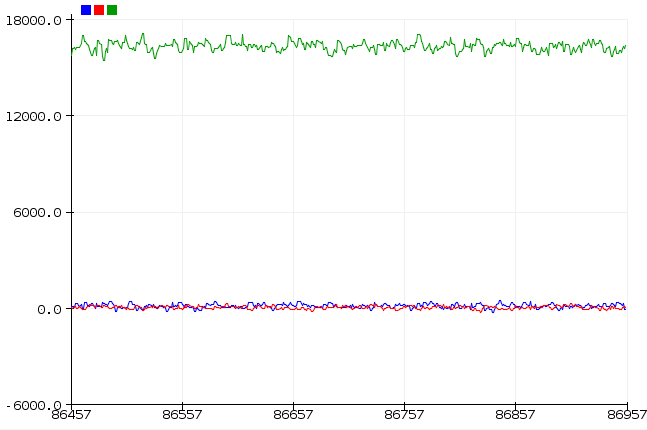
Notably, the z-axis readings seem to be about 2x as noisy as the x- and y-axes in this mode.
Processing the analog noise signal
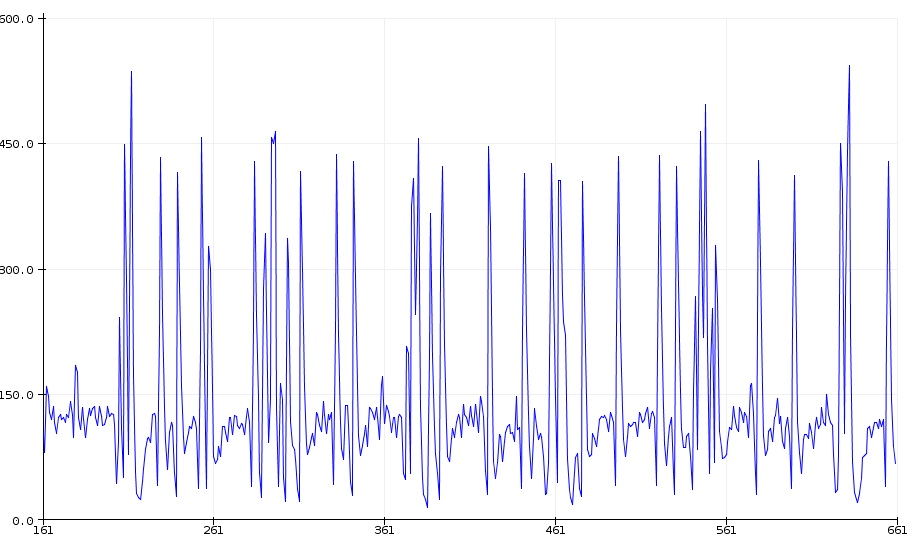
The noise sensor just give analog voltages. At first I just had it read a single value at the same slow interval as the other sensors. I got kind of weird data that looks a lot like what you’d get sampling a noisy signal:
I plotted raw values from the ADC and saw huge spikes pretty regularly.
This led me to others who had a similar issue. I knew I had turned off Wifi to read analog readings on the doorbell. Well anyway, (I thought to myself) there are a few ADC pins on my accelerometer chip so let’s just use one of those! Well unfortunately the Grove version of my accelerometer does not have breakout pins for the ADC inputs, so they’re totally inaccessible in this package. Damn. Guess I should have gone with Adafruit! So I went ahead and ordered the Adafruit one as a replacement…
Motion sensor
The motion sensor gave spurious values when powered at 3.3V so I switched to 5V. It also could not be put on D3, but worked fine on D5. Oscilloscope showed all sorts of strangeness on D3. I used interrupts to make sure motion alarms get triggered immediately, regardless of the report interval.
Data logging, visualizations, and automations
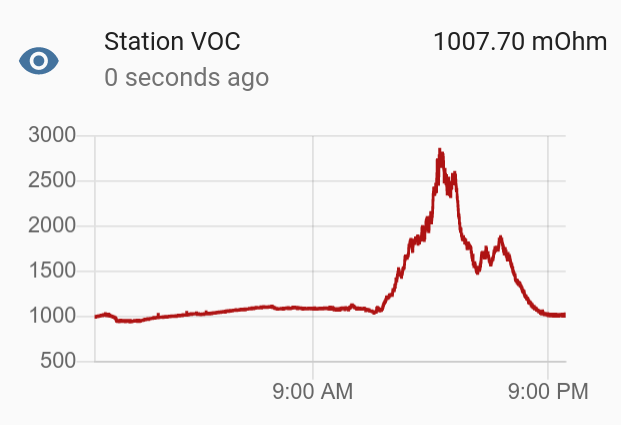
I also had to configure the server to process and respond to the data. As usual, I used the inimitable Home Assistant for this. Here’s some data from the VOC sensor one day:
The indoor CO2 sensor is a ton of fun given all those papers we keep seeing about how CO2 makes people more tired and stupid and grumpy. So that’s the problem!

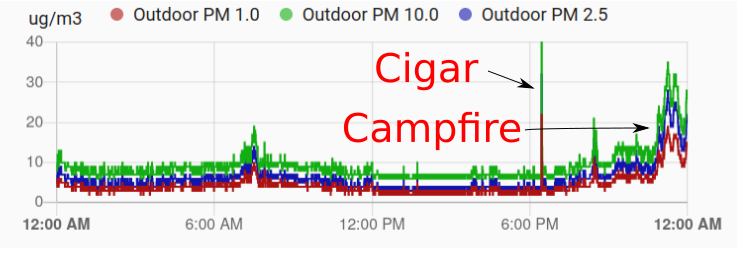
My neighbors have a cigar pretty much every night. I wanted to see if the PM2.5 sensor could detect it. Sure enough!
And one night someone was burning an outdoor fireplace and you could just barely sense smoke in the air. The sensor saw it beautifully.
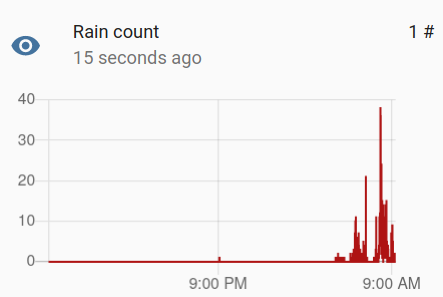
Here’s some more rain readings from the IR rain sensor:
Things I learned along the way
- There are lots of pretty awesome sensors out there these days, and the Grove ecosystem is really nice
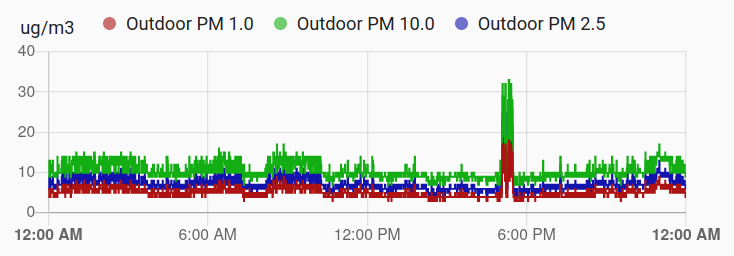
- Having similar air quality sensors inside and outside is lots of fun, and will be actually useful come forest fire season
- I had never reverse engineered a USB protocol before! (post on that later)
- I like working through the Arduino CLI so I can actually use vim to edit code rather than the Arduino GUI thing.
Other lessons learned
- Temperature sensors probably should not be in the enclosure. The temperature bumps up whenever I close it. I guess these fans are not big enough to do this right.
- The ESP8266 ADC kind of stinks, though I did handle it fine with the doorbell project somehow because that’s working great.
- If you want a sunlight sensor far away from the microcontroller, I2C connections are not the way to go. This is mostly a on-board communication protocol.
Wishlist
What’s a weather station without a wind sensor!? Well unfortunately I don’t have a great place to put one. My neighbors aren’t stoked about putting on up on the roof, and I don’t really want to deal with the project of grounding such a thing anyway. So I won’t have wind for now. But as I looked, I did discover these compact ultrasonic wind sensors that you can get (pretty pricey though).
Geiger counter integration is still really TBD.
Along the way, I found some integrated 11-sensor packages that basically offer most of the readings I’m getting in a $1500 package. Get your own! Of course you’ll still have to program a reader 😉
Hot tub water chemistry sensors might also be nice!
Anyway, this was a really fun project so far and I look forward to learning more from the readings.
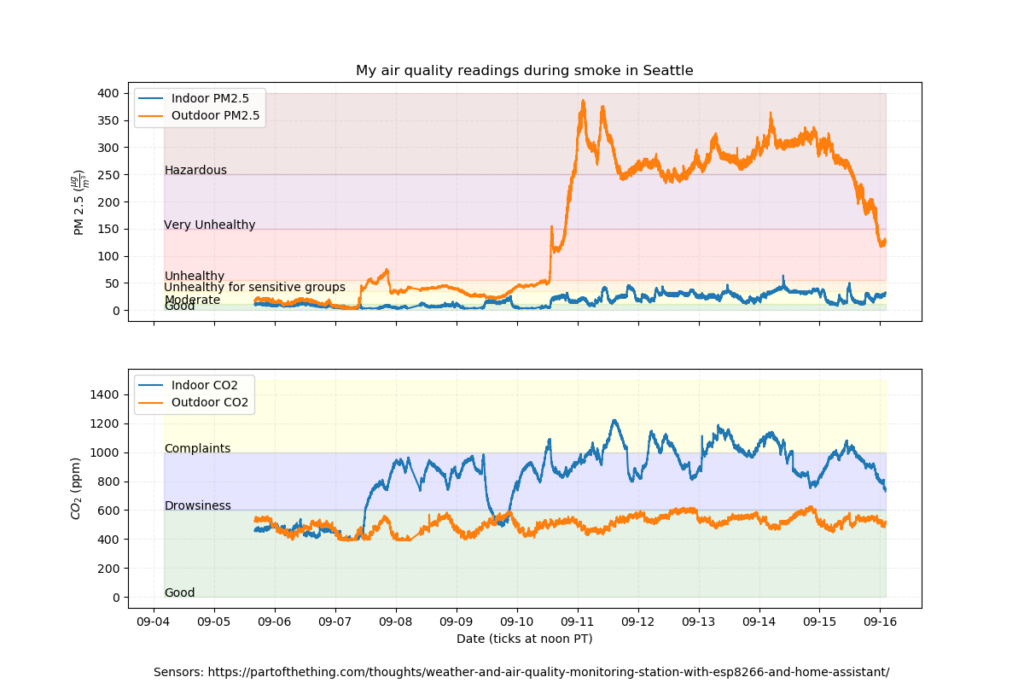
September 2020: Updates for Smoke Season
As the forest fires roll in here in Seattle my indoor and outdoor versions of this have been very useful to help see how hard I should run my box fan/filter combo. Here are my CO2 and PM 2.5 readings indoor and outdoor as the smoke blew through over the past 10 days.
Hi, your feed stopped updating on Nov 17, so this doesn’t appear on RSS.
Just thought you might want to know!
Yikes, thanks! I will look into it.
EDIT: I see it updating with this post. What URL of feed are you using? Maybe it’s a category feed or something?
Hello,
I’m Searching
Outdoor Air Quality Measurement Stations
that can constantly measure:
Concentration of Pollutants:
1. SO2,
2. NO2,
3. PM10,
4. PM2,5,
5. PM1
Meteorological data:
1. Temperature,
2. Humidity,
3. Atmospheric Pressure
Saludos Cordiales / Best Regards
Ronn Andreasen
Mobile / Whatsapp: +34 629 042 485
Hello Nick, I just came across your blog/website while I was searching for a home audio system (snapcast…). You are using I2C as your data bus in your project here? One comment of yours was about long wire capabilities of it…not being suitable. You are right…in principle. I am running though a home automation system on a I2C since 15 years accross my home with 100 m of cable length…meaning I use the I2C with long cables. If you need info about it let me know. Cheers, cal
Hi there. Yes it’s I2C. Wow good to know there may be some ‘wiggle room’ in the official limitations! That’s impressive. thanks for mentioning.
Hey Nick!
I’m new to embedded systems and planning on a similar set-up, is that a breadboard with ribbon cable pin-outs that’s hooked up to the ESP8266?
Do you have a part number for it? Or is it custom?
Thanks!
Hi! The ESP is hooked up to the ‘grove’ system with this thing: https://www.seeedstudio.com/Grove-Base-Shield-for-NodeMCU.html