I have a website or two and sometime wish I could get notifications whenever someone visited them, just for fun. Well I did it, and now I can get beeps in my home whenever anyone visits. It’s kind of cool to hear it go off, though normally it will be annoying, so we need a switch for it.
Author: ntouran

Adding rigor to information analysis in the era of Fake News and Alternative Facts
Collecting information about our surroundings, analyzing it to make conclusions, and then performing actions based on those conclusions is the definition of life itself. Organisms generally care most about their food source, dangerous strangers nearby, environmental changes, and family planning. For example, the rabbit pays attention to nearby gardens, the closest rival warren, any nearby foxes, human constructions, and potential lover rabbits*. The human was concerned with roughly the same things for years immeasurable, but since the Bronze Age, as we spread out globally and invented neat technologies, things became a bit more complex.
Continue reading Adding rigor to information analysis in the era of Fake News and Alternative Facts
Running fortune in a Python virtualenv
I learned on reddit the other day about the sudo “insults” capability where it throws shade at you when you mistype the password. I configured it everywhere I could, but I wanted more, so I came across cowsay and fortune.
$ fortune | cowsay
/ SHIFT TO THE LEFT! SHIFT TO THE RIGHT! \
\ POP UP, PUSH DOWN, BYTE, BYTE, BYTE!   /
 ----------------------------------------
        \   ^__^
         \  (oo)\_______
            (__)\       )\/\
                ||----w |
                ||     ||
Needless to say… wow.
Enlighten your old furnace with a Raspberry Pi, Home Assistant, an ESP8266, and some relays.
My mom has one of those on/off furnaces (EDIT: actually it’s a boiler) that heats up water and circulates it through pipes around the house that have little radiator fins. She wants it to turn on before she wakes up so it’s not so cold in the morning. In this post, I explain how to turn a normal furnace into a smart furnace controlled by Home Assistant for only a few bucks.
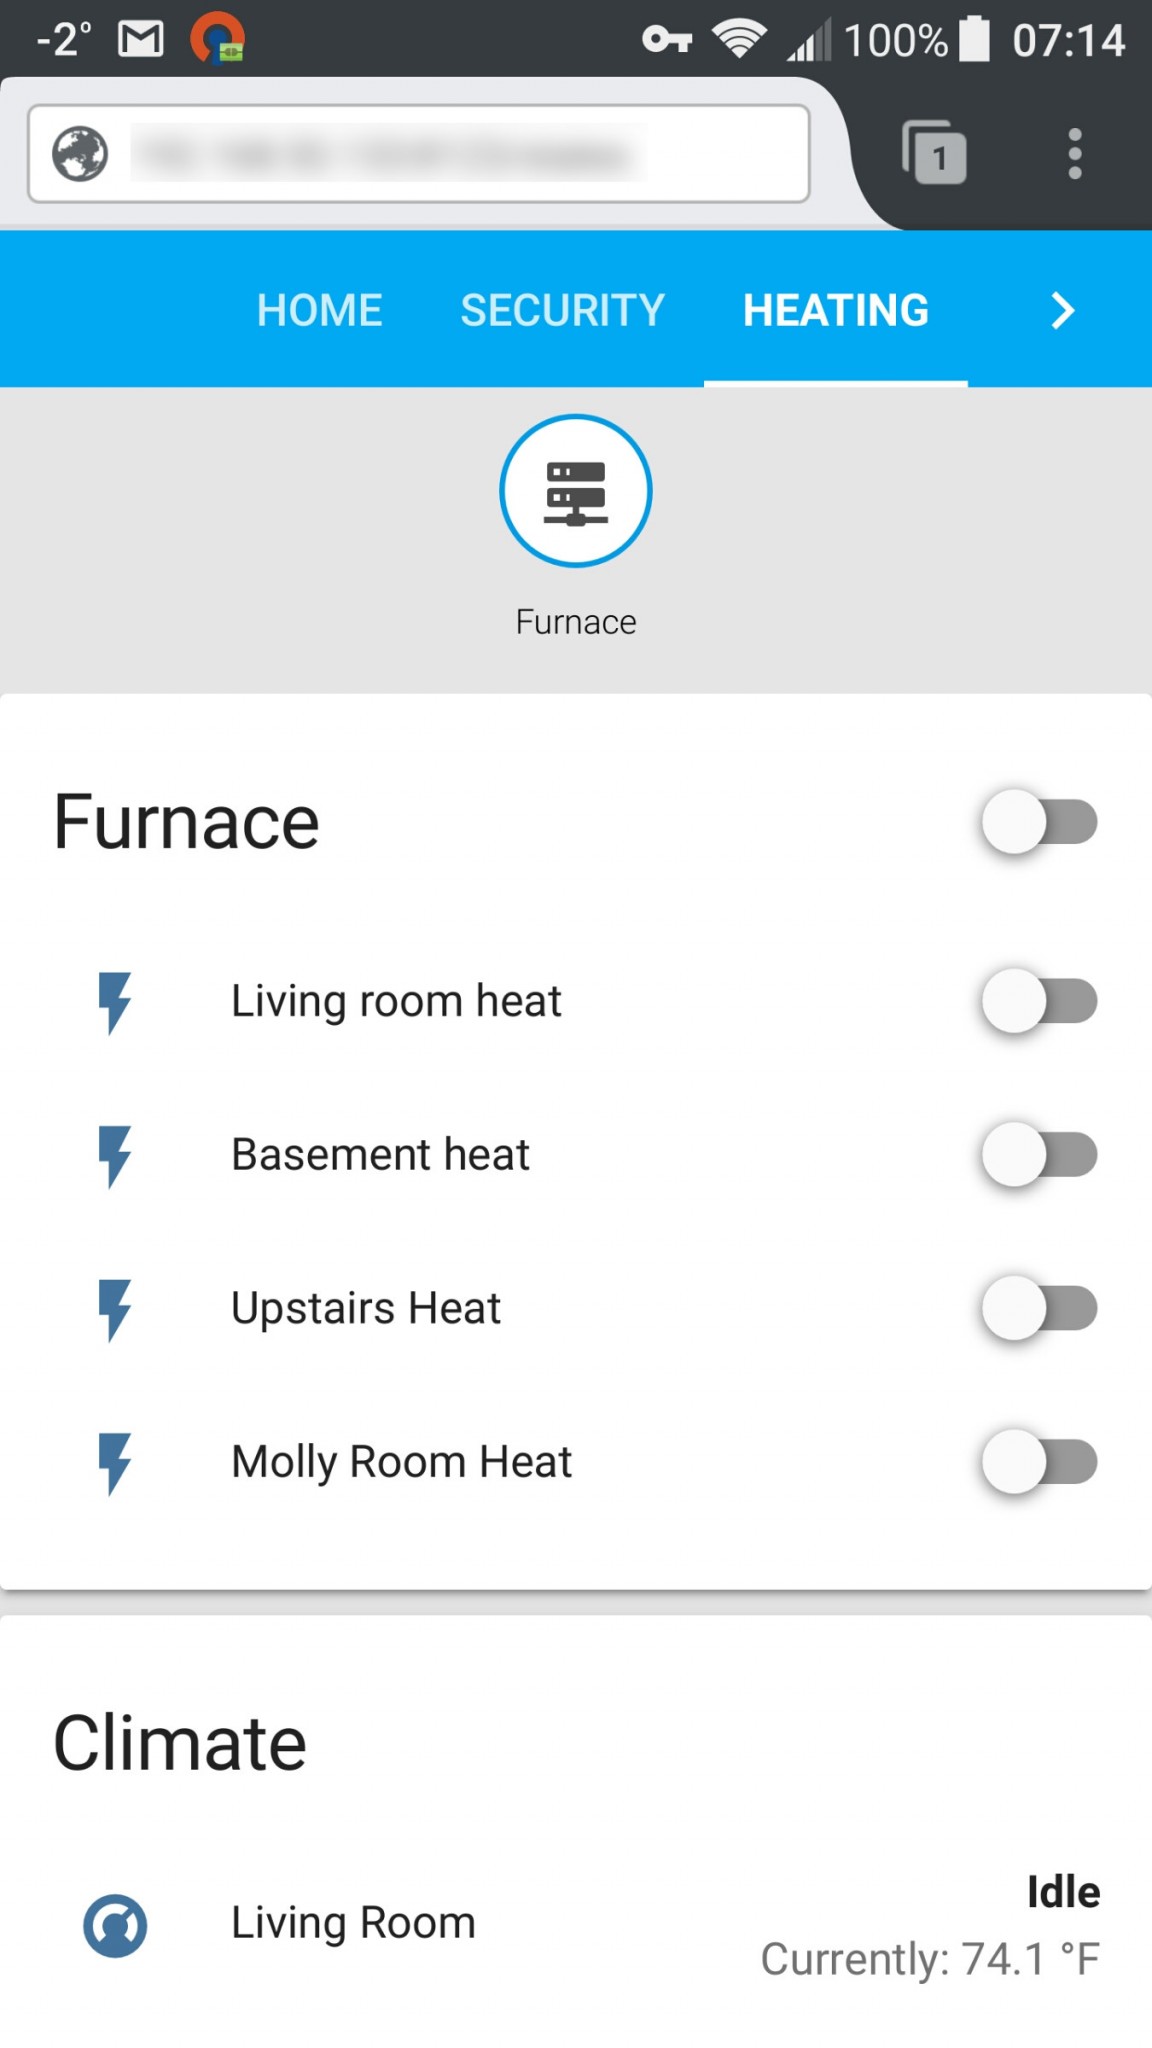
ESP8266 Furnace Code
Here’s the code for the smart furnace project. This is provided “as is”. Use at your own risk; I take no responsibility if this code damages or destroys your equipment or home or injures or kills anyone. Controlling household/industrial equipment is a non-trivial task.
|
1 2 3 4 5 6 7 8 9 10 11 12 13 14 15 16 17 18 19 20 21 22 23 24 25 26 27 28 29 30 31 32 33 34 35 36 37 38 39 40 41 42 43 44 45 46 47 48 49 50 51 52 53 54 55 56 57 58 59 60 61 62 63 64 65 66 67 68 69 70 71 72 73 74 75 76 77 78 79 80 81 82 83 84 85 86 87 88 89 90 91 92 93 94 95 96 97 98 99 100 101 102 103 104 105 106 107 108 109 110 111 112 113 114 115 116 117 118 119 120 121 122 123 124 125 126 127 128 129 130 131 132 133 134 135 136 137 138 139 140 141 142 143 144 145 146 147 148 149 150 151 152 153 154 155 156 157 158 159 160 161 162 163 164 165 166 167 168 169 170 171 172 173 174 175 176 177 178 179 180 181 182 183 184 185 186 187 188 189 190 191 192 193 194 195 196 197 198 199 200 201 202 203 204 205 206 207 208 209 210 211 212 213 214 215 216 217 218 219 220 221 222 223 224 225 226 227 228 229 230 231 232 233 234 235 236 237 238 239 240 241 242 243 244 245 246 247 248 249 250 251 252 253 254 255 |
/* * Furnace Controller for ESP8266 and MQTT. * * * Connections: GPIOs go to inputs, obviously. Connect 5V to VCC and jumper VCC to * VCC-JD to power the coils. Note that GPIO HIGH corresponds to relay off with this * board. * * D8 is a bad choice because it's actually GPIO 15 which messes things up during * reboot. * * THE SOFTWARE IS PROVIDED "AS IS", WITHOUT WARRANTY OF ANY KIND, EXPRESS OR * IMPLIED, INCLUDING BUT NOT LIMITED TO THE WARRANTIES OF MERCHANTABILITY, * FITNESS FOR A PARTICULAR PURPOSE, TITLE AND NON-INFRINGEMENT. IN NO EVENT * SHALL THE COPYRIGHT HOLDERS OR ANYONE DISTRIBUTING THE SOFTWARE BE LIABLE FOR * ANY DAMAGES OR OTHER LIABILITY, WHETHER IN CONTRACT, TORT OR OTHERWISE, * ARISING FROM, OUT OF OR IN CONNECTION WITH THE SOFTWARE OR THE USE OR OTHER * DEALINGS IN THE SOFTWARE. * * Safety Features: * 1. Should shut down if disconnected from internet (would be more robust * with internal MQTT broker, but then couldn't message nick) * 2. Should shut down if furnace pin has been on for a really long time. * This could happen if the RPi/hass dies but the internet is still up. * * See https://partofthething.com/thoughts/enlighten-your-old-furnace-with-a-raspberry-pi-home-assistant-an-esp8266-and-some-relays/ */ #include <ESP8266WiFi.h> #include <ESP8266mDNS.h> #include <WiFiUdp.h> #include <ArduinoOTA.h> #include <PubSubClient.h> #define wifi_ssid "[redacted]" #define wifi_password "[redacted]" #define mqtt_server "[redacted]" #define mqtt_user "[redacted]" #define mqtt_password "[redacted]" #define mqtt_error_topic "mom/status/furnace_error" #define mqtt_status_topic "mom/status/furnace" #define listen_topic "mom/furnace/#" #define ota_password "[redacted]" #define ota_hostname "[redacted]" #define FOUR_HOURS 14400000 // milliseconds #define NUM_PINS 6 #define FOUR_HOURS 14400000 // milliseconds #define NUM_PINS 6 int MOLLY_PIN=D5; int UPSTAIRS_PIN=D6; int LIVING_ROOM_PIN=D7; int BASEMENT_PIN=D4; int NICK_BEDROOM=D1; int DEN=D2; int allPins[NUM_PINS] = {LIVING_ROOM_PIN, UPSTAIRS_PIN, MOLLY_PIN, BASEMENT_PIN, NICK_BEDROOM, DEN}; // track how long each pin has been on for auto-shutoff function // (for when MQTT controller on Pi dies but net is up) unsigned long onTime; unsigned long now; int numPinsOn = 0; WiFiClientSecure espClient; PubSubClient client(espClient); void setup() { Serial.begin(115200); setup_gpio(); setup_wifi(); setup_mqtt(); setup_ota(); } void setup_gpio() { // Connect each relay pin to each GPIO. // Hook +5V up to relay module. for (int i=0;i<NUM_PINS+1;i++) { pinMode(allPins[i], OUTPUT); } all_pins_off(); } void all_pins_off() { for (int i=0;i<NUM_PINS+1;i++) { digitalWrite(allPins[i], HIGH); } numPinsOn = 0; } void setup_wifi() { delay(10); Serial.println(); Serial.print("Connecting to "); Serial.println(wifi_ssid); WiFi.mode(WIFI_STA); WiFi.begin(wifi_ssid, wifi_password); while (WiFi.status() != WL_CONNECTED) { delay(500); Serial.print("."); } Serial.println(""); Serial.println("WiFi connected"); Serial.println("IP address: "); Serial.println(WiFi.localIP()); } void callback(char* topic, byte* payload, unsigned int length) { Serial.print("Command arrived ["); Serial.print(topic); Serial.print("] "); for (int i = 0; i < length; i++) { Serial.print((char)payload[i]); } Serial.println(); // Switch on the heat if an 1 was received as first character int pin = -1; if(strcmp(topic,"mom/furnace/livingroom")==0) { pin = LIVING_ROOM_PIN; } else if (strcmp(topic,"mom/furnace/upstairs")==0){ pin = UPSTAIRS_PIN; } else if (strcmp(topic,"mom/furnace/molly")==0) { pin = MOLLY_PIN; } else if (strcmp(topic,"mom/furnace/basement")==0) { pin = BASEMENT_PIN; } else if (strcmp(topic,"mom/furnace/nick_room")==0) { pin = NICK_BEDROOM; } else if (strcmp(topic,"mom/furnace/den")==0) { pin = DEN; } if (pin == -1){ Serial.print("Unknown Topic. Aborting command.\n"); return; } else { Serial.print("Pin is "); Serial.print(pin); Serial.println(); } if ((char)payload[0] == '1') { Serial.print("Turning on"); digitalWrite(pin, LOW); numPinsOn = 1; // will be a problem if we start doing more than 1 zone. Upgrade then. onTime = millis(); // will roll over every 72 hours or so. } else { Serial.print("Turning off"); digitalWrite(pin, HIGH); numPinsOn = 0; } } void setup_mqtt() { client.setServer(mqtt_server, 8883); client.setCallback(callback); } void reconnect() { // Loop until we're reconnected. int reconnectAttempts = 0; while (!client.connected()) { Serial.print("Attempting MQTT connection..."); // Add a will message in case we get kicked offline for some reason. if (client.connect("ESP8266Furnace", mqtt_user, mqtt_password, mqtt_status_topic, 1, 1, "0")) { Serial.println("connected"); client.subscribe(listen_topic, 1); // important to get QoS of 1 to ensure message makes it. client.publish(mqtt_status_topic, "1", true); } else { reconnectAttempts++; Serial.print("failed, rc="); Serial.print(client.state()); Serial.println(" try again in 5 seconds"); if (reconnectAttempts > 60) { // If we cannot connect for a long time, shut off all pins. Internet is dead // and we can't be controlled anymore. Fallback on manual thermostats at this point // so we don't burn the house down. all_pins_off(); client.publish(mqtt_error_topic, "1", true); // for sensing errors. reconnectAttempts=0; } delay(5000); // Wait 5 seconds before retrying } } Serial.print("MQTT connected."); } void setup_ota() { ArduinoOTA.setPort(8266); ArduinoOTA.setHostname(ota_hostname); ArduinoOTA.setPassword(ota_password); ArduinoOTA.onStart([]() { Serial.println("Starting OTA update."); all_pins_off(); }); ArduinoOTA.onEnd([]() { Serial.println("\nOTA update ended."); }); ArduinoOTA.onProgress([](unsigned int progress, unsigned int total) { Serial.printf("OTA Progress: %u%%\r", (progress / (total / 100))); }); ArduinoOTA.onError([](ota_error_t error) { Serial.printf("Error[%u]: ", error); if (error == OTA_AUTH_ERROR) Serial.println("Auth Failed"); else if (error == OTA_BEGIN_ERROR) Serial.println("Begin Failed"); else if (error == OTA_CONNECT_ERROR) Serial.println("Connect Failed"); else if (error == OTA_RECEIVE_ERROR) Serial.println("Receive Failed"); else if (error == OTA_END_ERROR) Serial.println("End Failed"); }); ArduinoOTA.begin(); } void failsafe() { // If any pin has been on for more than four hours it seems like something's wrong. // Possibly the Rpi died and isn't sending an off signal. // Granted, if a bunch of zones were coming on and off staggered, then // this would have to be upgraded to get fancier. now = millis(); if (numPinsOn > 0 && (now-onTime)> FOUR_HOURS) { all_pins_off(); Serial.println("Seems stuck on. Rebooting."); client.publish(mqtt_error_topic, "2", true); // for sensing errors. ESP.restart(); } } void loop() { if (!client.connected()) { reconnect(); } client.loop(); failsafe(); ArduinoOTA.handle(); delay(500); } |
Getting IP camera motion events into Home Assistant to trigger things
Oh this is exciting! I’ve been trying to figure out how to get motion events from my IP camera into my home-assistant instance running on my Raspberry Pi, and I just did a successful test! It works! Hooray. Briefly, I set up an email server on the Pi, have the camera email the Pi, have the email server trigger a script which parses the email for key words and sends MQTT signals as appropriate, at which point the home-assistant MQTT client sees them and triggers automations (like blinking a light to scare people off). Here’s how I did it.
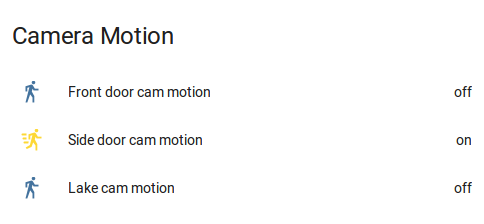
Continue reading Getting IP camera motion events into Home Assistant to trigger things
Cheap vacuum pump for home physics experiments
As documented earlier, I made one of those CRT-in-a-winebottle things. I used a cheap 2-stage mechanical vacuum pump for it. Well, it was so good that my boss wanted to use it as a science demo at some dinners he gives, so it’s been permanently transferred to work. So I need a new pump, and a new chamber!
Continue reading Cheap vacuum pump for home physics experiments
Fixing my motorcycle’s charging system
I got my first motorcycle, a 1997 Suzuki GS500, in 2007. It was great for a long time. I cut my motorcycle maintenance teeth on it, starting with gas line issues, shim adjustments, and an oil leak fix. Things escalated to taking the pistons out and head off to get the top-end rebuilt. Issues kept popping up more frequently than I liked so I sold it in 2012 and got a brand new Suzuki DL650A V-Strom ABS (aka “Glee”), feeling like I had had enough maintenance for a while. I only felt a little shame when I took it in to the shop for some routine maintenance
Well…I guess I’m back in the routine. After I totaled it but kept it, I got warmed up doing basic maintenance stuff on it. So when an issue came up recently, I decided to fix it myself.
UPDATE Jan 2017: Whaddaya know? The stator was just recalled due to a tendancy for this to happen.
Trouble a-brewing
Raspberry Pi + Home Assistant DIY Burglar Alarm
I just configured a pretty slick burglar alarm with the open-source Home-Assistant platform running on my Raspberry Pi. It can be armed to trigger when a door is opened and/or when a motion sensor goes off.
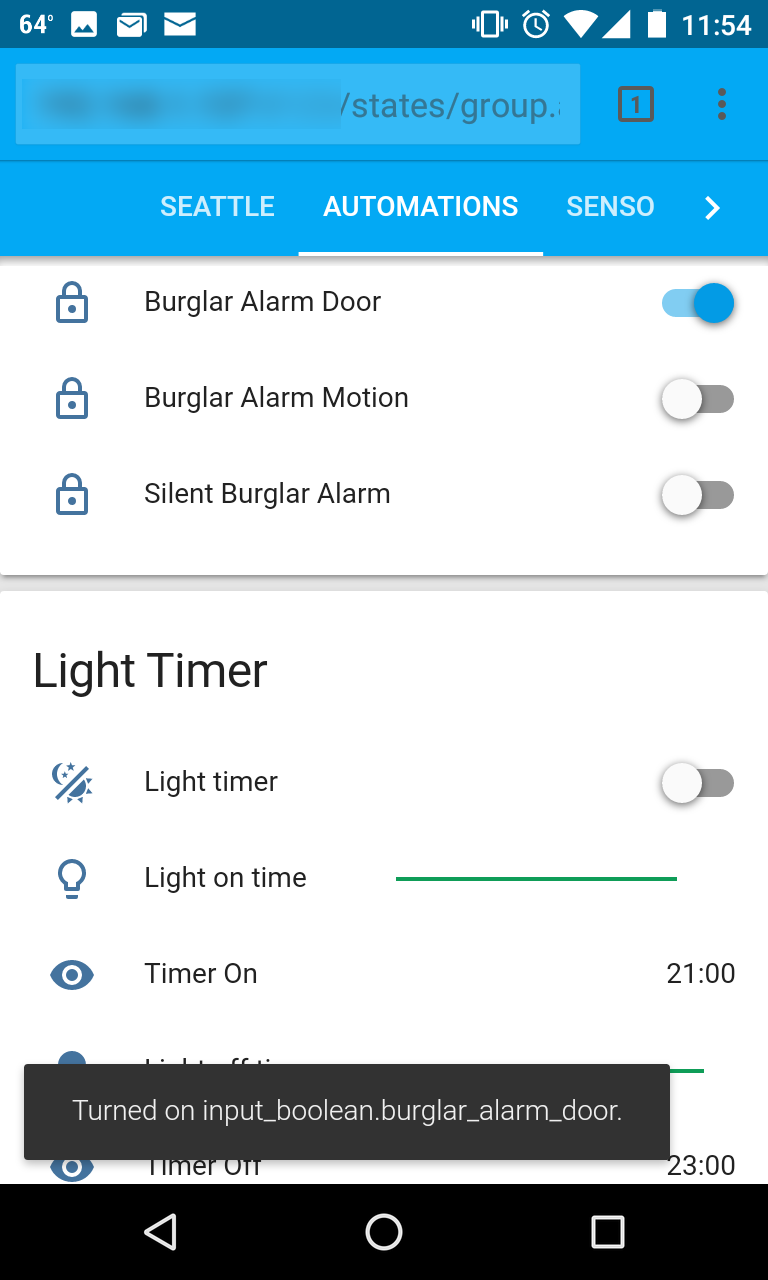
Then, a sequence of events happens:
- An IR LED turns on my stereo
- A sound file I cobbled together starts playing. It starts with a computerized voice saying that your entry been detected and recorded, then it beeps for a while (giving you time to disarm), and then it goes into a blaring siren noise. Quite the escalation!
- A light blinks on and off a few times
- A camera takes a series of snapshots of the area
- An email is sent to my phone with the snapshots, showing me what’s going on
Continue reading Raspberry Pi + Home Assistant DIY Burglar Alarm
Adding IR send and receive capabilities to my home-assistant based smart home
Or, how to control your A/C from your phone
You may have seen my earlier post about my new home automation setup. Well I just upgraded it! I just finished testing out a new infrared remote control send and receive capability and it is pure awesome. Here’s what I can do now from within home-assistant:
- Turn on and off my new DeLonghi portable air conditioner from Costco, and set the temperature to whatever
- Turn on and off the TV and press any buttons from its remote control
- Turn on and off the stereo and virtually press any buttons from its remote control (which I never even had!)
- Use an old random blueray remote control to set scenes, turn lights on and off, etc. (basically do anything under home-assistant’s control)
This post is about how I did it on my Raspberry Pi.
Update: A video!

Continue reading Adding IR send and receive capabilities to my home-assistant based smart home
Time-lapse cloud video
I’ve been learning about my Canon EOS D-SLR camera and wanted to try a time-lapse cloud video. It was pretty easy!
Continue reading Time-lapse cloud video
Using an Aeotech recessed door sensor in home-assistant
I went over to my friend’s house last night to help get home-assistant on a Raspberry Pi working for his z-wave door sensors and siren. The Ecotech sensor showed up fine but the Aeotech recessed one (Recessed Door Sensor Gen5 , ZW089-A) did not show up by default. After poking around in the logs for a while, we realized that it was sending BASIC_SET command classes instead of BinarySensor commands. Apparently (I thought I had fixed this already), home-assistant doesn’t recognize the BASIC_SET commands just yet. But looking at the config file for this device, we discovered that config item 121 changes which kind of report this sensor sends:
Continue reading Using an Aeotech recessed door sensor in home-assistant
Building a low-pass filter to remove alternator whine in my car
Ever since I installed a mobile ham radio in my Subaru, there has been a pretty noticeable whine that revs up and down with the engine. I got a few complaints that the whine was on my transmitted signal. I can also hear the whine through my subwoofer, though it is quieter. I needed a low-pass filter to let the DC from my battery make it through to the radio while blocking any alternator-induced AC coming along for the ride. I was going to just buy one but then I searched the web a little and found that it was fun and easy to build my own!
Continue reading Building a low-pass filter to remove alternator whine in my car
Determine your location from relative FM radio signal strengths
In this post, we’ll take a brief measurement of regular old FM radio stations and try to determine where we are. It’s like a GPS but with local FM transmitters instead of satellites. I did this just for fun. I wonder if it could be used for indoor location and stuff? It is nowhere near as accurate as GPS. But whatever.
 Reading FM radio signal power
The first step is to get a reading of all the nearby radio stations. I used gnuradio and a HackRF One software defined radio. A simple flow-chart that takes the FFT and dumps it to a file is all I needed. I had to throttle the I/O or else my computer would freeze. I used 16M sample rate to have as wide a bandwidth as possible.
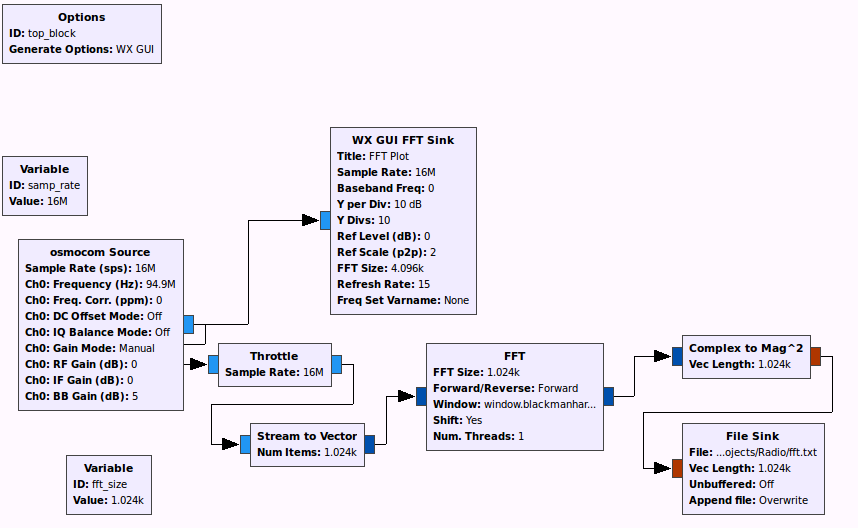
The file sink saves the FFT results in 4-byte integers and just has one 1024-length vector after the other. In a few seconds, I had a 50 MB of data. I did all the post-processing in an external Python script.
Continue reading Determine your location from relative FM radio signal strengths
Home automation with Z-Wave, Home-Assistant, Aeon Multisensor, HUE lights, and a Raspberry Pi 2
I’ve always dreamed of having a “smart-home.” There’s just something cool about being able to flip switches and read sensors and have a program turn a light on when you open the door, but only if it’s dark. This post is about home automation.
UPDATE: I made a video demoing everything:
Why your 32nd birthday is a momentous ordeal
Turning 32 may not seem like a very exciting birthday, but it is! In fact, it is the most momentous birthday of all, because it’s the first time in your life that you can’t show your age on a single hand.
Counting in binary.
First, a refresher. Binary, (popularly known as the number system of computers which think in terms of ons and offs, as represented by ones and zeros) is base-2, whereas good old decimal is base-10.
This means that in the decimal system, we have:
| One | 0001 | 100 |
| Ten | 0010 | 101 |
| One hundred | 0100 | 102 |
| One thousand | 1000 | 103 |
Whereas in the binary system, we have:
| One | 0001 | 20 |
| Two | 0010 | 21 |
| Four | 0100 | 22 |
| Eight | 1000 | 23 |
Continue reading Why your 32nd birthday is a momentous ordeal
My new color-changing LED lights
UPDATE 2023: After a decade of fun with HUE, I’m phasing them out now because they switched their policy to require connecting to their cloud rather than allowing local-only control. Screw those guys and get something else.
My wife got me an early birthday present: Philips HUE Color-Changing LED lights! They’re incredible. Look:
Right now I’m controlling them with my tablet, which is fine for changing colors and setting light alarms. I can even control them from afar thanks to my VPN. I will soon hook them up to my nascent Raspberry Pi powered home automation system (using the open-source Home Assistant program) that will allow me to trigger them based on various events like motion, doors opening, weather changing, or whatever. The future is here!
Each bulb uses 9 Watts but makes the same amount of light as a 60W conventional bulb, so they’re very eco-friendly. Furthermore, since they’re LEDs, they should last for 15 years of normal use! They communicate with a little hub that uses the ZigBee protocol (like Bluetooth but lower power and lower speed, good for home automation stuff).
Downside: They’re pretty pricey. I expect their coolness to drive demand enough to bring supply up. Expect these bulbs for $10 in the next few years.
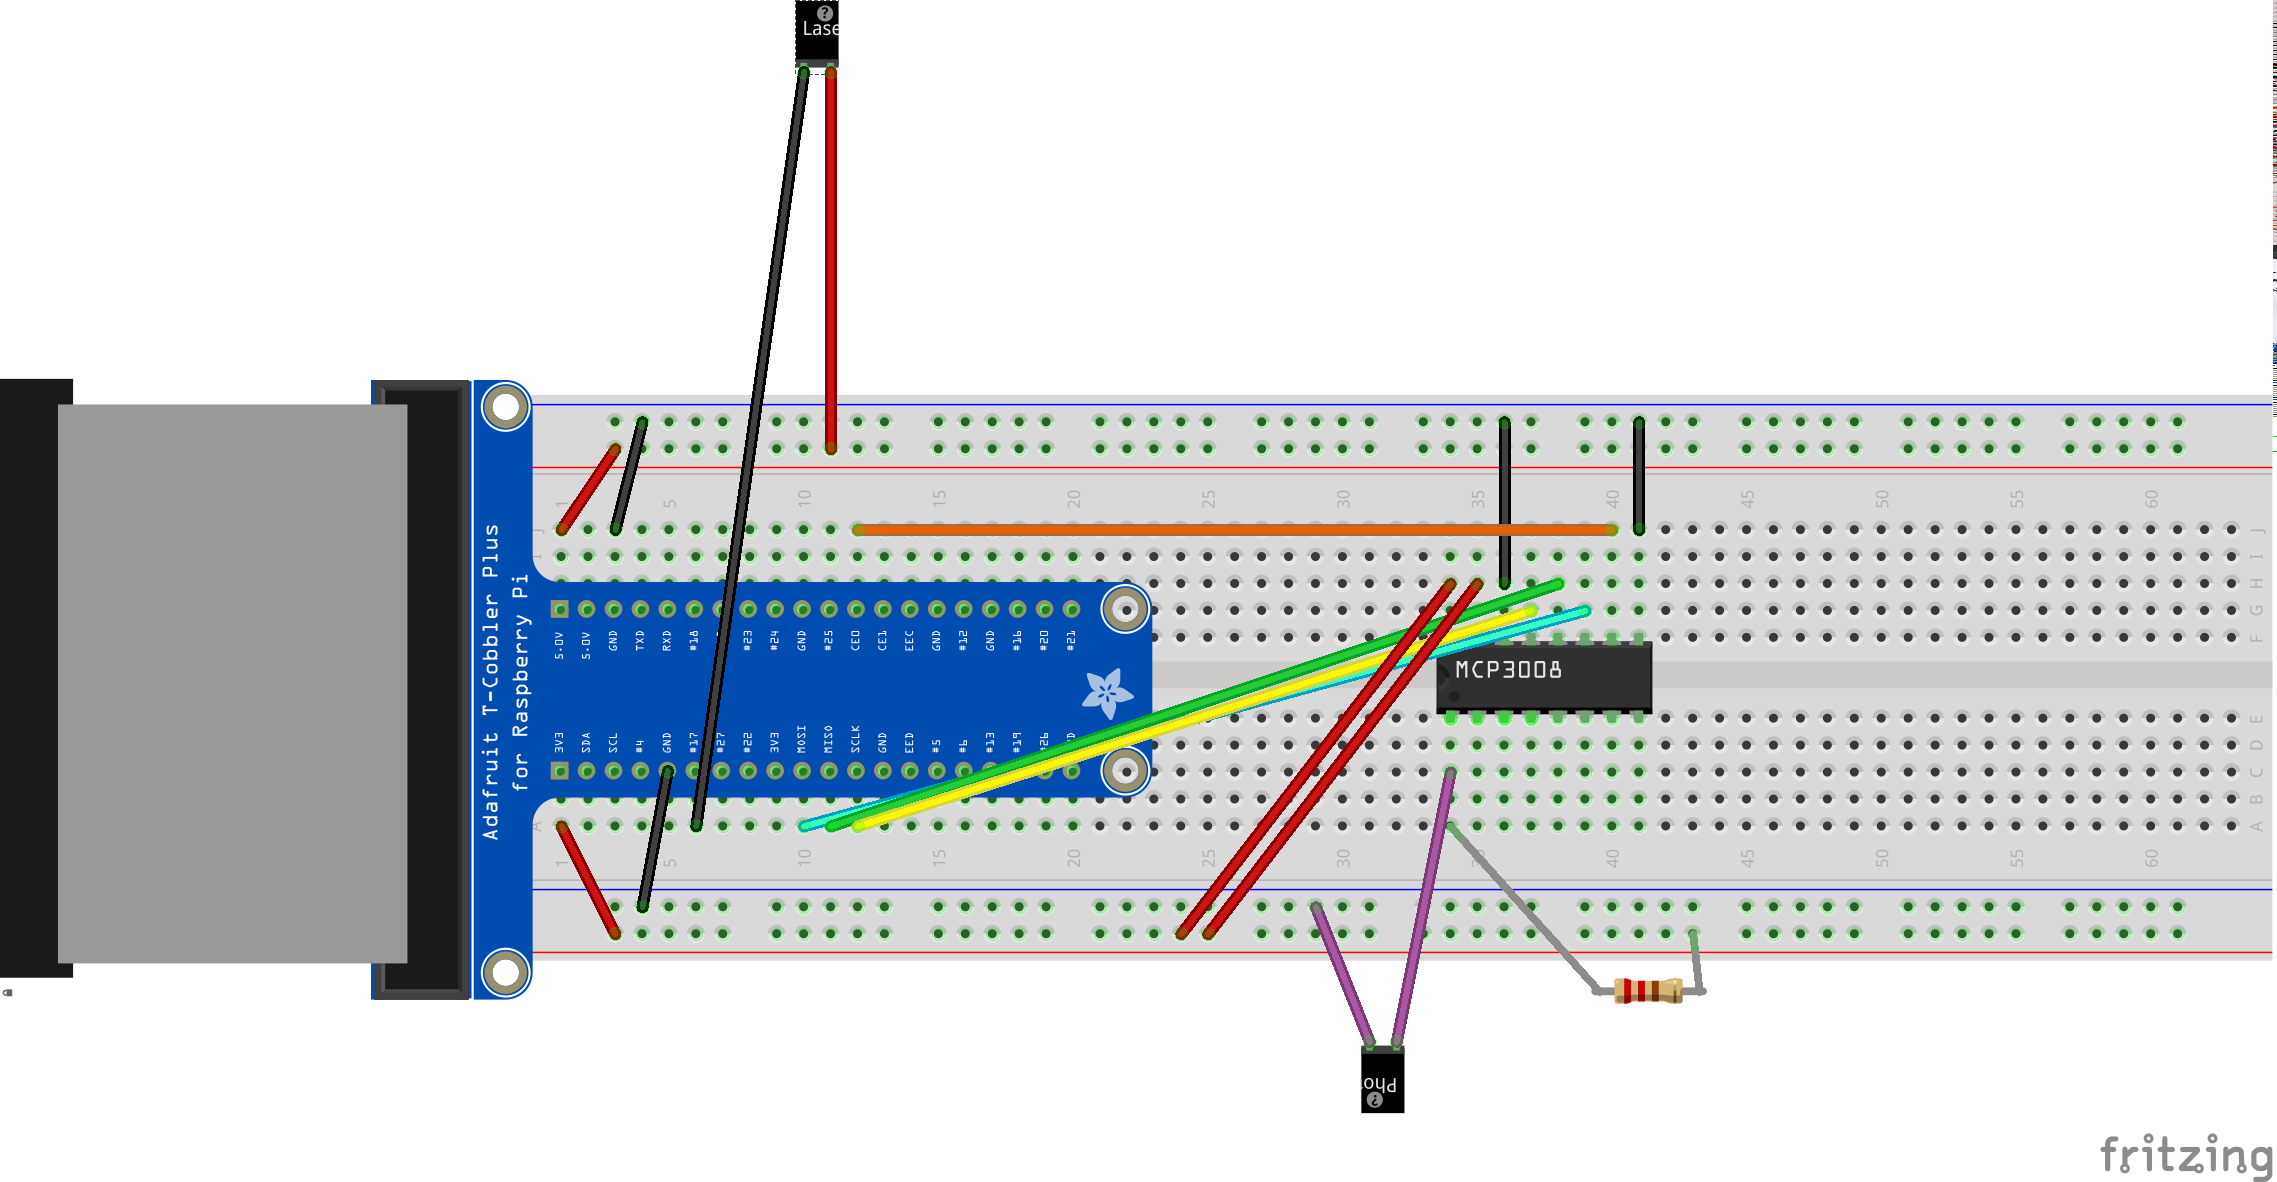
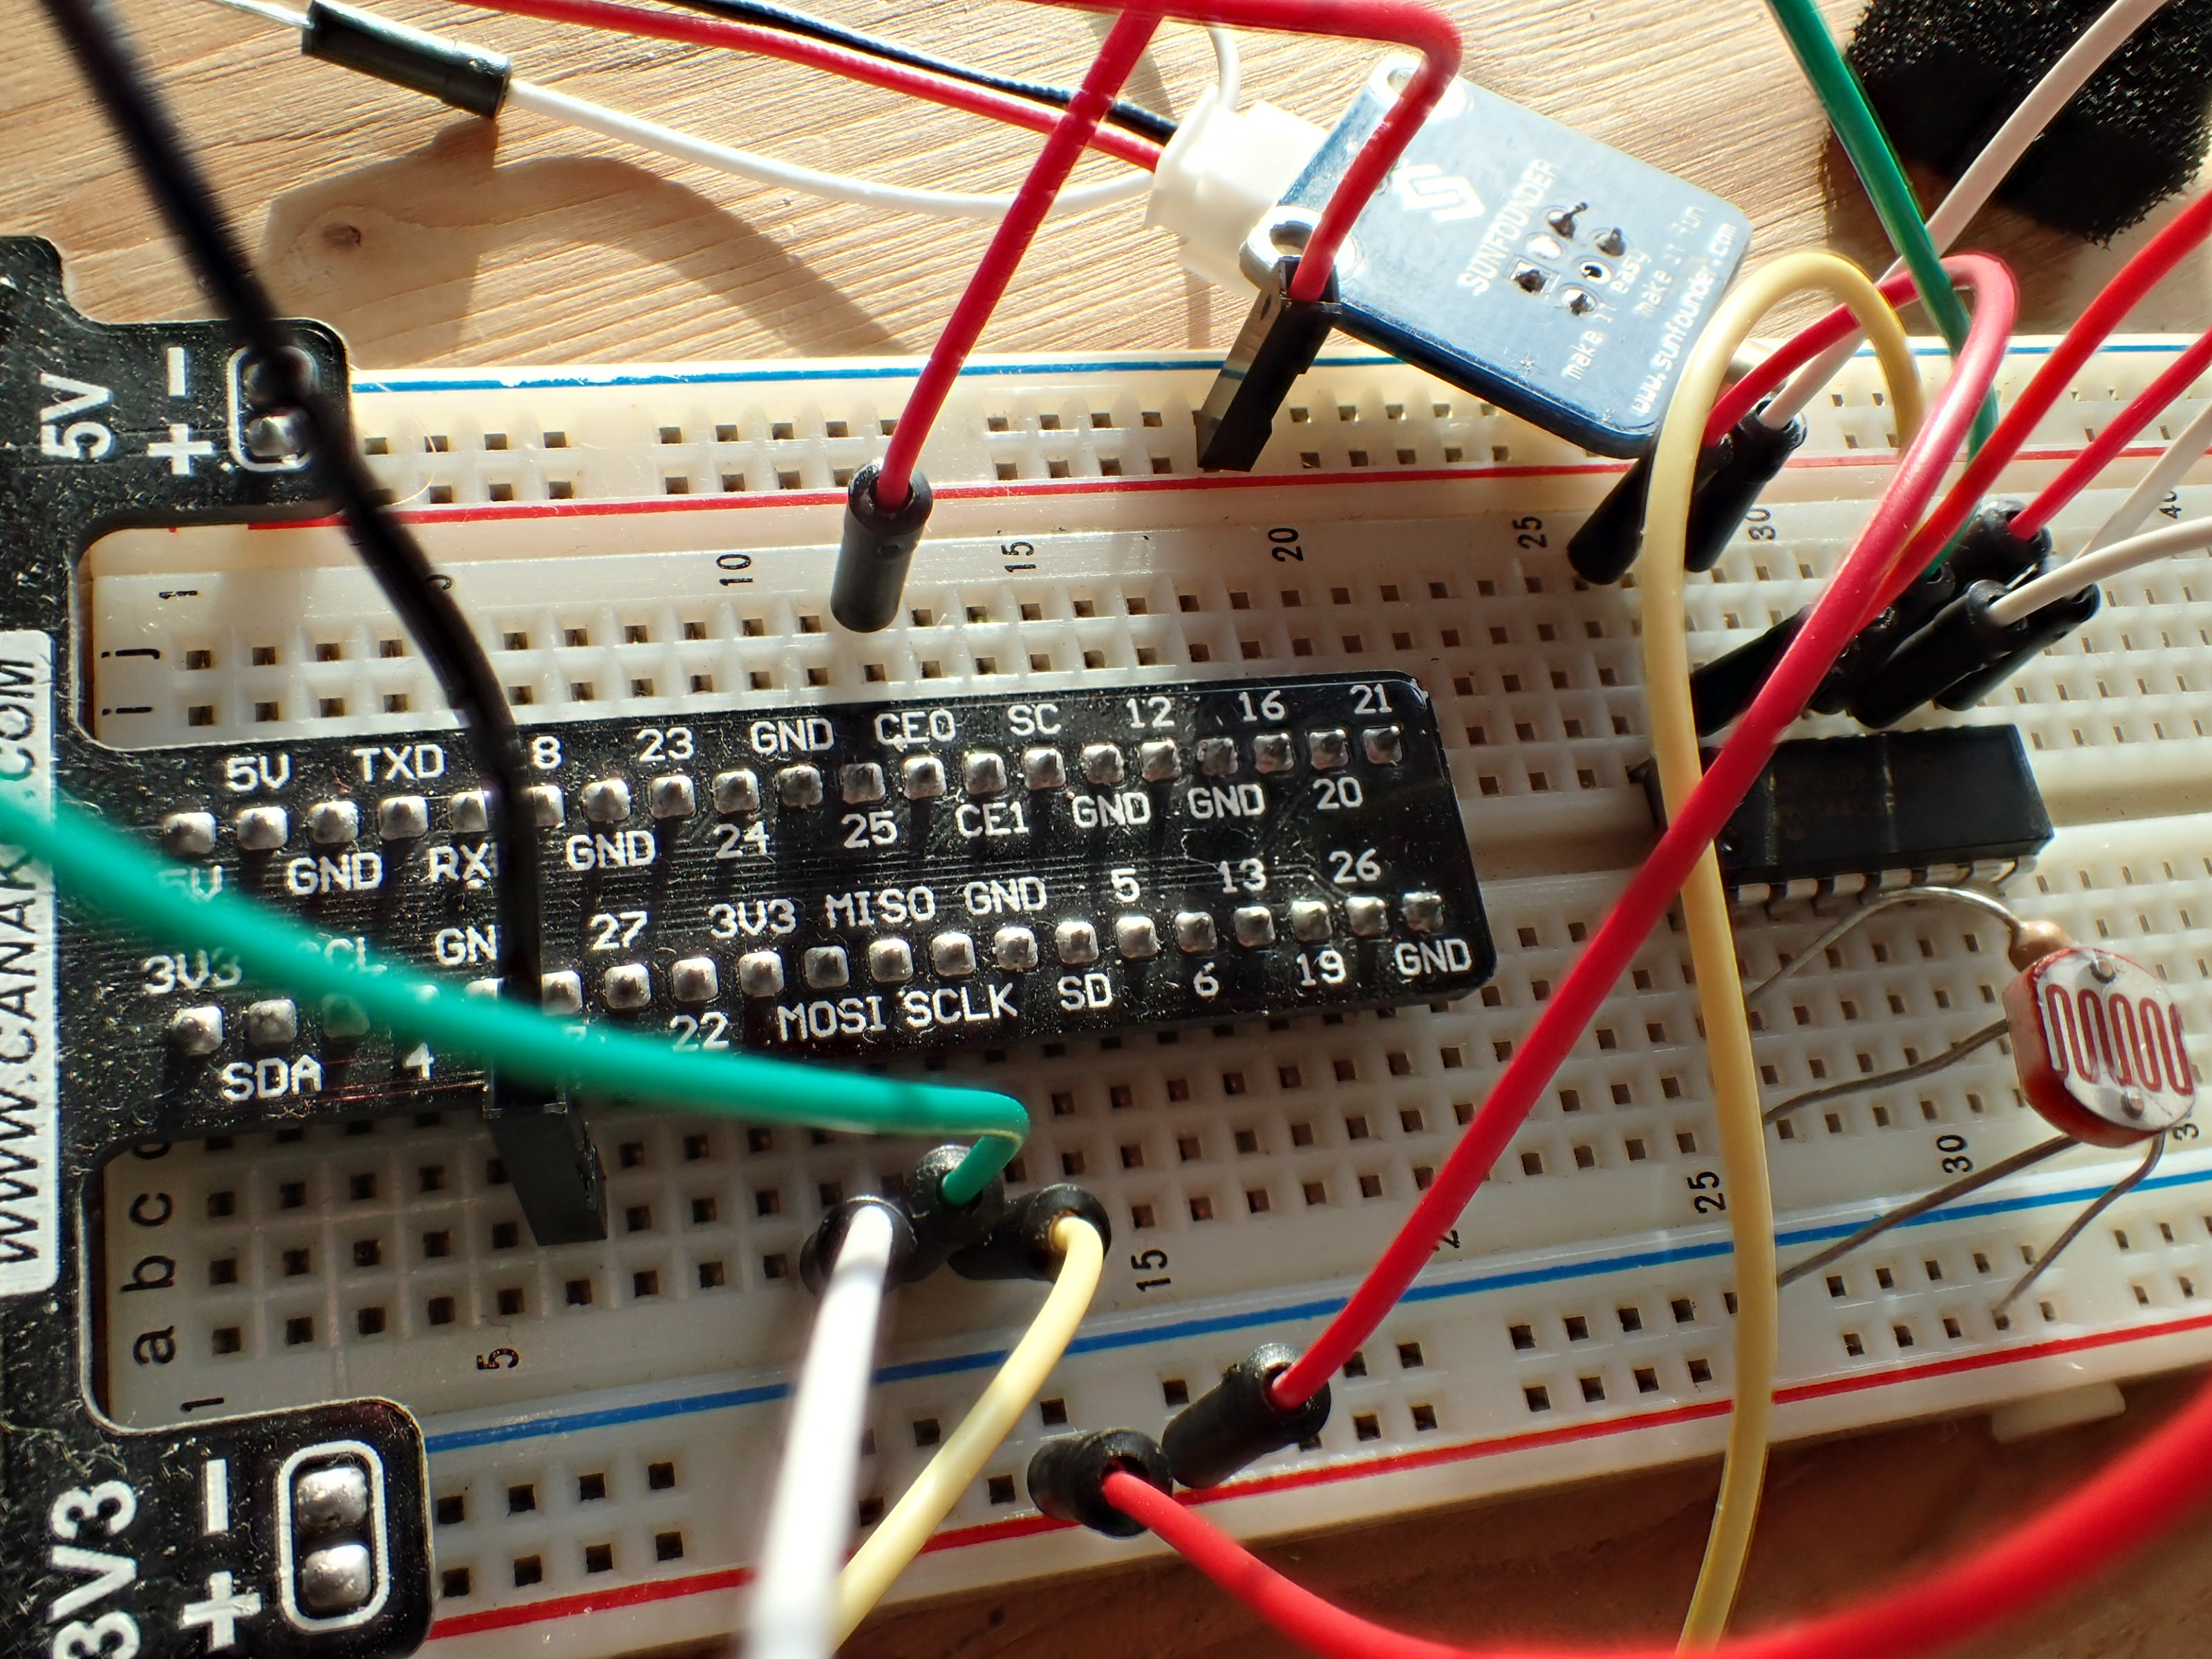
Sending and receiving Morse code with a laser and a Raspberry Pi
Sending and receiving text with Morse code light pulses across the room (or to your neighbor) is a fun and cheap project you can do on a Raspberry Pi or Arduino or any other microcontroller. This post explains how I did it, and how you can do it too.
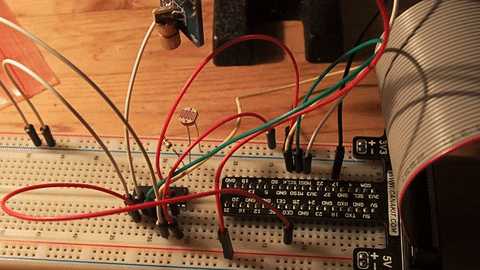
Hardware
The hardware is simple and cheap. Here’s my parts list:
- Raspberry Pi B+ as the controller. This does the sending, receiving, and signal processing.
- Photoresistor – Just a little guy that has variable resistance based on how much light is hitting it
- A 220 Ohm resistor – to make a voltage divider with the photoresistor for reading the input signal
- MCP3008 10-bit Analog-to-Digital Converter (ADC) – Since the RPi doesn’t come with an ADC, this is required for converting analog voltage from the photoresistor into a signal I can process on the RPi.
- Laser module – to transmit with laser light. I got one from sunfounder.com for like 3 bucks.
- Breadboard, wires
You can learn how to use the ADC at this Adafruit tutorial. I decided to talk to the ADC with the RPi’s hardware SPI interface, which I had already enabled. I wanted to be able to go very fast. (You can alternatively do SPI off of GPIO ports with software, if you prefer.) The laser just hooks directly between a GPIO and +5V. Here’s the layout:
And what it actually looks like:
Continue reading Sending and receiving Morse code with a laser and a Raspberry Pi
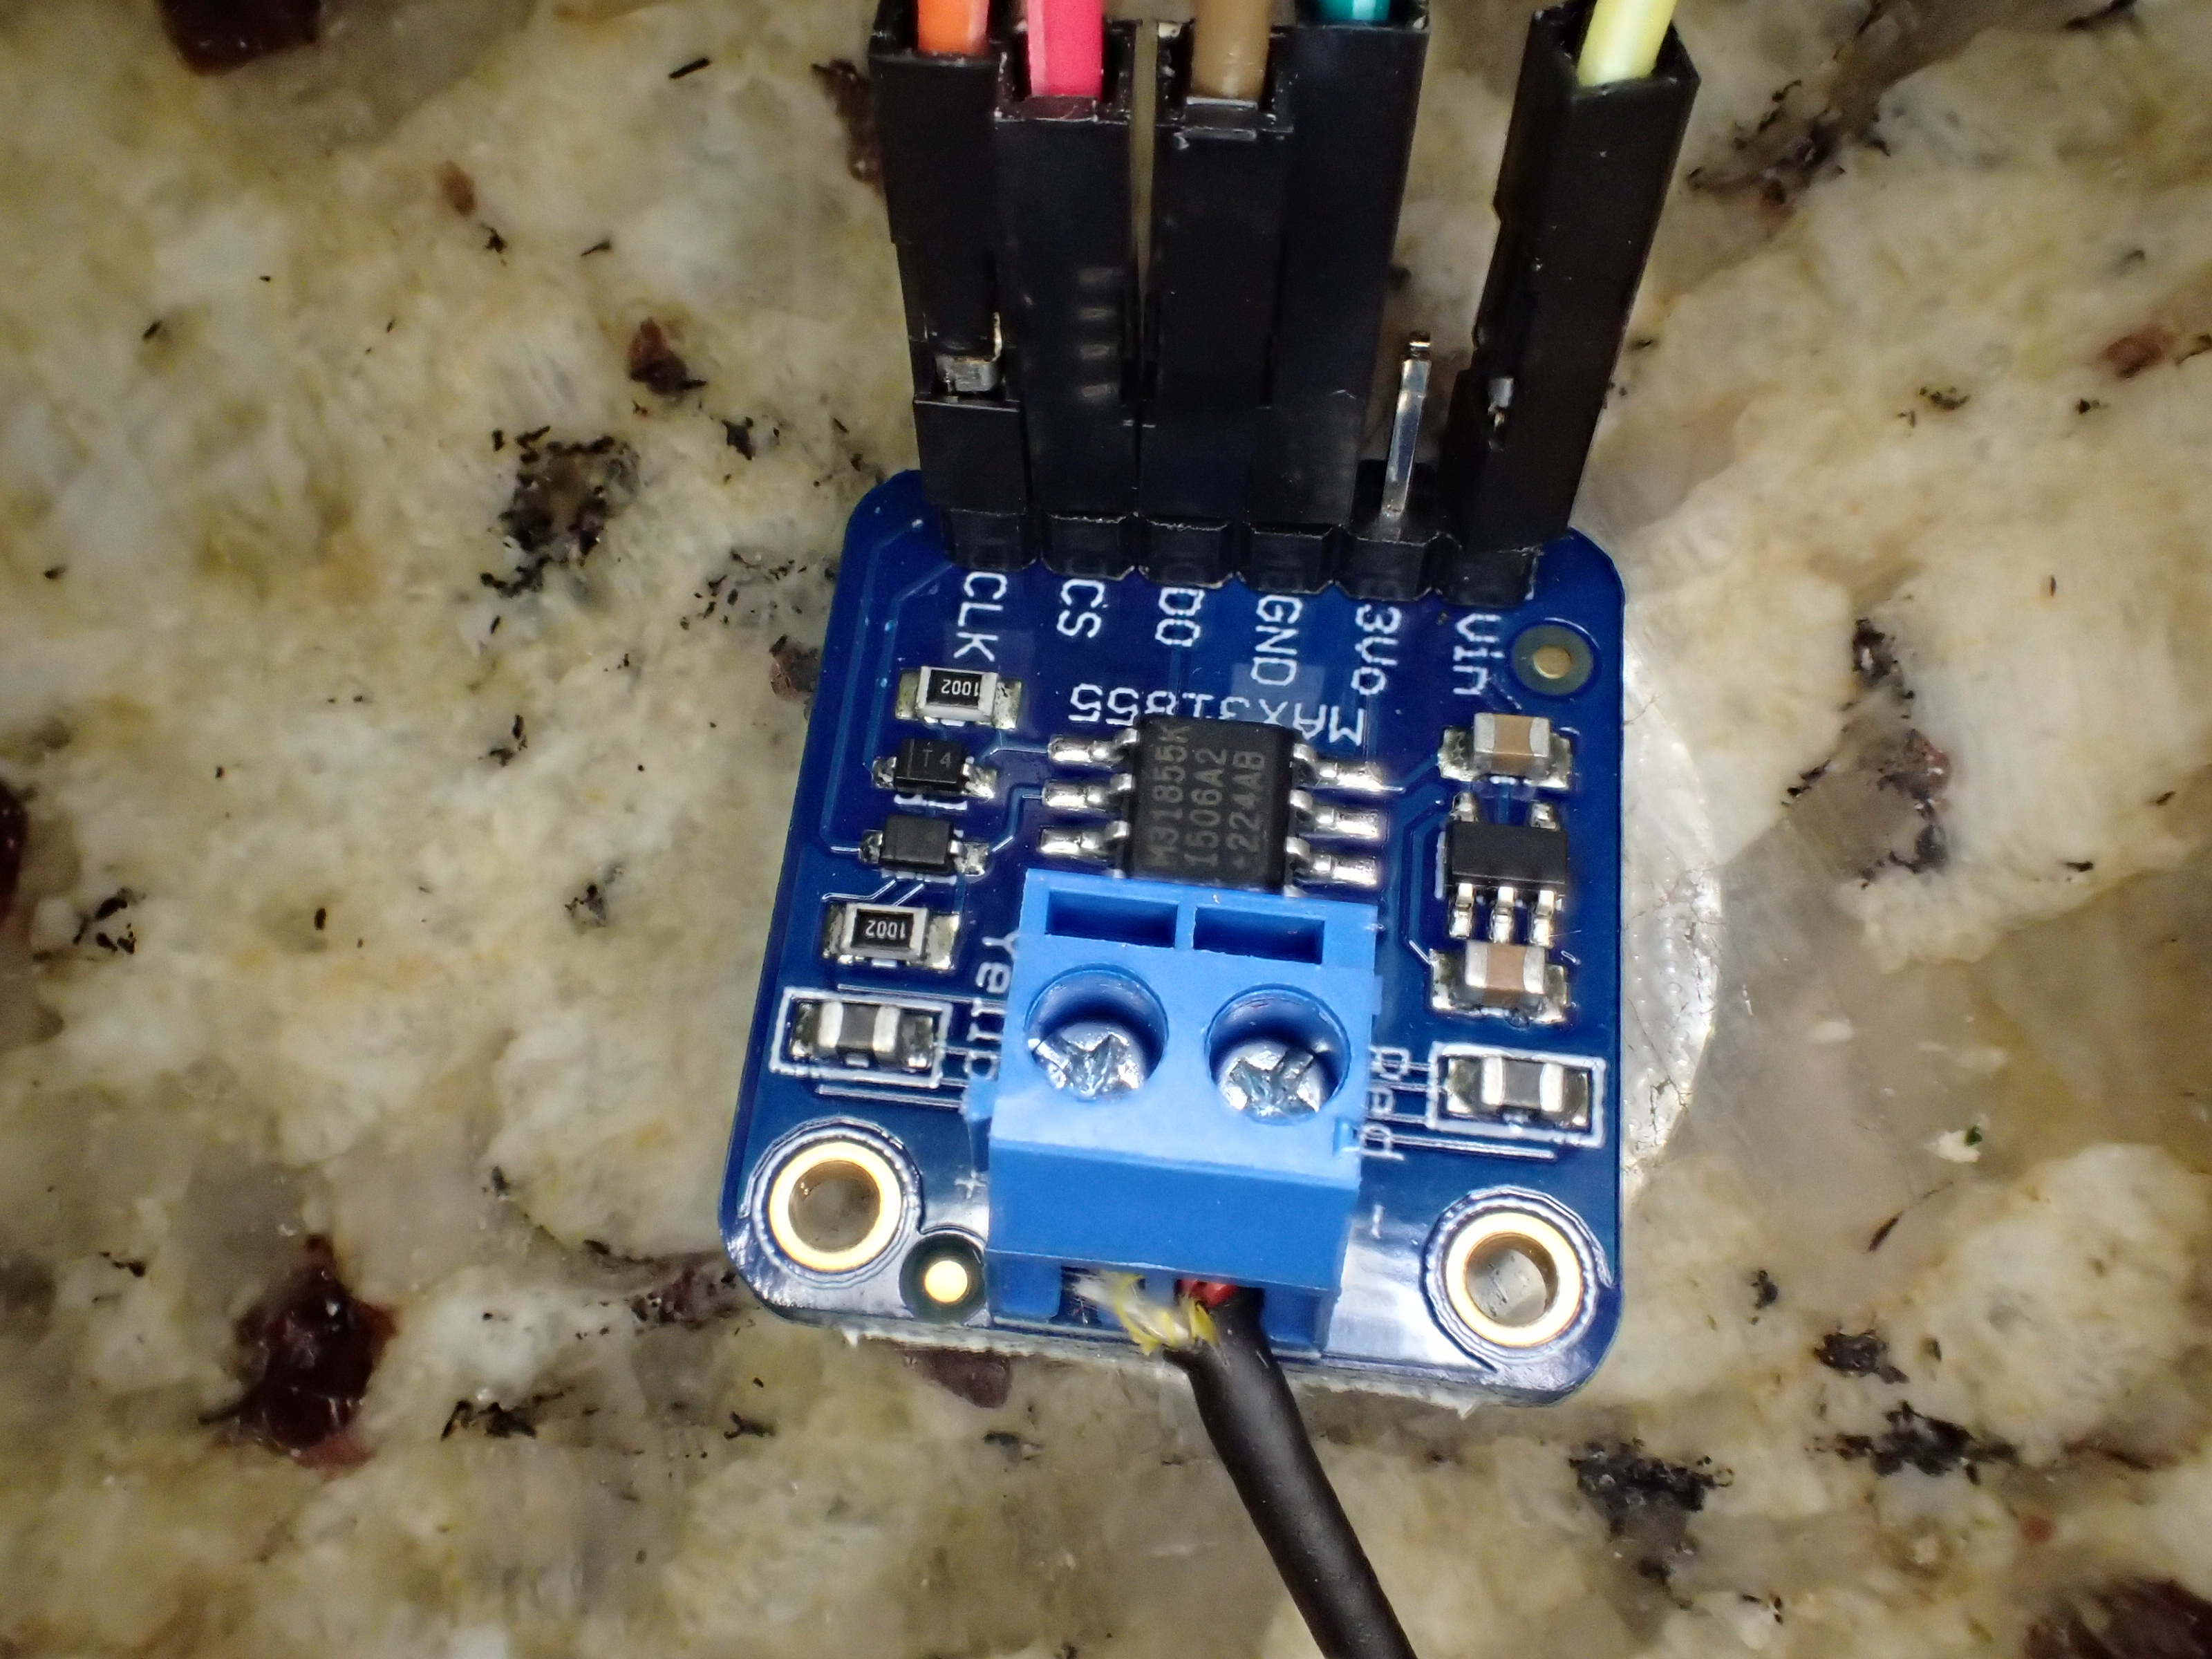
Data acquisition and live-plotting over the network with a Raspberry PI and Python
Sensors are fun! I wanted to keep an eye on the temperature of one of my home physics projects and realized I needed a thermocouple and a convenient way to read it. This post is about how I got one and wrote a Python program to send the data from a Raspberry PI over the network to my laptop, which plots the results in real time.

I bought a K-type thermocouple for several dollars that ranges from -100°C to 500°C. The Seebeck effect that makes it work only gives microvolts per degree so I needed a good amplifier for it. And since I wanted to read it on a Raspberry PI (which only has digital inputs), I’d need an analog-to-digital converter (ADC). Conveniently, the MAX31855 does amplification and ADC and is like $15, so I got one. Sweet. There’s even a Python library for it that makes it easy to access. Double-sweet.
Continue reading Data acquisition and live-plotting over the network with a Raspberry PI and Python
My old flux capacitor project
Alright, this is an oldie, but ah… well… it’s and oldie where I come from. In 2005, I had some healthy spare time and decided to build a flux capacitor. I posted the details on my old webpage. I just rewired a battery pack on it and it’s working fine so I figured it was time to get it back online again. So, here it is. How to build a LED flux capacitor.
The Concept
In the movie Back to the Future, Dr. “Doc” Emmett Brown completed his life goal of making the flux capacitor a reality. Here’s the story:
“I was standing on the edge of the toilet hanging a clock, the porcelain was wet, I slipped, hit my head on the edge of the sink — and when I came to I had a revelation! A vision! A picture in my head! A picture of this! This is what makes time travel possible! The Flux Capacitor.”
-Doc, Back to the Future

Unfortunately, I didn’t have room for the time circuits or nuclear reactor to generate the 1.21 jigawatts that the flux capacitor needs to travel in time so we’re going to have to go with the next best thing: A 30 LED sequencer!